5 Easy Zombie Brain Cupcakes That’ll Shock Your Party Guests
Oh my gosh, you guys – Halloween baking season is my absolute favorite time of year! There’s nothing quite like watching kids’ faces light up (or scream in delighted horror) when they see these zombie brain cupcakes sitting on my dessert table. I’ve been making creepy treats for neighborhood parties since my now-teenager was a toddler, and these cupcakes always steal the show. That deep red velvet crumb peeking through the squiggly pink “brains”? Pure magic. Trust me, these look way more complicated than they actually are – just wait till you see how easy it is to transform ordinary cupcakes into something gloriously gruesome!
Why You’ll Love These Zombie Brain Cupcakes
Let me tell you why these cupcakes have become my go-to Halloween treat year after year. First off, that brain design? Way easier than it looks – just a simple piping technique that even my 8-year-old nephew mastered on his first try. But the real magic happens when you see people’s reactions. I’ve watched grown adults shriek with delight before devouring these. They’re the perfect combo of spooky and sweet that makes any Halloween party instantly more fun. Plus, starting with a box mix means you can focus all your energy on the gross-out decorating part!
Zombie Brain Cupcakes Ingredients
Okay, let’s gather our gory goodies! The beauty of this recipe is how simple the ingredients are – you probably have most in your pantry right now. Here’s what you’ll need to bring these creepy cupcakes to life (or should I say… undeath?):
- 1 box red velvet cake mix (my secret weapon for quick but delicious results)
- 3 large eggs (room temperature makes them blend better)
- 1/2 cup vegetable oil (this keeps the cupcakes super moist)
- 1 cup water (just plain tap water works fine)
- 1 can (16 oz) vanilla frosting (the blank canvas for our brains)
- Red food coloring (gel works best for vibrant zombie hues)
- Optional but highly recommended: raspberry jam for extra “blood” effects
See? Nothing too scary in the ingredients department. The real magic happens when we start decorating – but we’ll get to that soon enough!
Equipment Needed for Zombie Brain Cupcakes
Now let’s talk tools! You don’t need anything fancy to create these creepy confections. Here’s what I always grab from my kitchen:
- A piping bag with small round tip (this is your brain-making magic wand!)
- Cupcake liners (black or white work best for that autopsy-table look)
- Mixing bowls (one for batter, one for tinting frosting)
- Electric mixer (though a strong arm and whisk works in a pinch)
- Cupcake pan (standard 12-cup does the trick)
That’s it! See? No need for special zombie-making gadgets – just basic baking gear with a spooky twist.
How to Make Zombie Brain Cupcakes
Alright, let’s get to the fun part! Making these cupcakes is super straightforward, but I’ll walk you through every step so they turn out perfectly creepy. Trust me, once you see how easy it is to pipe those brains, you’ll want to make these for every Halloween party!
Baking the Red Velvet Cupcakes
First things first, preheat your oven to 350°F (175°C). While that’s heating up, grab your mixing bowl and combine the red velvet cake mix, eggs, oil, and water. Mix it until it’s smooth – no lumps allowed! Line your cupcake pan with liners (I love using black ones for extra spook factor), and fill each about 2/3 full. Pop them in the oven for 18-20 minutes. You’ll know they’re done when a toothpick comes out clean. Here’s the key: let them cool completely before you start frosting. Trust me, piping on warm cupcakes is a recipe for disaster!
Creating the Zombie Brain Frosting
While your cupcakes are cooling, let’s make the frosting look properly zombie-ish. Empty your can of vanilla frosting into a bowl and start adding red food coloring. I use gel food coloring because it gives you that vibrant pink without thinning out the frosting. Keep adding until you get that perfect “zombie flesh” color – not too bright, not too pale. If the frosting feels too soft, pop it in the fridge for 10 minutes. You want it thick enough to hold its shape when you pipe those brains!
Piping the Brain Design
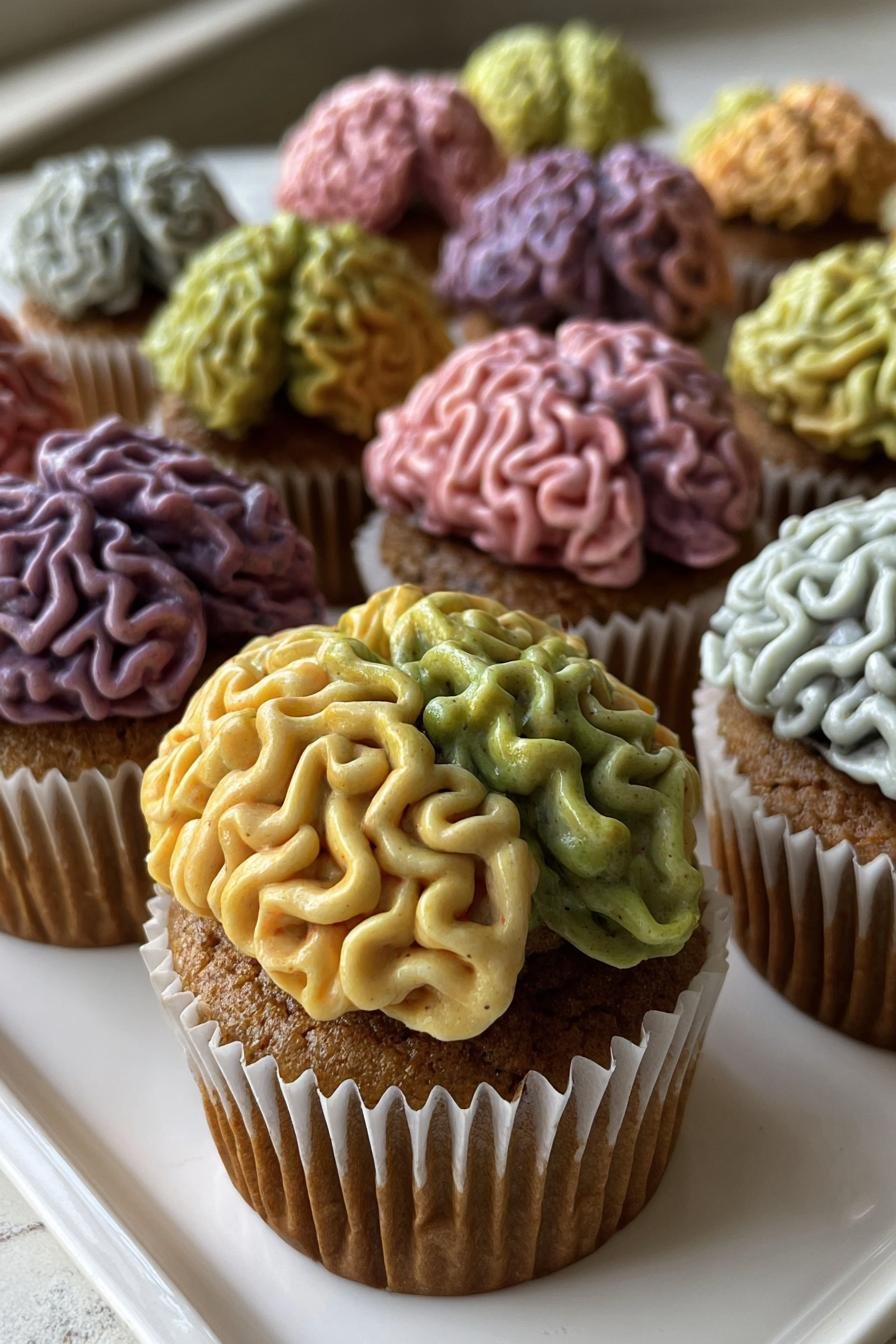
Now for the best part – creating the brains! Fill your piping bag with the pink frosting and use a small round tip. Start by piping a squiggly line down the center of the cupcake, then add more squiggles on either side to create that brain-like texture. Don’t stress about making them perfect – brains are supposed to look messy! For an extra gory touch, mix a little extra red food coloring with some raspberry jam and drizzle it over the brains for a bloody effect. Step back and admire your work – you’ve just created edible zombie brains!
Pro Tips for Perfect Zombie Brain Cupcakes
After making these cupcakes way too many times (not that I’m complaining!), I’ve picked up some tricks that take them from good to gruesomely great. First – chill those cupcakes! At least 30 minutes in the fridge makes them so much easier to frost without crumbs. And trust me on the gel food coloring – the regular liquid kind will make your frosting runny just when you need it to hold shape. Want next-level gore? Warm some raspberry jam slightly and use a toothpick to create “blood” dripping between the brain folds. The sticky red ooze looks disgustingly perfect!
Zombie Brain Cupcakes Variations
Oh, the possibilities for these creepy cupcakes are endless! If red velvet isn’t your thing (or if you want to change up the zombie theme), try using chocolate cake mix – the dark color makes the pink “brains” pop even more. For a sparkly zombie apocalypse, mix edible silver glitter into your frosting. Feeling extra adventurous? Add a drop of mint extract to the frosting for “icy zombie” brains. My neighbor swears by using strawberry cake mix – the pinkish crumbs peeking through look like… well, I’ll let you imagine!
Storing and Serving Zombie Brain Cupcakes
Here’s the deal with these cupcakes – they’re best served the same day you make them, when that brain frosting is at its peak creepy perfection! If you absolutely must store them, pop them in an airtight container in the fridge for up to 2 days. Just know the frosting might lose some of its sharp definition. Pro tip: Bring them to room temperature before serving for the tastiest zombie brains!
Zombie Brain Cupcakes Nutrition Information
Just a heads up – these nutrition facts are estimates based on standard ingredients. Each cupcake comes in at about 320 calories, with 25g of sugar (hey, they’re treats, not health food!). Keep in mind, these numbers might change slightly depending on your specific cake mix or frosting brand. So, enjoy your zombie brains in moderation – or not, it’s Halloween after all!
Zombie Brain Cupcakes FAQs
Can I make these gluten-free?
Absolutely! Just swap the regular cake mix for your favorite gluten-free red velvet mix. The texture might be slightly different, but the creepy brain effect works just as well. I’ve even used gluten-free flour blends when making from scratch – just add extra xanthan gum if your mix doesn’t include it.
How far ahead can I decorate?
For the best brain definition, I recommend decorating the day you plan to serve them. That said, you can pipe the brains up to 24 hours ahead if you store them uncovered in the fridge. The frosting might lose a tiny bit of sharpness, but they’ll still look deliciously gory!
What piping tip works best?
I swear by a #3 or #5 round tip for perfect brain squiggles – small enough for detail but big enough to see the effect. No fancy tips? No problem! Just snip a small corner off a plastic bag. The messier the brains look, the more realistic they appear!
5 Easy Zombie Brain Cupcakes That’ll Shock Your Party Guests
Spooky zombie brain cupcakes perfect for Halloween. These gory treats feature red velvet cake and a creepy brain design.
- Prep Time: 20 minutes
- Cook Time: 20 minutes
- Total Time: 40 minutes
- Yield: 12 cupcakes 1x
- Category: Dessert
- Method: Baking
- Cuisine: American
- Diet: Vegetarian
Ingredients
- 1 box red velvet cake mix
- 3 eggs
- 1/2 cup vegetable oil
- 1 cup water
- 1 can vanilla frosting
- Red food coloring
- Piping bag with small round tip
Instructions
- Preheat oven to 350°F (175°C).
- Mix cake mix, eggs, oil, and water until smooth.
- Pour batter into cupcake liners, filling 2/3 full.
- Bake for 18-20 minutes. Let cool completely.
- Tint frosting pink with red food coloring.
- Frost cupcakes smoothly with base layer.
- Pipe squiggly brain patterns using piping bag.
- Add extra red coloring for bloody effect.
Notes
- Use gel food coloring for vibrant color
- Chill cupcakes before frosting for cleaner piping
- Add raspberry jam for bloody oozing effect
Nutrition
- Serving Size: 1 cupcake
- Calories: 320
- Sugar: 25g
- Sodium: 280mg
- Fat: 14g
- Saturated Fat: 3g
- Unsaturated Fat: 8g
- Trans Fat: 0g
- Carbohydrates: 45g
- Fiber: 1g
- Protein: 3g
- Cholesterol: 40mg