Irresistible Tiramisu Cream Delight Cake in Just 4 Hours
Oh, Italian desserts! They have this magical way of making simple ingredients sing. I’ll never forget my first bite of proper tiramisu in a tiny trattoria outside Florence – the way the coffee-soaked ladyfingers melted against that cloud-like mascarpone cream? Absolute perfection. That moment sparked my love affair with what I now call Tiramisu Cream Delight Cake.
This no-bake wonder is my go-to when I need something impressive but don’t want to turn on the oven. The layers of bold coffee and velvety mascarpone cream create this dreamy contrast that’ll have everyone begging for seconds. What I love most is how the flavors deepen as it chills – that first slice after dinner tastes even better than the one you sneak at midnight!
Why You’ll Love This Tiramisu Cream Delight Cake
Trust me, this isn’t just another dessert—it’s THE dessert that’ll have your friends whispering “Where did you buy this?!” Here’s why:
- No-bake magic: Hot summer day? Tiny kitchen? No problem. This Tiramisu Cream Delight Cake comes together without ever turning on your oven.
- Coffee-cream harmony: That moment when bitter espresso meets sweet mascarpone? Pure bliss—not too heavy, not too light, just perfect.
- Looks fancy, zero stress: Those gorgeous cocoa-dusted layers make it look like you spent hours, when really? So simple.
- Make-ahead secret weapon: Actually tastes better after chilling overnight (more time for Netflix!).
- Crowd-pleaser guarantee: Picky eaters, coffee lovers, dessert fans—everyone scrapes their plates clean.
Tiramisu Cream Delight Cake Ingredients
Here’s the beautiful truth – with just six simple ingredients, you can create pure magic. But listen closely, because each one plays a starring role in this Tiramisu Cream Delight Cake. I’ve learned the hard way that substitutions can lead to dessert tragedy!
- 200g crisp ladyfinger biscuits (savoiardi): Not the soft ones! These sturdy Italian cookies hold their shape when dipped. Find them in the international aisle – they’re worth the hunt.
- 250g full-fat mascarpone cheese: At room temperature, please! Cold mascarpone turns lumpy when mixed. And skip the low-fat version – we’re making dessert, not diet food.
- 3 large eggs: Separated while cold (easier!), then brought to room temp. Farm-fresh eggs make the creamiest filling.
- 100g granulated sugar: Measured precisely – too little and your cream falls flat, too much and it overpowers the coffee.
- 300ml freshly brewed strong coffee: Cooled completely. I use espresso shots diluted with hot water – instant coffee just won’t give you that deep flavor.
- 2 tbsp unsweetened cocoa powder: For that classic dusting on top. Dutch-processed gives the richest color.
See? Nothing fancy – just quality ingredients treated right. Now let’s turn these humble players into something extraordinary!
Essential Equipment for Tiramisu Cream Delight Cake
Don’t worry—you don’t need fancy gadgets! Here’s my tried-and-true lineup:
- 8×8″ glass dish: Lets you see those beautiful layers forming.
- Electric mixer: Your arms will thank you when whipping egg whites.
- Two mixing bowls: One for yolks, one for whites—no shortcuts!
- Rubber spatula: Gentle folding keeps the cream cloud-like.
- Fine-mesh sieve: For that Instagram-worthy cocoa dusting.
That’s it! Now let’s get mixing.
How to Make Tiramisu Cream Delight Cake
Alright, let’s turn those simple ingredients into something absolutely divine. Follow these steps, and you’ll have a Tiramisu Cream Delight Cake that’ll make you feel like an Italian nonna in no time. And remember—patience is key here. That 4-hour chill time? Non-negotiable. It’s what makes this dessert truly magical.
Preparing the Coffee Mixture
First things first—that coffee layer! Brew your coffee strong—I’m talking 2 shots of espresso diluted with hot water, or 300ml of your favorite strong brew. Let it cool completely. Seriously, don’t rush this step. Hot coffee will melt your mascarpone later, and nobody wants a runny tiramisu. I usually set mine aside while I prep the other ingredients. You can even pop it in the fridge to speed things up a bit.
Making the Mascarpone Cream
Now, the star of the show—the creamy mascarpone filling. Start by separating your eggs while they’re cold (it’s easier, trust me). Then let them come to room temperature—about 15-20 minutes. In a large bowl, beat the yolks with sugar until they’re pale and creamy. Add the mascarpone and mix gently until smooth. Don’t overdo it, or you’ll lose that lovely texture.
Next, whip the egg whites in a separate bowl until they form stiff peaks. This is where your electric mixer becomes your best friend. When you lift the beaters, the peaks should hold their shape without drooping. Now, here’s the trick: fold the whites into the mascarpone mixture gently. Use a rubber spatula and make figure-eight motions to keep it light and airy. Overmixing? Big no-no. You’ll deflate all that hard work.
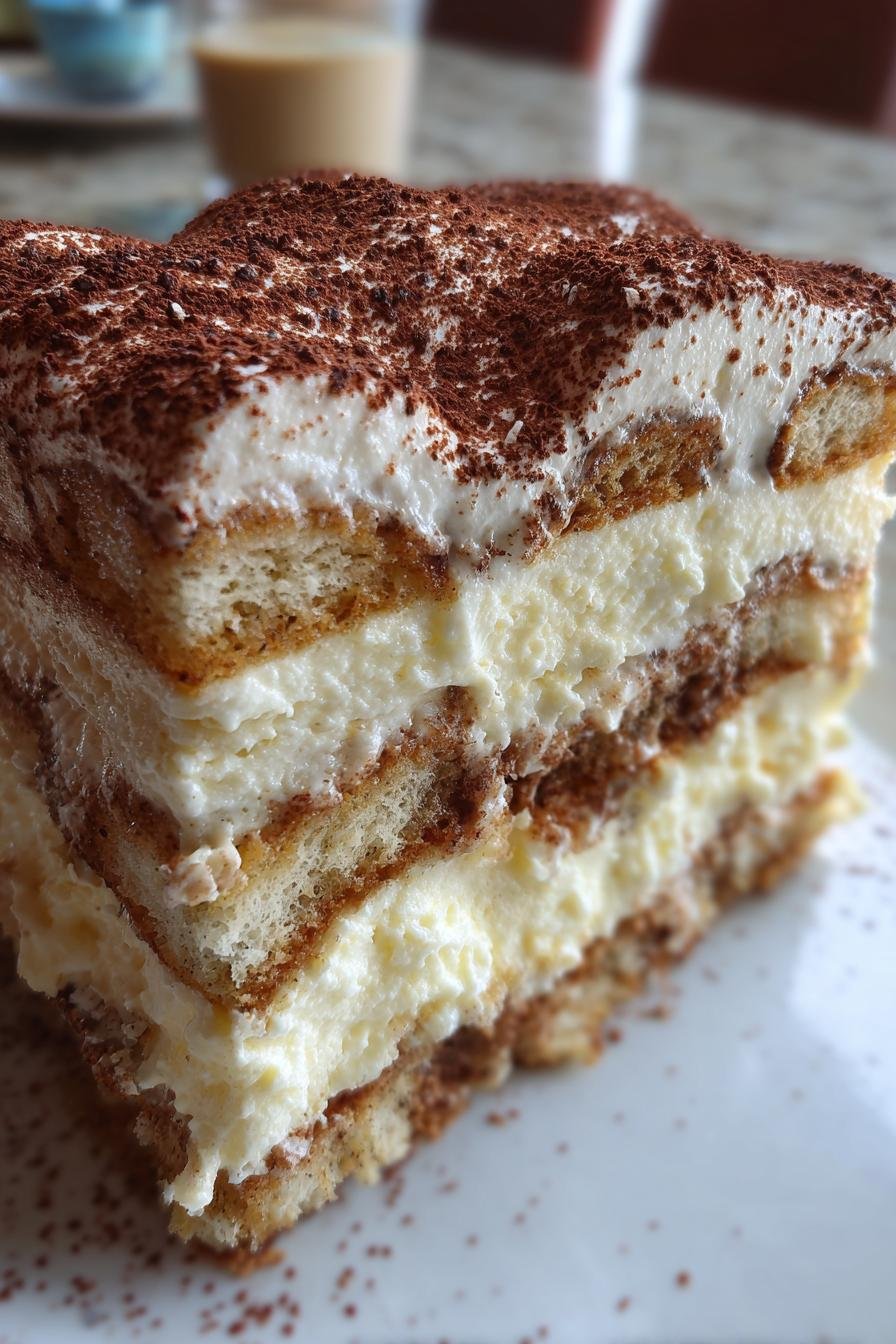
Assembling the Tiramisu Layers
Time to build those dreamy layers! Grab your ladyfingers and dip them quickly—I mean, 1 second per side max—into the cooled coffee. You want them moist but not soggy. Layer them in your dish, breaking a few to fill any gaps. Spread half the mascarpone cream over the top, smoothing it out evenly. Repeat with another layer of dipped ladyfingers and the rest of the cream. Pro tip: stagger the biscuits in the second layer for better stability.
Cover your masterpiece with plastic wrap and pop it in the fridge for at least 4 hours—overnight is even better. When you’re ready to serve, dust the top with cocoa powder using a fine-mesh sieve for that perfect, even finish. Slice, serve, and watch the magic happen!
Expert Tips for Perfect Tiramisu Cream Delight Cake
After making this cake more times than I can count (and yes, eating most of those attempts), I’ve learned a few secrets that take Tiramisu Cream Delight Cake from good to “can I have your recipe?” Here’s what makes all the difference:
- Mascarpone matters: Splurge on the good stuff—Italian-made, full-fat mascarpone in the tub, not the whipped kind. Cheap versions can be grainy or watery, and we want that silky-smooth texture.
- Chill your bowl: Pop your egg white mixing bowl in the freezer for 10 minutes before whipping. Cold bowls help those whites reach stiff peaks faster and stay stable longer.
- Sift like you mean it: When dusting with cocoa, use a fine-mesh sieve held high above the cake. Move it in gentle circles—this gives you that dreamy, even snowdrift effect instead of cocoa clumps.
Troubleshooting tip: If your layers turn soggy, you’re probably over-dipping the ladyfingers. They should just kiss the coffee—quick dip in, quick dip out. Think “moist sponge,” not “soaked dishrag.” If you’ve already gone too far? Chill longer—even overnight—to help the layers set up firmer.
Tiramisu Cream Delight Cake Variations
Oh, the fun begins when you start playing with this recipe! Here are my favorite twists that keep things exciting:
- Tipsy Tiramisu: Stir 1 tbsp Kahlúa into your cooled coffee for grown-up flavor. (Just warn your guests!)
- Berry Surprise: Layer fresh strawberries between the cream for a summery spin.
- Chocoholic’s Dream: Swap cocoa powder for dark chocolate shavings—so rich, so indulgent.
See? One recipe, endless possibilities. Now go get creative!
Serving and Storing Tiramisu Cream Delight Cake
Here’s the golden rule: serve this baby chilled, straight from the fridge. That 4-hour (or better yet, overnight) wait? It’s what transforms your Tiramisu Cream Delight Cake from good to “Oh my goodness, what IS this magic?” The flavors meld together, the layers set perfectly, and that first bite? Absolute heaven.
When it’s showtime, I like to use a sharp knife dipped in hot water for clean slices—wiping it between cuts keeps those layers picture-perfect. A little dusting of extra cocoa right before serving makes it look extra fancy, too. Pro tip: serve on chilled plates to keep everything cool longer—especially handy for summer gatherings.
Now, about leftovers (if you’re lucky enough to have any!): cover the dish tightly with plastic wrap or transfer slices to an airtight container. It’ll keep beautifully in the fridge for up to 3 days. But—and this is important—don’t freeze it. I learned this the hard way when my “brilliant” make-ahead batch turned grainy and weepy after thawing. The delicate balance of coffee, cream, and airy texture just doesn’t survive the freezer. Trust me, it’s better eaten fresh or shared with neighbors!
Tiramisu Cream Delight Cake FAQs
I get asked these questions all the time when I serve my Tiramisu Cream Delight Cake—so let me save you the trouble of wondering (and maybe some kitchen disasters too!). Here’s everything you need to know:
Can I make Tiramisu Cream Delight Cake ahead of time?
Absolutely—in fact, I insist on it! This dessert actually tastes better after chilling overnight. The flavors have time to mingle, the coffee soaks in just right, and the cream sets up perfectly. Make it the day before your event—your future self will thank you when all you have to do is dust with cocoa and serve.
Are there egg substitutes for this recipe?
I wish I could say yes, but those eggs are non-negotiable for the real-deal Tiramisu Cream Delight Cake texture. The yolks give richness to the mascarpone cream, and the whipped whites create that signature lightness. I’ve tried vegan versions with aquafaba—they’re okay, but never quite capture the magic. If eggs are a concern, this might not be the dessert for you.
Can I use decaf coffee?
You can, but—and this is a big but—the flavor won’t be as bold. That deep coffee kick is what makes tiramisu special! If you must go decaf, use extra-strong brew or even espresso powder to compensate. Pro tip: add a pinch of instant coffee to your decaf for more oomph without the caffeine.
Why did my cream layer turn runny?
Oh honey, we’ve all been there! Usually it’s one of three things: over-dipped ladyfingers making everything soggy, mascarpone that wasn’t room temperature before mixing, or not chilling long enough. Next time, pat your dipped biscuits lightly with a paper towel, let ingredients warm up properly, and—say it with me—chill for at least 4 hours!
Nutritional Information
Now, let’s be real—we’re not eating Tiramisu Cream Delight Cake for its health benefits! But since you might be curious (or need to track for dietary reasons), here’s what you should know about the nutritional profile of this luscious dessert.
Important disclaimer: All nutrition values are rough estimates that can vary widely based on your specific ingredients. Did you use organic eggs? Full-fat Italian mascarpone? Homemade ladyfingers? These choices all affect the final numbers. Even the brand of cocoa powder can make a difference!
Generally speaking, this rich dessert contains eggs, dairy, and sugar—so if you’re managing dietary restrictions or allergies, please adjust accordingly. The beauty of homemade? You control exactly what goes in. Want to lighten it up slightly? Try reducing the sugar by 10% or using part-skim ricotta mixed with mascarpone (though the texture won’t be quite as dreamy).
My philosophy? Life’s too short not to enjoy proper tiramisu—just savor reasonable portions and balance it with healthier choices throughout your day. After all, joy is its own kind of nourishment!
PrintIrresistible Tiramisu Cream Delight Cake in Just 4 Hours

A delicious layered cake with coffee-soaked sponge and creamy mascarpone filling.
- Prep Time: 30 minutes
- Cook Time: 0 minutes
- Total Time: 4 hours 30 minutes
- Yield: 8 servings 1x
- Category: Dessert
- Method: No-Bake
- Cuisine: Italian
- Diet: Vegetarian
Ingredients
- 200g ladyfinger biscuits
- 250g mascarpone cheese
- 3 eggs
- 100g sugar
- 300ml strong coffee
- 2 tbsp cocoa powder
Instructions
- Brew strong coffee and let it cool
- Separate egg yolks and whites
- Beat yolks with sugar until creamy
- Fold mascarpone into yolk mixture
- Whip egg whites to stiff peaks
- Gently fold whites into mascarpone mix
- Dip ladyfingers briefly in coffee
- Layer soaked biscuits and cream in dish
- Chill for 4 hours minimum
- Dust with cocoa before serving
Notes
- Use room temperature ingredients
- Don’t oversoak the biscuits
- Chill thoroughly before serving
Nutrition
- Serving Size: 1 slice
- Calories: 320
- Sugar: 22g
- Sodium: 80mg
- Fat: 18g
- Saturated Fat: 10g
- Unsaturated Fat: 6g
- Trans Fat: 0g
- Carbohydrates: 32g
- Fiber: 1g
- Protein: 7g
- Cholesterol: 120mg