“Spooky Skull Sugar Cookies for a Ghoulish Delight”
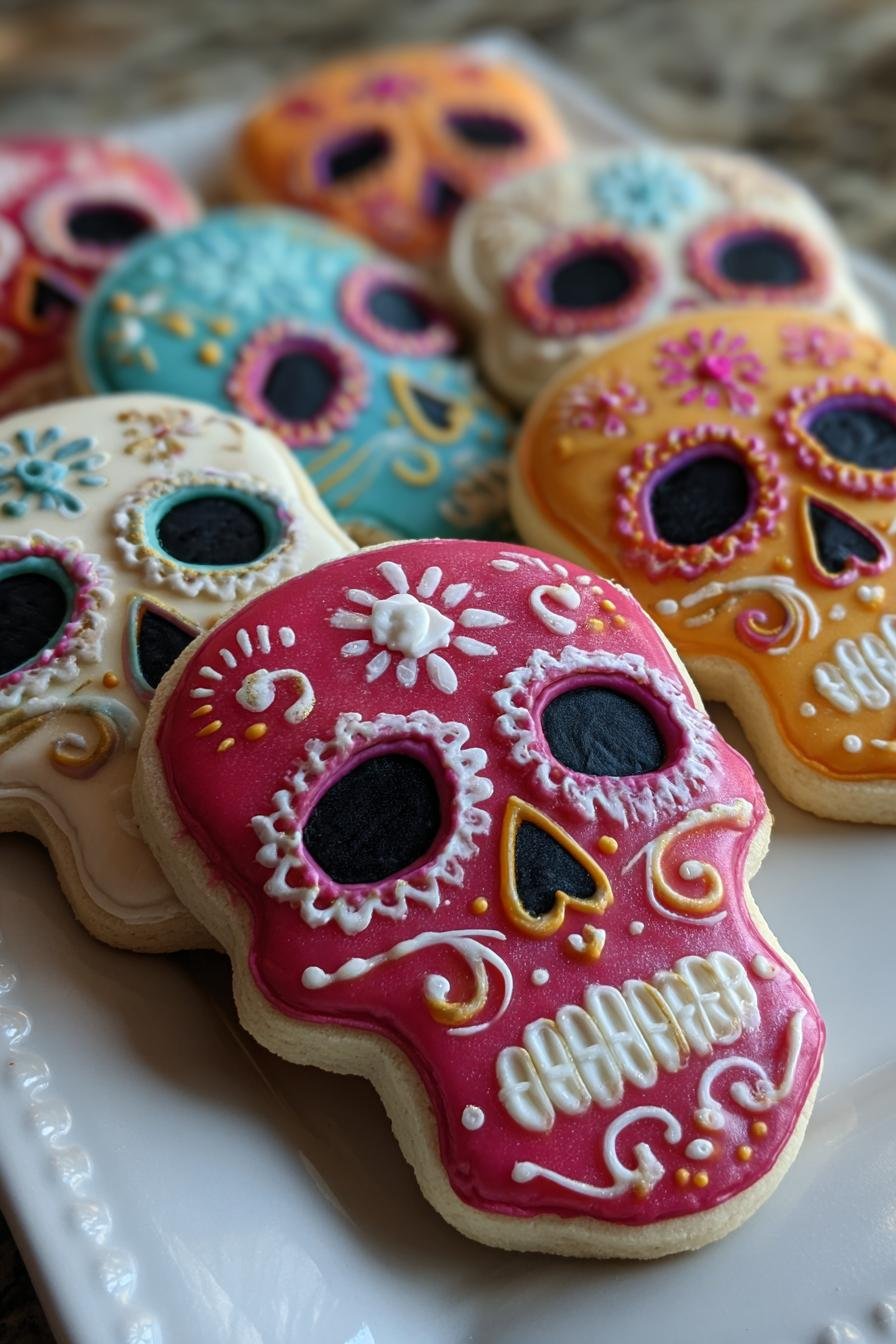
Nothing screams Halloween fun quite like a batch of spooky skull sugar cookies! I still remember the first time I made these—my kitchen looked like a mad scientist’s lab, covered in flour and black icing, but the giggles from my kids were totally worth it. These cookies are my go-to for themed parties, easy enough for beginners but with that classic crisp sugar cookie texture everyone loves. Whether you’re decorating them with sinister smiles or going all-out with intricate designs, they’re guaranteed to be the hit of any gathering. Trust me, once you try this recipe, you’ll be whipping up skull sugar cookies for every creepy occasion!
Why You’ll Love These Skull Sugar Cookies
Listen, I know you’ve got a million cookie recipes to choose from, but let me tell you why these skull sugar cookies deserve a spot in your baking rotation:
- So easy a zombie could make them – Seriously, the dough comes together in minutes, and even first-time bakers get perfect results
- Endless decorating fun – Go simple with spooky black icing or get fancy with edible glitter and candy eyes (my kids go nuts for this part)
- Party-perfect every time – They’re the star of Halloween bashes, but I’ve used them for Day of the Dead celebrations and even goth birthday parties
- That perfect crisp bite – The edges get just slightly golden while staying tender in the center – exactly how a sugar cookie should be
Honestly, what’s not to love? These cookies are equal parts delicious and delightfully creepy!
Ingredients for Skull Sugar Cookies
Here’s everything you’ll need to whip up these spooky treats. I promise, it’s all pantry staples—no weird ingredients here! Just gather:
- 2 3/4 cups all-purpose flour (spooned and leveled for accuracy—don’t pack it!)
- 1 cup unsalted butter (softened to room temperature—trust me, this makes a difference)
- 1 1/2 cups granulated sugar (for that perfect sweetness)
- 1 large egg (room temperature helps it mix in smoothly)
- 1 tsp vanilla extract (the secret touch that ties it all together)
- 1 tsp baking powder (for that slight lift)
- 1/2 tsp salt (to balance the sweetness)
- Black gel icing (for decorating—it’s a must for those creepy details!)
That’s it! Simple, right? Now let’s get baking!
Equipment You’ll Need
Before we dive in, let’s grab our baking essentials—nothing fancy, just the basics you probably already have:
- Skull-shaped cookie cutter (the star of the show—I collect different sizes for variety!)
- Rolling pin (I swear by my wooden one, but any will do)
- Baking sheets (line ’em with parchment paper for easy cleanup)
- Mixing bowls (I use one large and one medium)
- Hand mixer or stand mixer (though you can absolutely mix by hand if you’re feeling strong!)
See? Told you it was simple. Now let’s make some magic!
How to Make Skull Sugar Cookies
Alright, let’s get to the fun part—making these spooky delights! Don’t worry, I’ll walk you through each step just like I’m right there in the kitchen with you (flour-covered apron and all).
Mixing the Dough
First things first—let’s make that cookie dough sing! Start by creaming together your softened butter and sugar until it’s light and fluffy. I know it’s tempting to rush this step, but take your time—about 3 minutes with a mixer does the trick. You’ll know it’s ready when the mixture looks pale yellow and almost whipped.
Next, beat in that egg and vanilla extract until everything’s perfectly combined. Now for the dry ingredients—gradually add your flour mixture while mixing on low speed. The dough should come together nicely—not too sticky, not too dry. If it clings to your fingers, a quick 30-minute chill in the fridge will fix it right up!
Cutting and Baking
Preheat your oven to 350°F (175°C) while you roll out the dough. Here’s my pro tip: work with half the dough at a time and keep the rest chilled. Roll it to about 1/4-inch thickness—any thinner and the skulls might break, any thicker and they won’t crisp up right.
Press your skull cutter firmly into the dough and transfer the shapes to parchment-lined baking sheets, spacing them about 2 inches apart. Bake for 10-12 minutes—you’re looking for just the slightest golden hint around the edges. They’ll continue firming up as they cool!
Decorating Tips
Patience is key here—let those cookies cool completely before you start decorating unless you want melty icing disasters! I swear by black gel icing for those crisp, creepy details—it’s perfect for drawing intricate skull faces.
If you’re feeling fancy, royal icing gives you that smooth, professional look (just thin it slightly with water for piping). And hey—no rules here! Add edible glitter, mini chocolate chips for eyes, or even red icing “blood” drips. The spookier, the better!
Tips for Perfect Skull Sugar Cookies
Want your skull sugar cookies to turn out spook-tacular every time? Here are my tried-and-true tips:
- Chill sticky dough – If your dough feels too soft to roll, pop it in the fridge for 30 minutes. Trust me, it makes cutting those skull shapes so much easier!
- Watch the clock – Overbaking is the enemy of a perfect sugar cookie. Pull them out when the edges are just barely golden—they’ll firm up as they cool.
- Gel icing is your friend – It’s perfect for fine details like creepy cracks or sinister smiles. Just squeeze gently and let your inner artist shine!
With these little tricks, you’ll be the skull cookie master in no time!
Storage and Serving Suggestions
Alright, let’s talk about keeping these spooky treats fresh and fun! Once your skull sugar cookies are completely cooled, store them in an airtight container at room temperature—they’ll stay crisp and delicious for up to 5 days (if they last that long!). For parties, I love arranging them on a black platter with dry ice for extra drama. Pair them with witches’ brew punch or spooky margaritas for adults—just watch those little fingers grabbing seconds before dinner!
Skull Sugar Cookies Variations
Who says skulls have to be basic? Here are my favorite ways to mix things up when I’m feeling extra creative:
- Chocolate skulls – Swap out 1/2 cup of flour for cocoa powder and add a splash of coffee to the batter (it makes the chocolate flavor pop!)
- Rainbone cookies – Use vibrant colored icing for a Day of the Dead vibe – hot pink and turquoise look amazing
- Glittery ghouls – Brush cookies with corn syrup while warm and coat with colored sanding sugar for an eerie shimmer
The best part? No matter how you decorate them, they’ll disappear just as fast!
Skull Sugar Cookies FAQ
Got questions? I’ve got answers! Here are the things people ask me most about these spooky treats:
Can I freeze the dough? Absolutely! Wrap it tightly in plastic and it’ll keep for up to 3 months. Thaw in the fridge overnight before rolling out. I always make extra dough during Halloween season—future me is always grateful!
What can I use instead of gel icing? Melted chocolate works great (I like dark for contrast), or thin royal icing in a piping bag. In a pinch? Mix powdered sugar with milk and food coloring—just do a test cookie first to get the consistency right.
Why did my cookies spread too much? Usually means your butter was too warm or you didn’t chill sticky dough. Next time, try popping the cut-out cookies in the fridge for 10 minutes before baking—works like a charm!
Can I make these gluten-free? Yep! Swap in a 1:1 gluten-free flour blend. The texture changes slightly, but they’re still deliciously spooky.
Nutritional Information
Just a quick heads-up—nutritional info can vary based on the brands you use and how you measure your ingredients. But for a general idea, here’s the breakdown per cookie: about 150 calories, 10g sugar, and 7g fat. It’s a treat, after all, so enjoy it guilt-free—especially when those spooky faces are staring back at you!
Share Your Creations!
I’d love to see your spooky masterpieces! Snap a pic of your skull sugar cookies and tag me on social media—I’m always blown away by the creative designs you come up with. Let’s make this Halloween the most delicious one yet!
Print“Spooky Skull Sugar Cookies for a Ghoulish Delight”

Skull sugar cookies are a fun and spooky treat perfect for Halloween or themed parties. These cookies are sweet, crisp, and easy to decorate.
- Prep Time: 20 minutes
- Cook Time: 12 minutes
- Total Time: 32 minutes
- Yield: 24 cookies 1x
- Category: Dessert
- Method: Baking
- Cuisine: American
- Diet: Vegetarian
Ingredients
- 2 3/4 cups all-purpose flour
- 1 tsp baking powder
- 1/2 tsp salt
- 1 cup unsalted butter, softened
- 1 1/2 cups granulated sugar
- 1 large egg
- 1 tsp vanilla extract
- Black gel icing for decoration
Instructions
- Preheat your oven to 350°F (175°C). Line baking sheets with parchment paper.
- In a bowl, whisk together flour, baking powder, and salt.
- Cream the butter and sugar until light and fluffy. Beat in the egg and vanilla.
- Gradually mix in the dry ingredients until a dough forms.
- Roll out the dough to 1/4-inch thickness. Use a skull-shaped cookie cutter to cut out shapes.
- Place cookies on the prepared baking sheets. Bake for 10-12 minutes or until edges are lightly golden.
- Let cookies cool completely before decorating with black gel icing.
Notes
- Chill the dough for 30 minutes if it’s too soft to roll.
- Store cookies in an airtight container for up to 5 days.
- Use royal icing for more detailed designs.
Nutrition
- Serving Size: 1 cookie
- Calories: 150
- Sugar: 10g
- Sodium: 50mg
- Fat: 7g
- Saturated Fat: 4g
- Unsaturated Fat: 2g
- Trans Fat: 0g
- Carbohydrates: 20g
- Fiber: 0g
- Protein: 2g
- Cholesterol: 25mg