“Simple Herb Bread: Elevate Your Baking Skills Today!”
Introduction to Simple Herb Bread
As a busy mom, I know how precious time can be, especially when it comes to cooking. That’s why I love this simple herb bread. It’s not just easy to make; it fills your kitchen with the most delightful aroma, making it feel like a warm hug. Whether you’re looking to impress your loved ones or simply want a quick solution for a busy day, this recipe is your go-to. With just a few ingredients, you can create a delicious loaf that pairs perfectly with any meal. Let’s dive into this culinary adventure together!
Why You’ll Love This Simple Herb Bread
This simple herb bread is a game-changer for anyone short on time but big on flavor. It’s incredibly easy to whip up, making it perfect for busy weeknights or last-minute gatherings. The taste? Oh, it’s like a burst of sunshine in every bite! Plus, the delightful aroma wafting through your home will have everyone asking for seconds. Trust me, this bread will quickly become a family favorite!
Ingredients for Simple Herb Bread
Gathering the right ingredients is the first step to creating your simple herb bread masterpiece. Here’s what you’ll need:
- All-purpose flour: The backbone of your bread, providing structure and texture. You can substitute with whole wheat flour for a nuttier flavor.
- Active dry yeast: This little powerhouse helps your bread rise. Make sure it’s fresh for the best results!
- Warm water: Essential for activating the yeast. Aim for a temperature around 110°F—too hot, and you’ll kill the yeast!
- Olive oil: Adds moisture and a lovely richness. Feel free to swap it with melted butter for a different flavor profile.
- Sugar: Just a touch to feed the yeast and enhance browning. You can use honey or maple syrup as a natural alternative.
- Salt: A crucial ingredient that enhances flavor and controls yeast activity. Don’t skip it!
- Mixed dried herbs: This is where the magic happens! A blend of rosemary, thyme, and oregano brings a burst of flavor. Adjust the mix to your taste or use fresh herbs if you have them on hand.
For exact measurements, check the bottom of the article where you can find everything listed for easy printing. Happy baking!
How to Make Simple Herb Bread
Now that you have your ingredients ready, let’s get our hands a little floury! Making this simple herb bread is a delightful journey, and I promise it’s easier than you think. Follow these steps, and you’ll have a warm, fragrant loaf in no time!
Step 1: Prepare the Yeast Mixture
Start by combining warm water, sugar, and yeast in a bowl. Stir gently and let it sit for about 5 to 10 minutes. You’ll know it’s ready when it becomes frothy and bubbly. This is the yeast waking up, and it’s a beautiful sight!
Step 2: Mix in the Ingredients
Once your yeast mixture is frothy, add in the olive oil, salt, and mixed dried herbs. Stir everything together until well combined. The aroma of the herbs will start to fill your kitchen, and trust me, it’s heavenly!
Step 3: Form the Dough
Now, it’s time to gradually add the all-purpose flour. Mix it in slowly, using a wooden spoon or your hands, until a dough begins to form. It should be slightly sticky but manageable. If it’s too wet, sprinkle in a bit more flour.
Step 4: Knead the Dough
Transfer the dough to a floured surface. Knead it for about 10 minutes, folding and pressing until it’s smooth and elastic. This is a great workout for your arms! If the dough sticks, don’t hesitate to dust it with a little more flour.
Step 5: Let the Dough Rise
Place your kneaded dough in a greased bowl, turning it to coat all sides. Cover it with a clean kitchen towel and let it rise in a warm spot for about an hour. It should double in size, which is always a satisfying moment!
Step 6: Shape the Loaf
After the dough has risen, gently punch it down to release the air. Shape it into a loaf by rolling it tightly. This step is like giving your dough a little hug, preparing it for its final form!
Step 7: Second Rise
Place the shaped loaf in a greased loaf pan. Cover it again with the towel and let it rise for another 30 minutes. This second rise helps create that lovely, airy texture we all love in bread.
Step 8: Bake the Bread
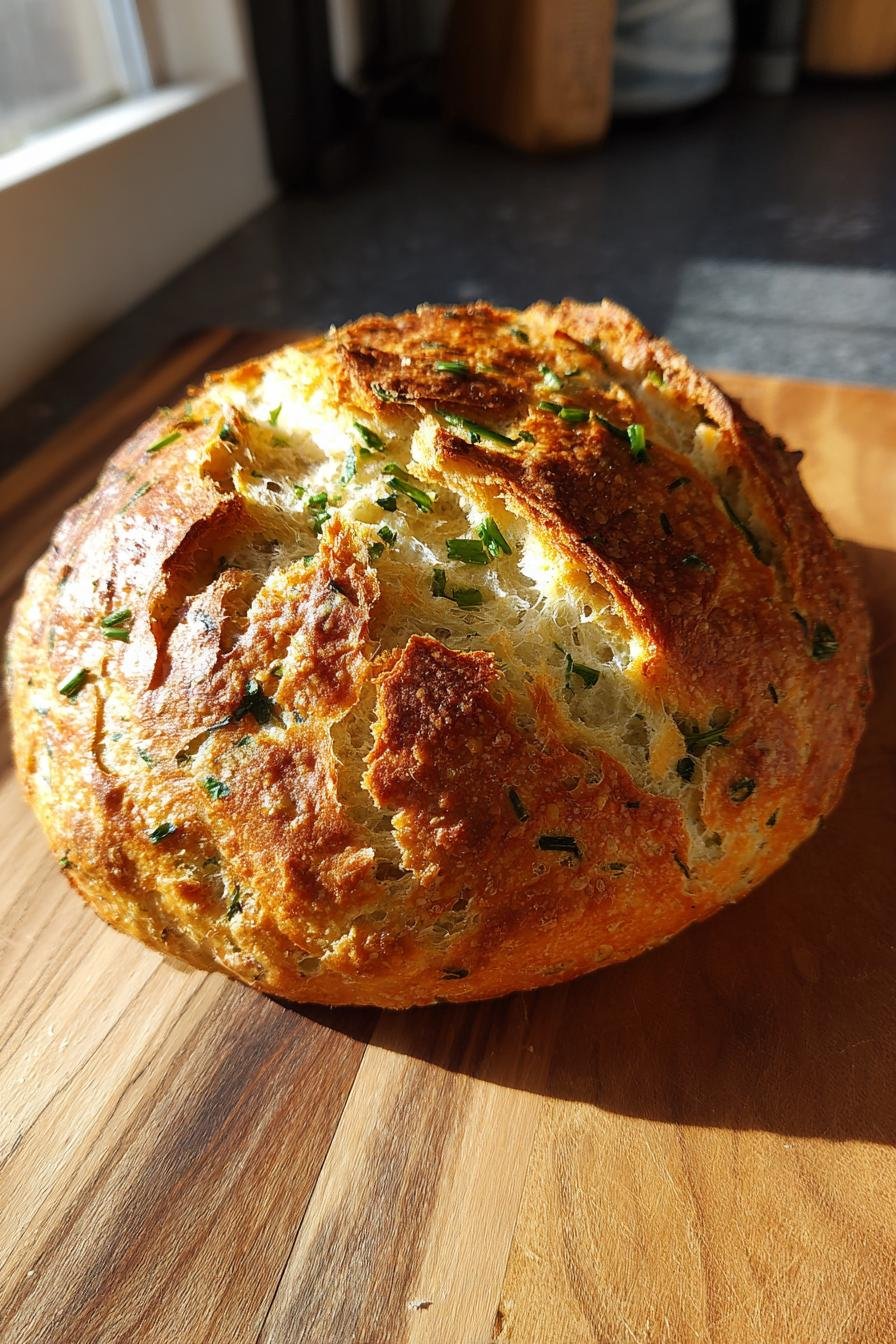
Preheat your oven to 375°F (190°C). Once it’s ready, pop your loaf in and bake for 25 to 30 minutes. You’ll know it’s done when it’s golden brown and sounds hollow when tapped on the bottom. Let it cool before slicing, and enjoy the fruits of your labor!
Tips for Success
- Always check the expiration date on your yeast for the best rise.
- Use a kitchen thermometer to ensure your water is at the right temperature.
- Don’t rush the rising time; it’s crucial for fluffy bread.
- For a golden crust, brush the loaf with olive oil before baking.
- Experiment with different herbs to find your favorite flavor combination!
Equipment Needed
- Mixing bowl: A large bowl for combining ingredients. A sturdy pot works too!
- Wooden spoon: Perfect for mixing. You can use a spatula if that’s what you have.
- Loaf pan: Essential for shaping your bread. A round cake pan can be a fun alternative!
- Kitchen towel: To cover the dough while it rises. A clean dishcloth will do just fine.
- Oven: For baking. A toaster oven can work for smaller loaves!
Variations of Simple Herb Bread
- Cheesy Herb Bread: Add 1 cup of shredded cheese, like mozzarella or cheddar, to the dough for a cheesy twist.
- Garlic Herb Bread: Mix in 2-3 minced garlic cloves with the herbs for a robust flavor that garlic lovers will adore.
- Whole Wheat Herb Bread: Substitute half of the all-purpose flour with whole wheat flour for a heartier texture and added nutrition.
- Spicy Herb Bread: Incorporate a teaspoon of red pepper flakes or chopped jalapeños for a kick of heat.
- Sweet Herb Bread: Add a tablespoon of honey or maple syrup to the dough for a hint of sweetness that pairs beautifully with butter.
Serving Suggestions for Simple Herb Bread
- Serve warm with a drizzle of olive oil and a sprinkle of sea salt for a simple yet elegant appetizer.
- Pair with a fresh garden salad for a light lunch that feels gourmet.
- Enjoy alongside a hearty soup or stew to soak up all the delicious flavors.
- Slice and toast for breakfast, topped with avocado or your favorite jam.
- Present on a rustic wooden board for a charming touch at your next gathering.
FAQs about Simple Herb Bread
As you embark on your baking journey with this simple herb bread, you might have a few questions. Here are some common queries I’ve encountered, along with helpful answers to guide you along the way!
Can I use fresh herbs instead of dried herbs?
Absolutely! Fresh herbs can add a vibrant flavor to your simple herb bread. Just remember to use about three times the amount of fresh herbs compared to dried, as they are less concentrated.
What should I do if my dough doesn’t rise?
If your dough isn’t rising, it could be due to inactive yeast. Make sure your yeast is fresh and that the water temperature is just right—too hot or too cold can hinder the yeast’s activity. Give it a little more time; sometimes, patience is key!
How can I store leftover bread?
To keep your simple herb bread fresh, store it in an airtight container at room temperature for up to three days. You can also freeze it for longer storage. Just slice it first, so you can grab a piece whenever you crave that delicious flavor!
Can I make this bread ahead of time?
Yes! You can prepare the dough and let it rise, then shape it into a loaf and refrigerate it overnight. Just let it come to room temperature before baking. This way, you can enjoy freshly baked bread with minimal effort!
What can I serve with simple herb bread?
This bread pairs wonderfully with olive oil for dipping, soups, salads, or even as a side for pasta dishes. The possibilities are endless, and it’s sure to elevate any meal!
Final Thoughts
Baking this simple herb bread is more than just a recipe; it’s an experience that fills your home with warmth and love. The joy of kneading the dough, watching it rise, and finally pulling a golden loaf from the oven is truly rewarding. Each slice is a reminder that even on the busiest days, you can create something special for your family. Whether enjoyed with a meal or as a snack, this bread brings people together. So, roll up your sleeves, embrace the process, and let the delightful aroma of homemade bread fill your kitchen. Happy baking!
Print“Simple Herb Bread: Elevate Your Baking Skills Today!”

A delightful and easy-to-make herb bread that enhances your baking skills with fresh flavors.
- Prep Time: 15 minutes
- Cook Time: 30 minutes
- Total Time: 1 hour 45 minutes
- Yield: 1 loaf 1x
- Category: Baking
- Method: Baking
- Cuisine: American
- Diet: Vegetarian
Ingredients
- 3 cups all-purpose flour
- 1 packet (2 1/4 tsp) active dry yeast
- 1 cup warm water (110°F)
- 2 tbsp olive oil
- 1 tbsp sugar
- 1 tsp salt
- 2 tbsp mixed dried herbs (such as rosemary, thyme, and oregano)
Instructions
- In a bowl, combine warm water, sugar, and yeast. Let it sit for 5-10 minutes until frothy.
- Add olive oil, salt, and mixed herbs to the yeast mixture.
- Gradually add flour, mixing until a dough forms.
- Knead the dough on a floured surface for about 10 minutes until smooth.
- Place the dough in a greased bowl, cover, and let it rise in a warm place for 1 hour or until doubled in size.
- Punch down the dough and shape it into a loaf.
- Place the loaf in a greased loaf pan and let it rise for another 30 minutes.
- Bake in a preheated oven at 375°F (190°C) for 25-30 minutes or until golden brown.
- Let it cool before slicing and serving.
Notes
- For a stronger herb flavor, increase the amount of dried herbs.
- This bread can be stored in an airtight container for up to 3 days.
- Serve with olive oil or butter for dipping.
Nutrition
- Serving Size: 1 slice
- Calories: 150
- Sugar: 1g
- Sodium: 200mg
- Fat: 3g
- Saturated Fat: 0.5g
- Unsaturated Fat: 2.5g
- Trans Fat: 0g
- Carbohydrates: 28g
- Fiber: 1g
- Protein: 4g
- Cholesterol: 0mg