Haunted House Cake: 1 Spooky Chocolate Masterpiece
There’s something magical about baking a haunted house cake right as October rolls around. The moment I pull out my black food coloring and gummy worms, my kitchen transforms into a spooky baker’s workshop! This eerie creation became my signature Halloween treat after my niece begged me to make something “terrifyingly tasty” for her school party. Trust me, nothing beats the look on kids’ faces (and even adults!) when you unveil this creepy chocolate masterpiece – cracked frosting for peeling walls, candy cobwebs stretching across the roof, and those adorable edible eyeballs peeking from every corner. It’s easier than you’d think to turn a simple cake into a haunted masterpiece!
Why You’ll Love This Haunted House Cake
This haunted house cake checks all the boxes for the perfect Halloween treat:
- Super simple – Basic ingredients, no fancy techniques, just spooky fun!
- Halloween showstopper – Instantly becomes the centerpiece of any party.
- Kid-approved – Little hands love adding the candy decorations.
- Totally customizable – Swap candies based on what’s in your pantry.
- Tastes amazing – The rich chocolate base keeps everyone coming back for “just one more” slice.
Seriously, the hardest part? Waiting for the cake to cool before decorating!
Ingredients for Your Haunted House Cake
Here’s everything you’ll need to bring this spooky creation to life. Don’t worry – it’s all pantry staples with a few fun extras for the decorations. I like to gather everything before I start, so I’m not scrambling mid-bake!
- Dry Ingredients:
- 2 cups all-purpose flour
- 1 1/2 cups granulated sugar
- 1/2 cup cocoa powder (the darker, the eerier!)
- 1 tsp baking soda
- 1/2 tsp salt
- Wet Ingredients:
- 1 cup water
- 1/3 cup vegetable oil
- 1 tsp pure vanilla extract
- 1 tbsp white vinegar
- Decorations:
- 1 batch buttercream frosting (homemade or store-bought)
- Black and orange gel food coloring
- Assorted candy (gummy worms, candy eyeballs, licorice, etc.)
Pro tip: If you’re short on time, you can use a boxed chocolate cake mix – I won’t tell! Just make sure your frosting and decorations are on point for that haunted house vibe.
Equipment You’ll Need
Don’t worry – you don’t need fancy gadgets to make this haunted masterpiece. Here’s what’s essential:
- A 9×13-inch rectangular cake pan (the perfect haunted house “foundation”)
- Mixing bowls (one for dry, one for wet ingredients)
- Whisk and spatula
- Serrated knife for leveling
- Offset spatula or butter knife for frosting
- Piping bag (or ziplock with corner cut) for details
That’s it! The real magic happens with your creativity and those spooky decorations.
How to Make a Haunted House Cake
Alright, let’s get spooky! Making this haunted house cake is seriously fun – just follow these simple steps, and you’ll have a Halloween showstopper that’ll have everyone screaming (with delight). The key is taking your time with each stage – especially letting that cake cool completely before you start decorating. Trust me, I learned that the hard way when I rushed it one year and ended up with a crumbling “haunted ruin” instead of a house!
Step 1: Prepare the Cake Batter
First things first – preheat your oven to 350°F (175°C). While that’s heating up, let’s make our chocolatey haunted house foundation. In a large bowl, whisk together all your dry ingredients – the flour, sugar, cocoa powder, baking soda, and salt. Make sure there’s no cocoa lumps hiding in there!
In another bowl, mix the water, oil, vanilla, and vinegar. Now here’s the fun part – pour the wet ingredients into the dry and stir just until combined. I use a spatula and make about 15-20 gentle folds – you want to stop when you can’t see any dry flour patches, but don’t go crazy mixing. Overmixing makes tough cake, and ghosts prefer tender crumbs!
Step 2: Bake and Cool the Cake
Pour your batter into the greased 9×13-inch pan – it should spread evenly on its own, but you can give the pan a gentle shake if needed. Pop it in the oven and set your timer for 30 minutes. At the 30-minute mark, do the toothpick test – stick it in the center, and if it comes out with just a few moist crumbs (not wet batter), you’re golden. If not, give it another 3-5 minutes.
Now, patience is key! Let the cake cool in the pan for 10 minutes, then transfer to a wire rack to cool completely – about 1-2 hours. I know it’s tempting to start decorating, but warm cake plus frosting equals melty mess. Ask me how I know!
Step 3: Decorate Your Haunted House Cake
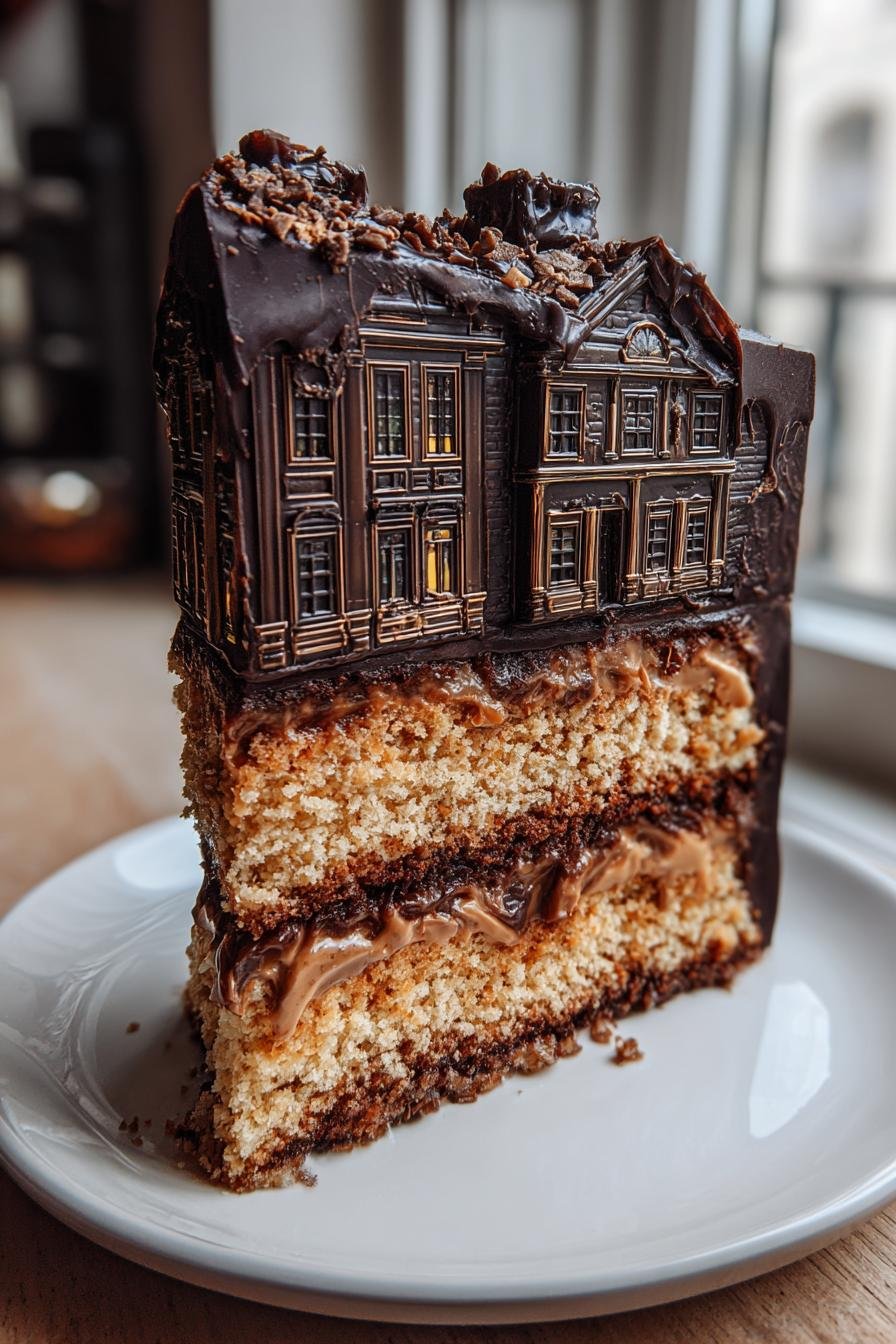
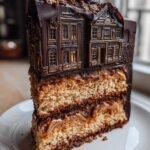
Time for the best part! Divide your frosting – about ⅔ gets colored black (gel food coloring works best for deep colors), and ⅓ gets colored orange. Use an offset spatula to frost the whole cake with black first – make it intentionally uneven for that “peeling haunted house” look. I like to leave some cake showing through in spots for extra creep factor.
Now the orange frosting – pipe or spread it as windows and doors. Then go wild with decorations! Press in gummy worms crawling out of cracks, stick candy eyeballs in unexpected places, use licorice for roof shingles or fence posts. There’s no wrong way to do this – just channel your inner ghost and have fun!
Tips for the Perfect Haunted House Cake
After making this cake more times than I can count (and learning from all my mistakes!), here are my foolproof tips for haunted house cake success:
- Level that cake! Use a serrated knife to gently slice off any dome for a flat surface – it makes decorating so much easier.
- Frosting too runny? Chill it for 15 minutes before spreading. Too thick? Add milk 1 tsp at a time until spreadable.
- Crumb coat first – do a thin layer of frosting, chill 10 minutes, then add the final layer to prevent crumbs in your spooky design.
- Store smart – Keep it covered at room temperature up to 3 days (if it lasts that long!). The fridge dries it out.
- Extra creepy touch – Dust with edible gray powder for an “aged” look right before serving.
Remember – imperfections make it look more haunted, so don’t stress!
Haunted House Cake Variations
This recipe is super flexible – I’ve made it every which way over the years! For gluten-free friends, swap in your favorite 1:1 gluten-free flour blend (the vinegar helps keep it tender). Vegan? Use plant-based butter in the frosting and a flax egg instead of regular eggs if adapting a box mix. Halloween candy running low? Get creative – crushed cookies make great “graveyard dirt,” shredded coconut dyed green becomes ghostly moss, and pretzel sticks work as fence posts. Last year I even used black sesame seeds for “spider eggs” – the spookier, the better!
Serving and Storing Your Haunted House Cake
This cake is best served at room temperature – the flavors really pop! For maximum spook factor, I love displaying it on a cake stand with some dry ice “fog” swirling around the base. Store any leftovers (ha!) in an airtight container at room temperature for up to 3 days. The frosting might darken slightly, but that just adds to the haunted charm!
Haunted House Cake Nutritional Information
Now, let’s be real – this haunted house cake isn’t exactly health food, but Halloween comes just once a year! The nutritional info can vary quite a bit depending on how generous you are with frosting and decorations (I’m definitely guilty of going overboard with those candy eyeballs). Here’s what you should know:
Since we’re using basic pantry ingredients like flour, sugar, and cocoa powder, it falls into classic dessert territory. The vinegar actually helps cut through some of the sweetness, and you’d be surprised how much moisture you get from that simple combination of oil and water.
Remember, nutritional values are always estimates and will change based on exactly which ingredients you use – homemade vs store-bought frosting makes a difference, as does the type and amount of candy decorations. My philosophy? Enjoy a slice (or two) guilt-free during spooky season!
Frequently Asked Questions
Can I use a boxed cake mix for this haunted house cake?
Absolutely! I’ve done it both ways, and while I love the from-scratch version, a good chocolate box mix works perfectly in a pinch. Just prepare according to package directions for a 9×13 pan. The real magic is in the decorations anyway – no one will know unless you tell them!
How do I prevent my haunted house cake from crumbling?
Two secrets: 1) Let it cool COMPLETELY before frosting (I know, the wait kills me too), and 2) Use a serrated knife to level it gently. If it still crumbles, a quick crumb coat (thin frosting layer) chilled for 10 minutes before the final decorate will save the day!
What if I can’t find black food coloring?
No panic! Mix equal parts blue, red, and green gel food coloring – it makes a deep black. Or embrace the eerie gray look (ghosts approve!). Pro tip: Start with chocolate frosting as your base – less coloring needed!
Can kids help decorate the haunted house cake?
Oh my gosh, YES! This is the perfect kid-friendly project. Let them place candy eyeballs, press in gummy worms, or pipe simple frosting cobwebs. Messy decorations just make it look more authentically haunted!
Well, there you have it – my ultimate haunted house cake that never fails to delight (and slightly terrify) everyone who sees it! I’d love to hear about your spooky baking adventures. Did you add giant candy spiderwebs? Maybe a marshmallow ghost family peeking from the windows? Snap a photo of your creepy creation and share it in the comments below – nothing makes me happier than seeing how you put your own haunted twist on this Halloween classic. Happy baking, and watch out for those gummy worms… they have a way of mysteriously disappearing!
PrintHaunted House Cake: 1 Spooky Chocolate Masterpiece
A spooky haunted house cake perfect for Halloween. This cake is designed to look like a creepy haunted house with edible decorations.
- Prep Time: 20 minutes
- Cook Time: 35 minutes
- Total Time: 55 minutes
- Yield: 12 servings 1x
- Category: Dessert
- Method: Baking
- Cuisine: American
- Diet: Vegetarian
Ingredients
- 2 cups all-purpose flour
- 1 1/2 cups sugar
- 1/2 cup cocoa powder
- 1 tsp baking soda
- 1/2 tsp salt
- 1 cup water
- 1/3 cup vegetable oil
- 1 tsp vanilla extract
- 1 tbsp vinegar
- 1 batch buttercream frosting
- Black and orange food coloring
- Candy decorations (gummy worms, candy eyeballs, etc.)
Instructions
- Preheat oven to 350°F (175°C). Grease and flour a rectangular cake pan.
- Mix dry ingredients in a bowl.
- Add wet ingredients and stir until combined.
- Pour batter into prepared pan and bake for 30-35 minutes.
- Let cake cool completely before decorating.
- Divide frosting and color with black and orange food coloring.
- Frost the cake and add edible decorations to create a haunted house.
Notes
- Use a serrated knife to level the cake before frosting.
- Let frosting set before adding candy decorations.
- Store in an airtight container for up to 3 days.
Nutrition
- Serving Size: 1 slice
- Calories: 320
- Sugar: 25g
- Sodium: 180mg
- Fat: 10g
- Saturated Fat: 2g
- Unsaturated Fat: 6g
- Trans Fat: 0g
- Carbohydrates: 55g
- Fiber: 2g
- Protein: 3g
- Cholesterol: 5mg