Spooky Halloween Ghost Cake in 3 Easy Steps
Oh, I just get so excited when October rolls around! There’s that crispness in the air, the smell of fallen leaves, and of course, the best part: planning the treats for our annual Halloween party. For years, I was the one showing up with a store-bought sheet cake, but not anymore. My absolute favorite thing to make now is this wonderfully spooky Halloween ghost cake. It’s so much easier than it looks, I promise. The decorating part is honestly the most fun—my kids love crowding around the counter to help me give each little ghost its own silly or scary personality. It’s become our little tradition, and it always gets so many laughs and compliments from our friends. Trust me, this is the showstopping centerpiece your dessert table is begging for!
Why You’ll Love This Halloween Ghost Cake
This cake is a total win for so many reasons! First off, it’s ridiculously easy—no fancy skills needed, just a simple chocolate cake base that comes together in minutes. The real magic happens when you decorate. Those little ghost faces? Pure joy to pipe on, and everyone at your party will go crazy for them. It’s the kind of dessert that disappears fast (just like a real ghost—see what I did there?). Plus, kids and adults alike get such a kick out of the spooky-but-cute vibe. Honestly, it’s become my go-to Halloween treat because it never fails to impress.
Ingredients for Halloween Ghost Cake
Alright, let’s gather up our ghostly baking supplies! I’ve made this cake so many times that I’ve learned a few little tricks with the ingredients. The best part? You probably have most of this stuff in your pantry already. Here’s what you’ll need to bring these adorable little ghosts to life (or should I say… afterlife?):
- 2 cups all-purpose flour – Spoon and level it, don’t scoop! This keeps the cake light and fluffy.
- 1 1/2 cups sugar – Regular granulated works perfectly here.
- 1/2 cup cocoa powder – I like using Dutch-processed for that rich chocolate flavor.
- 1 1/2 tsp baking soda – Make sure it’s fresh so your ghosts rise properly.
- 1 tsp salt – Just regular table salt to balance the sweetness.
- 1 cup milk – Room temperature is best, but don’t stress if it’s cold.
- 1/2 cup vegetable oil – This keeps our ghosts moist and tender.
- 2 large eggs – Crack them into a separate bowl first to check for shells.
- 2 tsp vanilla extract – The good stuff makes all the difference.
- 1 cup boiling water – This makes the batter thin but creates an amazing texture.
- 2 cups white frosting – Homemade or store-bought, both work great.
- Black icing gel – The gel works better than regular icing for those spooky faces.
See? Nothing too crazy! Just good, simple ingredients that come together to make something magically spooky. Now let’s get that oven preheating!
Equipment Needed for Halloween Ghost Cake
Now let’s talk tools! You don’t need anything fancy for this ghost cake – just a few kitchen basics. I always grab my trusty 9-inch round cake pan (ghosts look best round, don’t you think?), a couple of mixing bowls, and a whisk for the batter. The real game-changer? A piping bag with a round tip – it makes those ghostly swirls and faces so much easier. Oh, and don’t forget a rubber spatula to scrape every last bit of that delicious batter into the pan!
How to Make Halloween Ghost Cake
Alright, let’s get this spooky show on the road! Making this Halloween ghost cake is super straightforward, but I’ll walk you through every step so it turns out perfect. Trust me, it’s easier than it looks, and the decorating part is where the real fun begins. Let’s dive in!
Step 1: Prepare the Cake Batter
First things first—preheat your oven to 350°F (175°C). While that’s warming up, grab a large mixing bowl and whisk together your dry ingredients: flour, sugar, cocoa powder, baking soda, and salt. Once that’s combined, add in the milk, vegetable oil, eggs, and vanilla extract. Mix it all until it’s smooth and glossy. Now, here’s the trick—slowly stir in the boiling water. The batter will look super thin, but don’t panic! This is exactly what you want. It bakes up into the most tender, moist cake. Pour it into your greased and floured 9-inch round pan, and we’re ready to bake!
Step 2: Bake and Cool the Cake
Pop that pan into the oven and let it bake for 30-35 minutes. You’ll know it’s done when a toothpick inserted into the center comes out clean with just a few moist crumbs. Now, here’s the important part—let the cake cool completely in the pan for about 10 minutes, then turn it out onto a wire rack to cool fully. I know it’s tempting to rush, but if the cake is even slightly warm, that frosting will melt right off. Patience is key here!
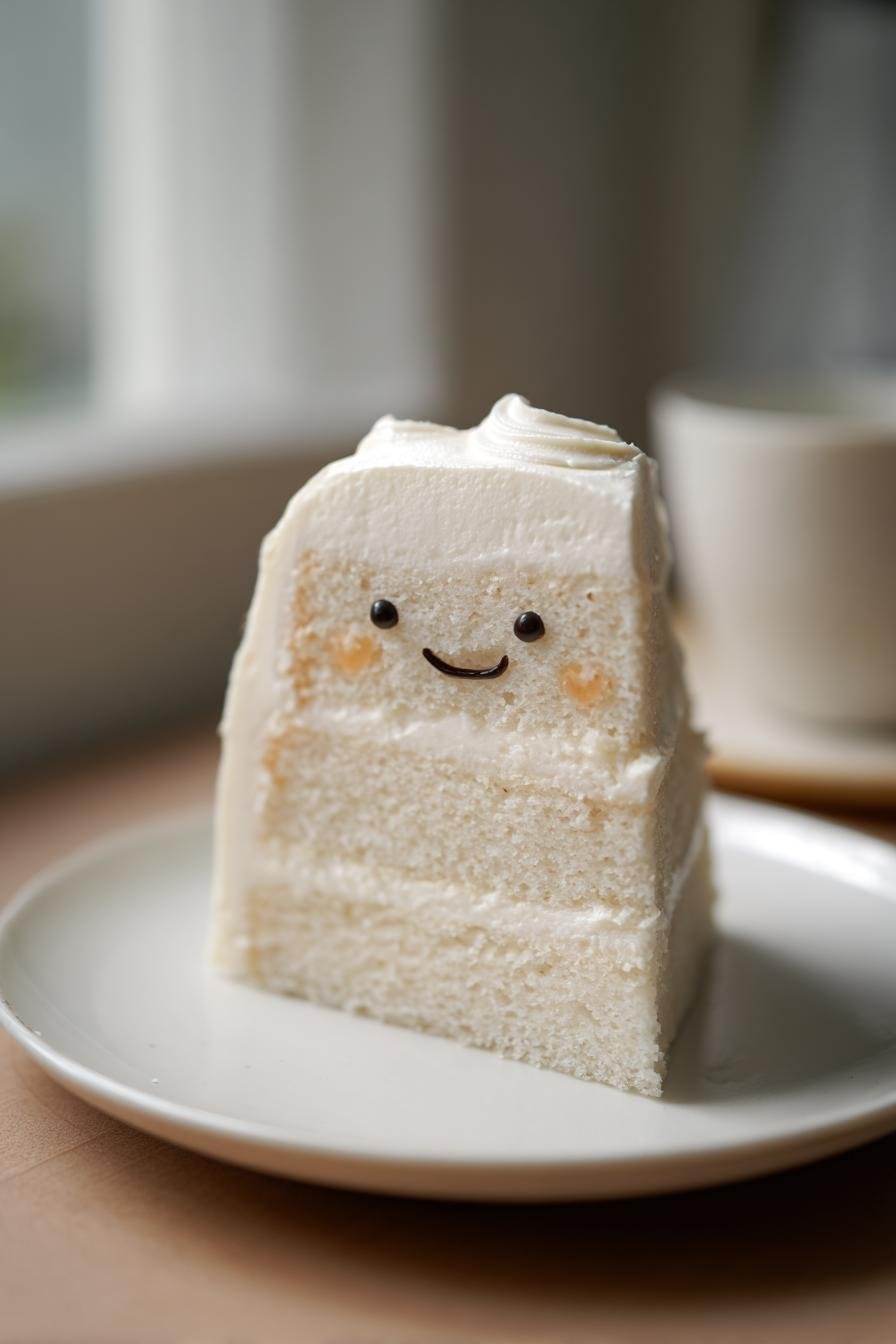
Step 3: Decorate Your Halloween Ghost Cake
Time for the fun part—turning this cake into a spooky masterpiece! Start by covering the entire cake with your white frosting. I like to use a piping bag with a round tip to create little ghostly swirls, but you can also just spread it on with a spatula if you’re in a hurry. Next, grab your black icing gel and start drawing those ghost faces. Go classic with wide, surprised eyes and a little “O” mouth, or get creative with spooky expressions. This is where you can really let your Halloween spirit shine. And voila—you’ve got a cake that’s ready to haunt your dessert table!
Tips for the Best Halloween Ghost Cake
After making this cake more times than I can count, I’ve picked up some foolproof tricks to make sure your Halloween ghost cake turns out perfect every time:
- Chill your cake before frosting! Seriously, pop it in the fridge for 30 minutes—it makes spreading that white frosting so much easier and prevents crumbs.
- Use gel icing for those ghost faces—it gives you way more control than regular icing and won’t run everywhere.
- If your frosting is too soft, beat in powdered sugar a tablespoon at a time until it holds its shape.
- Practice ghost faces on parchment paper first—it’s way less stressful than going straight onto the cake!
- For extra-spooky ghosts, add edible glitter to give them an eerie glow.
Follow these simple tricks, and your ghost cake will be the talk of the party—I promise!
Halloween Ghost Cake Variations
Oh, the possibilities with this cake are endless! Sometimes I like to mix it up by making chocolate ghosts—just add some cocoa powder to your frosting for spooky, shadowy spirits. For a fun pop of color, try tinting your ghosts with pastel food coloring for a cute “Casper” look. One year I even went wild with neon ghosts using electric blue and purple frosting—the kids went nuts for them! And if you’re feeling extra creative, pipe on little ghost arms reaching up from the cake edges. Your Halloween party, your ghost rules!
Serving and Storing Halloween Ghost Cake
Once your spooky masterpiece is ready, it’s time to show it off! I love serving this cake on a black or orange platter to really make those white ghosts pop. You can even add some Halloween-themed sprinkles or plastic spiders around the edges for extra fright. As for storage, keep it covered in an airtight container at room temperature for up to 2 days. If it’s humid, pop it in the fridge—just let it come to room temperature before serving so the frosting stays soft. Trust me, this cake doesn’t last long anyway—it’s too delicious to resist!
Halloween Ghost Cake Nutrition Facts
Okay, let’s talk numbers—because even ghosts need to know what they’re eating! Each slice of this spooky cake comes in at around 280 calories, with 25g of sugar and 10g of fat. Keep in mind, these are estimates—if you tweak the frosting or add extra decorations, the totals will change slightly. But hey, it’s Halloween! A little indulgence is part of the fun, right?
Halloween Ghost Cake FAQs
Got questions about your Halloween ghost cake? I’ve got answers! Here are the most common things people ask me when I make this spooky treat:
Can I use a boxed cake mix instead? Absolutely! If you’re short on time, a boxed chocolate cake mix works just fine. Follow the package directions, but skip the boiling water step—your batter will still turn out great.
Help! My frosting is too runny. What do I do? Don’t panic! Just beat in a tablespoon of powdered sugar at a time until it thickens up. If it’s still too soft, pop it in the fridge for 15-20 minutes to firm up.
Can I make this cake ahead of time? Yes! Bake the cake the day before and store it (unfrosted) in an airtight container. Frost it the day of your party for the freshest look.
What if I don’t have a piping bag? No problem! Use a zip-top bag with the corner snipped off, or just spread the frosting with a spatula and draw the ghost faces freehand.
Can I freeze this cake? Definitely! Wrap the unfrosted cake tightly in plastic wrap and freeze for up to a month. Thaw it at room temperature before decorating.
Share Your Spooky Creation
I’d absolutely love to see your ghostly masterpieces! Snap a photo of your Halloween ghost cake and tag me—nothing makes me happier than seeing everyone’s spooky (or silly!) ghost faces. Happy haunting!
PrintSpooky Halloween Ghost Cake in 3 Easy Steps

A spooky Halloween ghost cake perfect for your Halloween party. Easy to make and fun to decorate.
- Prep Time: 20 minutes
- Cook Time: 35 minutes
- Total Time: 55 minutes
- Yield: 1 cake (12 servings) 1x
- Category: Dessert
- Method: Baking
- Cuisine: American
- Diet: Vegetarian
Ingredients
- 2 cups all-purpose flour
- 1 1/2 cups sugar
- 1/2 cup cocoa powder
- 1 1/2 tsp baking soda
- 1 tsp salt
- 1 cup milk
- 1/2 cup vegetable oil
- 2 eggs
- 2 tsp vanilla extract
- 1 cup boiling water
- 2 cups white frosting
- Black icing gel
Instructions
- Preheat oven to 350°F (175°C). Grease and flour a round cake pan.
- Mix flour, sugar, cocoa powder, baking soda, and salt in a bowl.
- Add milk, vegetable oil, eggs, and vanilla extract. Mix until smooth.
- Slowly stir in boiling water. Batter will be thin.
- Pour batter into prepared pan. Bake for 30-35 minutes or until a toothpick comes out clean.
- Let cake cool completely.
- Cover cake with white frosting.
- Use black icing gel to draw ghost faces.
Notes
- Use a piping bag for smooth frosting.
- Let cake cool completely before frosting.
- Store leftovers in an airtight container.
Nutrition
- Serving Size: 1 slice
- Calories: 280
- Sugar: 25g
- Sodium: 300mg
- Fat: 10g
- Saturated Fat: 2g
- Unsaturated Fat: 4g
- Trans Fat: 0g
- Carbohydrates: 45g
- Fiber: 2g
- Protein: 4g
- Cholesterol: 35mg