Spooky Graveyard Dirt Cake Haunts Your Taste Buds
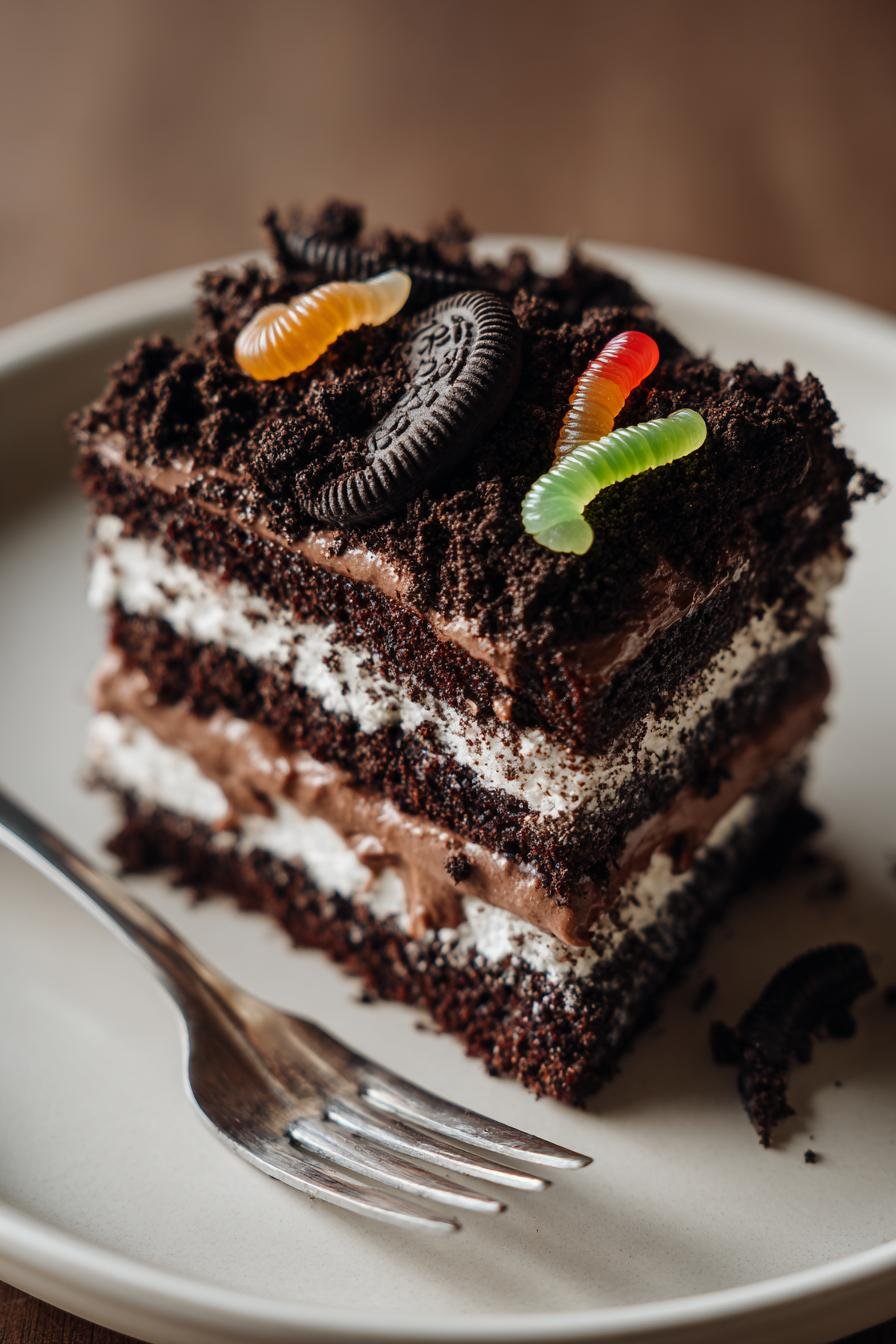
Oh, you’re in for a treat—literally! Every Halloween, my kitchen turns into a spooky dessert lab, and nothing gets my friends screaming (in delight!) like my graveyard dirt cake. Picture this: rich chocolate cake layered with creamy pudding, topped with crumbly “dirt” and crawling with gummy worms. It’s the perfect mix of creepy and delicious, just like those Halloween nights when we’d dare each other to walk past the “haunted” house down the street. Whether you’re hosting a party or just craving something fun, this graveyard dirt cake is a must-make. Let’s dig in—if you dare!
Why You’ll Love This Graveyard Dirt Cake
Listen, I know Halloween can get crazy with costumes and decorations—but dessert shouldn’t be stressful! That’s why this graveyard dirt cake is my go-to every year. Here’s why you’ll adore it:
- Easiest “dirt” you’ll ever dig into: No fancy skills needed. If you can layer cake, pudding, and cookie crumbs, you’ve got this.
- Kid-approved (and kid-proof!): Little hands love squishing gummy worms into the “dirt.” Messy fingers? More memories!
- Spooky but sweet: The tombstones and worms make it Halloween-perfect, but that chocolatey taste? Pure comfort food.
Perfect for Halloween Parties
I’ve lost count of how many times this cake has stolen the show at parties. Last year, my niece turned it into a zombie graveyard with candy bones poking out—total crowd pleaser! The best part? You can swap decorations yearly: candy corn one year, ghost peeps the next. It’s like a edible Halloween costume for your dessert table.
No-Bake Option Available
Running short on time? Grab a store-bought chocolate cake—I won’t tell! The pudding and cookie layers do all the heavy lifting flavor-wise. (Confession: I’ve even used leftover brownies in a pinch. Shh!)
Graveyard Dirt Cake Ingredients
Here’s everything you’ll need to bring this spooky dessert to life—measurements matter, so no eyeballing!
- 1 box (15.25 oz) chocolate cake mix – plus whatever oil, eggs, and water your brand calls for (check the box!)
- 1 cup cold whole milk – the colder, the better for thickening that pudding
- 1 package (3.9 oz) instant chocolate pudding mix – don’t grab cook-and-serve by accident!
- 1 tub (8 oz) whipped topping, thawed – Cool Whip works, but homemade whipped cream is divine
- 1 package (14.3 oz) chocolate sandwich cookies – Oreos are classic, but store-brand works too
- Gummy worms – at least 20, because more is creepier
- Plastic tombstones – find these at party stores or make your own from white chocolate
Ingredient Notes & Substitutions
Allergies or preferences? No problem! Here’s how to tweak it:
- Gluten-free? Use GF cake mix and gluten-free chocolate cookies (Glutino makes great ones).
- Dairy-free? Swap milk for almond milk, pudding mix for a vegan brand, and whipped topping for coconut cream.
- Extra chocolatey? Add chocolate chips between layers or mix cocoa powder into the cookie crumbs.
Pro tip: If you’re using homemade whipped cream, stabilize it with a tablespoon of powdered sugar so it holds up!
Equipment You’ll Need
No fancy gadgets required—just grab these basics from your kitchen:
- Mixing bowls (one big, one medium)
- 9×13-inch baking dish or clear trifle bowl for that wow-factor layered look
- Food processor (or a zip-top bag + rolling pin for smashing cookies the old-school way)
- Rubber spatula – for scraping every last bit of pudding goodness
- Measuring cups – because eyeballing pudding never ends well
That’s it! Now let’s get spooky.
How to Make Graveyard Dirt Cake
Ready to get your hands dirty? Let’s break it down step by step. Trust me, it’s easier than it looks—and way more fun!
Step 1: Prepare the Chocolate Cake
First, bake your chocolate cake according to the package instructions. I usually go with a 9×13-inch pan because it’s perfect for layering. Let it cool completely—don’t rush this part! A warm cake will make the pudding layer soggy, and nobody wants that. I set mine on a wire rack for about an hour while I prep the other layers. Patience, my friend—it’s worth it.
Step 2: Make the Pudding Layer
In a medium bowl, whisk the instant chocolate pudding mix with cold milk until it thickens. This takes about 2 minutes. Then, gently fold in the whipped topping with a rubber spatula. Be careful not to overmix—you want it fluffy, not flat! This creamy layer is the secret to balancing the cake and cookie crumbs. I always sneak a spoonful because, well, quality control.
Step 3: Crush the Cookies
Time to make that “dirt”! If you’ve got a food processor, pulse the chocolate sandwich cookies until they’re fine crumbs. No processor? No problem! Toss the cookies into a zip-top bag and go at them with a rolling pin. It’s oddly satisfying, and you’ll end up with the perfect texture. Just make sure there are no big chunks—unless you’re going for “rocky dirt,” which, honestly, sounds kinda cool too.
Step 4: Assemble the Graveyard
Now for the fun part! In your serving dish, layer the cake, pudding mixture, and cookie crumbs. I like to start with cake, then pudding, and finish with a generous layer of “dirt.” Don’t be shy—pile it on! Then, stick in the gummy worms so they look like they’re crawling out of the ground. Add the plastic tombstones for that eerie graveyard vibe. Chill it in the fridge for at least an hour before serving. This lets all the flavors meld together and makes it easier to slice. Trust me, it’s worth the wait!
Tips for the Best Graveyard Dirt Cake
After years of perfecting this spooky dessert (and plenty of “oops” moments), here are my foolproof tips for graveyard dirt cake success:
- Chill it like it’s haunted: That hour in the fridge isn’t just for looks—it lets the pudding set so your layers stay picture-perfect when scooped.
- Clear cups = wow factor: For parties, I layer individual portions in plastic cups so everyone sees those creepy-crawly layers.
- Crumb control: If your cookie “dirt” sticks to the bag, add 1 tsp of pudding powder to absorb moisture and prevent clumping.
- Last-minute decor: Add tombstones right before serving so they don’t sink into the edible earth!
Bonus: Leftovers? They taste even better the next day—if they last that long!
Graveyard Dirt Cake Variations
Once you’ve mastered the classic version, it’s time to play mad scientist with your graveyard dirt cake! Here are my favorite twists to keep things fresh (or should I say… freshly dug up?):
- Candy bone yard: Toss in some candy bones or skeleton parts for an extra-creepy archeological dig theme. Perfect for dinosaur-loving kids!
- Vanilla ghost town: Swap chocolate pudding for vanilla and use golden Oreos as “sand.” Top with marshmallow ghosts for a spooky contrast.
- Peanut butter plot: Mix peanut butter into the pudding layer and use Nutter Butters for the “dirt”—so good it’s scary!
- Zombie apocalypse: Add red jelly “blood” between layers and stand gummy worms upright like they’re rising from the grave.
The best part? You can reinvent this dessert every Halloween. What spooky spin will you try first?
Serving & Storage
This graveyard dirt cake is best served chilled, straight from the fridge. The cool temperature keeps the layers firm and makes it easier to scoop. If you’re serving at a party, let it sit out for about 10 minutes to take the edge off the chill—just don’t leave it out too long, especially if it’s warm outside. Leftovers? Cover tightly with plastic wrap or transfer to an airtight container. It’ll stay fresh in the fridge for up to 3 days—if it lasts that long!
Graveyard Dirt Cake Nutritional Information
Okay, let’s be real—this graveyard dirt cake isn’t winning any health food awards (unless “Most Delicious Way to Haunt Your Taste Buds” counts). But hey, it’s Halloween! Here’s the nutritional breakdown per serving—just remember, these are rough estimates since brands vary:
- Serving Size: 1 slice (about 1/12 of a 9×13-inch cake)
- Calories: Around 350 – consider it fuel for trick-or-treating!
- Sugar: 25g (blame those sneaky gummy worms)
- Sodium: 400mg – mostly from the pudding and cookie layers
- Fat: 12g (but it’s the good kind… because chocolate)
- Carbohydrates: 55g – perfect for a post-haunted house sugar rush
Important note: These numbers can swing wildly depending on your brands. Using sugar-free pudding? Low-fat whipped topping? Different cookie varieties? Your mileage may vary. Always check labels if you’re tracking specifics—but honestly, on Halloween night, I say savor every creepy, chocolatey bite!
FAQs About Graveyard Dirt Cake
I get SO many questions about this graveyard dirt cake—especially when October rolls around. Here are the answers to everything you’ve been dying to ask (see what I did there?).
Can I Use Homemade Cake?
Absolutely! My grandmother’s chocolate cake recipe works beautifully here—it’s extra moist and rich. But let’s be honest: when you’re elbow-deep in glitter glue and fake spiderwebs for costumes, store-bought cake is a lifesaver. No shame in that game! Just make sure whatever cake you use is completely cooled before layering.
How Far in Advance Can I Decorate?
Here’s my rule of thumb: assemble the cake layers up to a day ahead, but wait to add tombstones and gummy worms until right before serving. Those sneaky worms start to “melt” into the pudding after a few hours! Plastic tombstones can go in earlier, but I like them crisp-looking—so last-minute decor keeps everything photo-ready.
How Long Does Graveyard Dirt Cake Last?
In our house? About 37 minutes. But realistically, covered tightly in the fridge, it stays delicious for 3 days. The cookie crumbs soften over time (which some people LOVE), so if you prefer crunchier “dirt,” assemble individual portions closer to serving.
Can I Make This Entirely No-Bake?
You bet! Skip the cake layer entirely and just alternate pudding with cookie crumbs—instant dirt! Or use crushed chocolate graham crackers as your base. It’ll be denser but still deliciously eerie.
Got more questions? Drop ’em in the comments—and show me your spooky creations! Did you add zombie hands? Turn it into a witch’s cauldron? I wanna see!
PrintSpooky Graveyard Dirt Cake Haunts Your Taste Buds

A spooky and delicious dessert perfect for Halloween or themed parties. This graveyard dirt cake combines chocolate, cookies, and gummy worms for a fun and eerie treat.
- Prep Time: 20 minutes
- Cook Time: 30 minutes
- Total Time: 1 hour 50 minutes
- Yield: 12 servings 1x
- Category: Dessert
- Method: Baking
- Cuisine: American
- Diet: Vegetarian
Ingredients
- 1 package chocolate cake mix
- 1 cup milk
- 1 package instant chocolate pudding mix
- 1 container whipped topping
- 1 package chocolate sandwich cookies
- Gummy worms for decoration
- Plastic tombstones for decoration
Instructions
- Prepare the chocolate cake mix according to the package instructions. Let it cool completely.
- In a separate bowl, mix the instant chocolate pudding with milk until thickened. Fold in the whipped topping.
- Crush the chocolate sandwich cookies into fine crumbs using a food processor or by placing them in a bag and crushing with a rolling pin.
- Layer the cake, pudding mixture, and cookie crumbs in a serving dish or individual cups, starting with cake, then pudding, and topping with cookie crumbs.
- Decorate with gummy worms and plastic tombstones to create a graveyard scene.
- Chill in the refrigerator for at least 1 hour before serving.
Notes
- You can use store-bought chocolate cake instead of making it from scratch.
- Add more decorations like candy bones or ghosts for extra spookiness.
- Serve in clear cups for a layered effect.
Nutrition
- Serving Size: 1 slice
- Calories: 350
- Sugar: 25g
- Sodium: 400mg
- Fat: 12g
- Saturated Fat: 5g
- Unsaturated Fat: 6g
- Trans Fat: 0g
- Carbohydrates: 55g
- Fiber: 2g
- Protein: 5g
- Cholesterol: 10mg