Spooky 2-Step Creepy Spiderweb Cake Haunts Halloween
Oh my gosh, you’re going to love this creepy spiderweb cake—it’s the perfect mix of spooky and delicious! Every Halloween, my kitchen turns into a mad scientist’s lab, and this recipe is my absolute favorite creation. I’ve been making it for years, tweaking and perfecting until I got that eerie marbled effect just right. The secret? Swirling jet-black chocolate batter with a rich, dark crumb, then drizzling it with glossy white chocolate webs that look straight out of a haunted house. Trust me, this isn’t just a cake—it’s a showstopper. And the best part? It’s way easier to make than it looks!
Ingredients for Creepy Spiderweb Cake
Okay, let’s gather our potion ingredients—I mean, cake ingredients! Here’s everything you’ll need to whip up this spooky masterpiece. I’ve learned the hard way that precise measurements make all the difference, so don’t eyeball it unless you want a baking disaster (been there, done that).
Dry Ingredients
- 2 cups all-purpose flour (spooned and leveled, please!)
- 1 1/2 cups granulated sugar
- 3/4 cup unsweetened cocoa powder (the darker, the creepier)
- 1 1/2 teaspoons baking powder
- 1 1/2 teaspoons baking soda
- 1 teaspoon salt
Wet Ingredients
- 2 large eggs (room temperature—they mix better)
- 1 cup whole milk (2% works in a pinch)
- 1/2 cup vegetable oil
- 2 teaspoons vanilla extract
- 1 cup boiling water (yes, really boiling—it makes the cake extra moist)
For That Spooky Touch
- Black food coloring gel (liquid just doesn’t give that deep, dark color)
- 1 cup white chocolate chips (for the web—don’t skimp!)
- 1/2 cup heavy cream (to melt the chocolate into silky perfection)
See? Nothing too weird or hard to find. Just make sure you’ve got everything measured and ready before you start—trust me, scrambling for ingredients mid-bake is how cake disasters happen!
How to Make Creepy Spiderweb Cake
Alright, let’s get creepy! This cake comes together in simple steps, but I’ll walk you through each one so you get that perfect spooky effect. Grab your favorite mixing bowl and let’s make some Halloween magic!
Preparing the Cake Batter
First things first: preheat that oven to 350°F (175°C) and grease your pan really well. I learned the hard way – nothing’s scarier than a cake that won’t come out of the pan!
- Whisk all your dry ingredients together in a big bowl. Get ’em nice and combined – no cocoa powder lumps allowed!
- Add eggs, milk, oil and vanilla. Mix just until smooth – overmixing makes tough cake, and we want tender crumb for our spider’s lair.
- Now for the secret weapon: slowly pour in that boiling water while mixing. The batter will look crazy thin, but don’t panic! This gives us that super moist texture.
Creating the Spiderweb Effect
Here’s where the fun begins:
- Divide your batter into two bowls. Add black gel coloring to one portion – go darker than you think! Liquid coloring won’t give that inky look.
- Alternate spoonfuls of the black and regular batter into your prepared pan. Don’t worry about being neat – chaos makes better webs!
- Take a butter knife and gently swirl through the batter just 2-3 times. Overdo it and you’ll lose the marbled effect. Bake for 30-35 minutes until a toothpick comes out clean.
- Let it cool completely – I mean completely! Warm cake makes melty spiderwebs, and we want crisp, creepy designs.
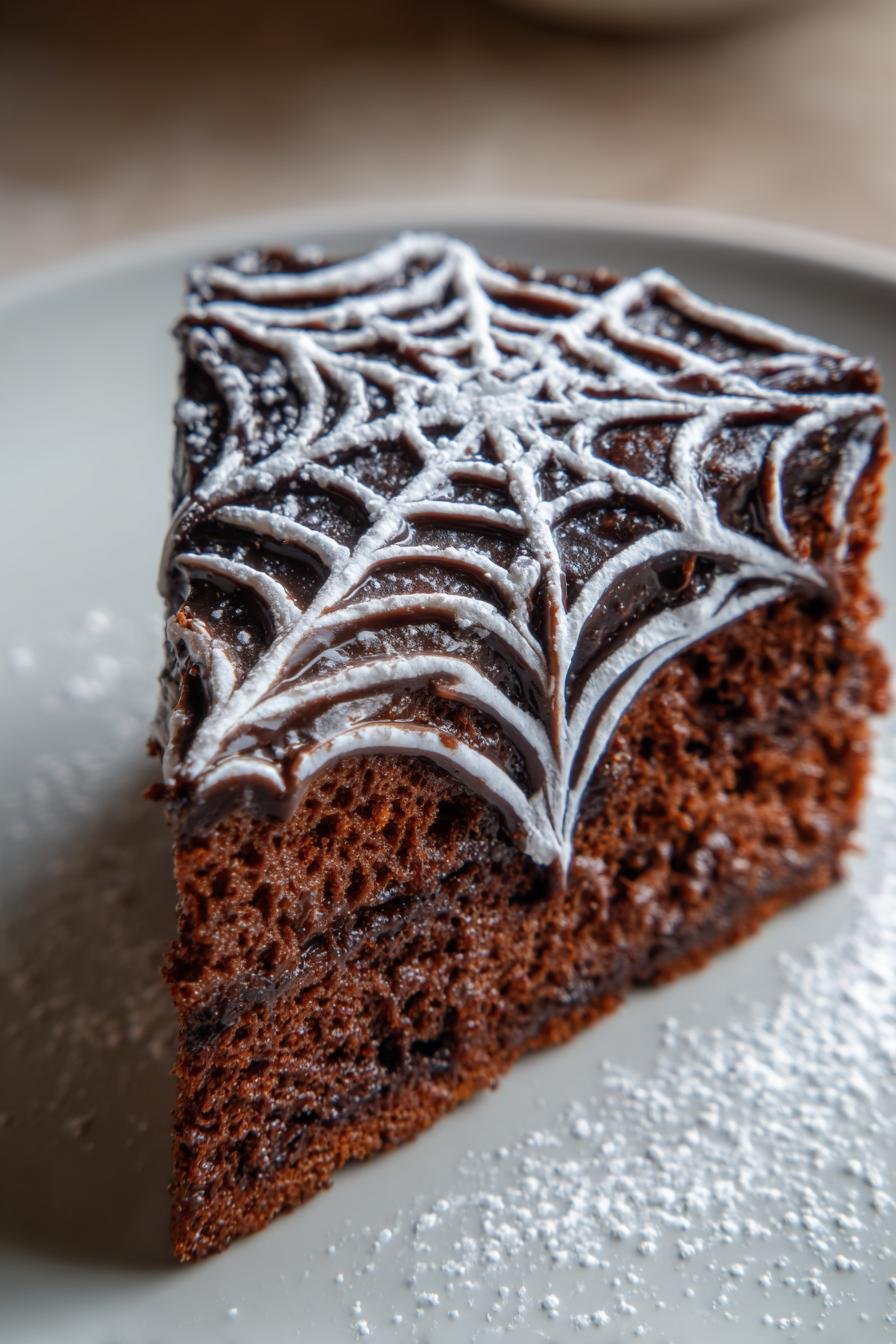
Decorating with White Chocolate
The grand finale!
- Heat cream until just simmering, then pour over white chocolate chips. Let sit 2 minutes before stirring into glossy perfection.
- Transfer to a piping bag (or ziplock with corner snipped) and start in the center. Make concentric circles, then drag a toothpick from center outward to create web strands.
- Let set 15 minutes before serving. The chocolate firms up but stays slightly soft – just like real spider silk!
There you have it – a cake that looks like it crawled straight out of a haunted house! The contrast of dark cake against those white webs always gets gasps at my Halloween parties.
Tips for Perfect Creepy Spiderweb Cake
Want your creepy spiderweb cake to be the star of the Halloween party? Here are my tried-and-true tips to nail it every time:
- Use gel food coloring: Liquid just won’t give you that deep, inky black. Gel coloring is more concentrated, so your batter stays dark and dramatic.
- Cool completely before decorating: Warm cake = melty spiderwebs. Trust me, waiting is worth it for those crisp, creepy designs.
- Swirl gently: Only 2-3 swirls with a knife! Overdo it, and you’ll lose the marbled effect. A little chaos goes a long way.
- No piping bag? No problem: Use a ziplock bag with the corner snipped off. It works just as well for drizzling that white chocolate web.
- Experiment with patterns: Try different web designs—zigzags, spirals, or even a spider silhouette. Have fun with it!
Ingredient Substitutions & Notes
Don’t panic if you’re missing something—we can work around it! Here’s how to adapt this recipe without losing that spooky magic:
- Dairy-free? Swap the milk for almond or oat milk—just make sure it’s unsweetened. For the cream in the glaze, coconut cream works beautifully.
- Cocoa powder: Dutch-processed gives a darker, richer color, but natural unsweetened cocoa works too (your web might just look a tad lighter).
- No black gel coloring? You gotta get some—liquid food coloring turns the batter gray and watery. In a pinch, mix equal parts blue, red, and green gel to make black.
- White chocolate chips: If you only have bars, chop them finely so they melt evenly. And no, candy melts won’t give the same glossy finish!
Remember: some ingredients are non-negotiable for that perfect creepy effect. But with these swaps, you’ll still end up with a cake that’s deliciously spooky!
Serving and Storing Creepy Spiderweb Cake
This cake is made to be the star of your Halloween spread! I love serving it with ghoulish touches—think dry ice “fog” underneath the cake stand or plastic spiders crawling up the sides. For parties, pair it with witch’s brew punch or caramel-dipped apple slices for a full spooky dessert table.
Leftovers? Ha! Like there’ll be any. But if you miraculously have some, store it in an airtight container at room temp for up to 3 days. The chocolate web stays perfect, though I recommend eating it within 48 hours for that fresh-baked texture. No fridge—that’ll dry it out faster than a vampire in sunlight!
Creepy Spiderweb Cake Nutritional Info
Okay, let’s be real—this cake isn’t health food (it’s Halloween, people!), but here’s the scoop per slice: about 320 calories, 15g fat, and 45g carbs. These numbers are estimates based on my exact ingredients—your favorite brands might tweak things slightly. The cocoa gives you a tiny fiber boost (2g!), and there’s 5g protein hiding under all that spooky sweetness. Enjoy every creepy bite!
FAQs About Creepy Spiderweb Cake
Got questions? I’ve got answers! Here are the things people ask me most about this spooky cake:
Can I use regular food coloring instead of gel?
Oh honey, don’t even try it! Liquid coloring will turn your batter gray and watery. Gel’s the way to go—it’s super concentrated so you get that inky black color without messing up the batter texture. In a pinch, mix blue, red, and green gel to make your own black.
Help—my white chocolate glaze is too runny!
No worries! Just add more melted chocolate a tablespoon at a time until it thickens. Too thick? A teaspoon of warm cream will loosen it up. The perfect glaze should drizzle slowly off a spoon—not pour like soup!
Can I make this cake ahead of time?
Absolutely! Bake it up to 2 days before and store at room temp (tightly wrapped). Wait to add the chocolate web until the day of serving though—it stays prettiest when fresh. The cake actually tastes better the next day as the flavors meld!
Why does the batter look so thin?
That boiling water makes it crazy runny on purpose! It bakes up moist and tender. Just trust the process—I promise it works. My first time making it, I nearly panicked and added flour. So glad I didn’t!
Share Your Creepy Creation!
I live for seeing your spooky cake masterpieces! Snap a pic of your creepy spiderweb creation and tag me—I wanna see those swirling webs and hear how it scared your guests. Bonus points if you add plastic spiders crawling up the sides! Use #CreepySpiderwebCake so we can all marvel at your Halloween baking skills.
PrintSpooky 2-Step Creepy Spiderweb Cake Haunts Halloween

A spooky and delicious creepy spiderweb cake perfect for Halloween or themed parties.
- Prep Time: 20 minutes
- Cook Time: 35 minutes
- Total Time: 55 minutes
- Yield: 12 servings 1x
- Category: Dessert
- Method: Baking
- Cuisine: American
- Diet: Vegetarian
Ingredients
- 2 cups all-purpose flour
- 1 1/2 cups granulated sugar
- 3/4 cup unsweetened cocoa powder
- 1 1/2 tsp baking powder
- 1 1/2 tsp baking soda
- 1 tsp salt
- 2 large eggs
- 1 cup whole milk
- 1/2 cup vegetable oil
- 2 tsp vanilla extract
- 1 cup boiling water
- Black food coloring gel
- 1 cup white chocolate chips
- 1/2 cup heavy cream
Instructions
- Preheat your oven to 350°F. Grease and flour a cake pan.
- In a large bowl, mix flour, sugar, cocoa powder, baking powder, baking soda, and salt.
- Add eggs, milk, oil, and vanilla extract. Mix until smooth.
- Gradually stir in boiling water. The batter will be thin.
- Divide the batter into two bowls. Add black food coloring to one portion.
- Pour the batters into the pan, alternating colors. Swirl gently with a knife.
- Bake for 30-35 minutes or until a toothpick comes out clean. Let it cool.
- Melt white chocolate chips with heavy cream. Stir until smooth.
- Drizzle the white chocolate over the cake in a spiderweb pattern.
- Serve and enjoy your creepy creation.
Notes
- Use gel food coloring for vibrant black color.
- Allow the cake to cool completely before decorating.
- Experiment with different patterns for the spiderweb design.
Nutrition
- Serving Size: 1 slice
- Calories: 320
- Sugar: 25g
- Sodium: 300mg
- Fat: 15g
- Saturated Fat: 5g
- Unsaturated Fat: 8g
- Trans Fat: 0g
- Carbohydrates: 45g
- Fiber: 2g
- Protein: 5g
- Cholesterol: 40mg