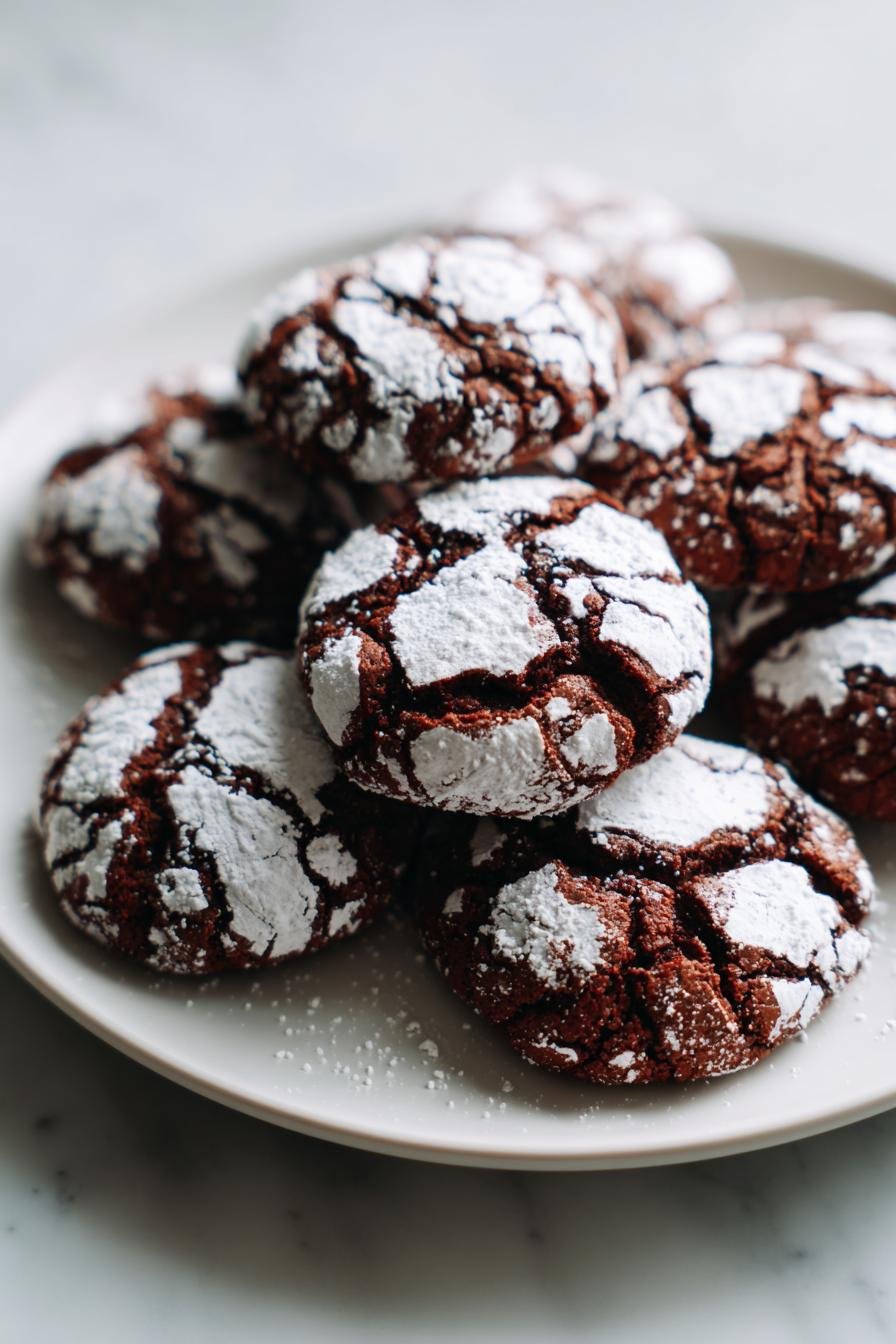
Chocolate crinkle cookies that will wow your taste buds!
Introduction to Chocolate Crinkle Cookies
Ah, chocolate crinkle cookies! Just the name makes my heart flutter. These delightful treats are not only a feast for the eyes but also a quick solution for those busy days when you need a sweet pick-me-up. I remember the first time I baked them; the kitchen filled with a rich, chocolatey aroma that made my family gather around, eager to taste. Whether you’re looking to impress guests or simply want to indulge after a long day, these cookies are the perfect answer. Trust me, once you try them, you’ll be hooked!
Why You’ll Love This Chocolate Crinkle Cookies
These chocolate crinkle cookies are a dream come true for busy moms and professionals alike. They come together in just a few simple steps, making them perfect for a last-minute dessert. The rich, fudgy texture is simply irresistible, and the powdered sugar coating gives them that wow factor. Plus, they’re versatile enough for any occasion, whether it’s a family gathering or a cozy night in. You’ll love how quickly they disappear!
Ingredients for Chocolate Crinkle Cookies
Gathering the right ingredients is the first step to creating these delightful chocolate crinkle cookies. Here’s what you’ll need:
- All-purpose flour: This is the base of your cookies, providing structure and a soft texture.
- Unsweetened cocoa powder: The star of the show! It gives the cookies their rich chocolate flavor.
- Granulated sugar: This sweetens the dough and helps create that lovely chewy texture.
- Brown sugar: Adds moisture and a hint of caramel flavor, making the cookies even more delicious.
- Vegetable oil: Keeps the cookies moist and fudgy, ensuring they don’t dry out.
- Large eggs: They bind everything together and contribute to the cookies’ soft texture.
- Vanilla extract: A splash of this enhances the overall flavor, making each bite more delightful.
- Baking powder: This leavening agent helps the cookies rise slightly, giving them a perfect texture.
- Salt: Just a pinch balances the sweetness and enhances the chocolate flavor.
- Powdered sugar: For rolling the cookies, it gives them that signature snowy appearance.
For those looking to experiment, consider using dark cocoa powder for a richer flavor. You can also substitute vegetable oil with melted coconut oil for a hint of tropical taste. If you’re in a pinch, you can find all these ingredients at your local grocery store, and exact quantities are available at the bottom of the article for easy printing!
How to Make Chocolate Crinkle Cookies
Now that you have your ingredients ready, let’s dive into the fun part—making these chocolate crinkle cookies! Follow these simple steps, and you’ll have a batch of delicious cookies in no time.
Step 1: Preheat the Oven
First things first, preheat your oven to 350°F (175°C). This step is crucial because it ensures that your cookies bake evenly. A hot oven helps them rise and develop that lovely crinkle effect. Trust me, you don’t want to skip this part!
Step 2: Mix Dry Ingredients
In a medium bowl, combine the all-purpose flour, unsweetened cocoa powder, baking powder, and salt. Whisk them together until they’re well blended. This helps distribute the baking powder evenly, ensuring your cookies rise perfectly. Plus, it’s a great way to get those chocolatey aromas wafting through your kitchen!
Step 3: Combine Wet Ingredients
In another bowl, whisk together the granulated sugar, brown sugar, and vegetable oil until it’s smooth and creamy. This step is important because it helps dissolve the sugars, creating a lovely base for your cookies. The mixture should look glossy and inviting—just like a warm hug!
Step 4: Add Eggs and Vanilla
Now, crack in the eggs and add the vanilla extract. Whisk everything together until it’s well combined. The eggs add moisture and richness, while the vanilla enhances the overall flavor. It’s like adding a sprinkle of magic to your dough!
Step 5: Combine Wet and Dry Mixtures
Gradually add the dry ingredients to the wet mixture. Stir gently until just combined. Be careful not to overmix; you want to keep that fudgy texture. A few flour streaks are okay—this is where the magic happens!
Step 6: Chill the Dough
Cover the bowl with plastic wrap and chill the dough in the refrigerator for about 30 minutes. Chilling is key! It firms up the dough, making it easier to shape and ensuring your cookies don’t spread too much while baking. Plus, it intensifies the flavors!
Step 7: Shape the Cookies
Once the dough is chilled, scoop out tablespoon-sized portions and roll them into balls. Try to keep them uniform in size for even baking. This step is like crafting little chocolate treasures, and your kids might love to help with this part!
Step 8: Coat in Powdered Sugar
Roll each dough ball in powdered sugar until they’re fully coated. This gives your cookies that signature snowy appearance. It’s like dressing them up for a fancy party! Make sure they’re well coated for that beautiful contrast against the dark chocolate.
Step 9: Bake the Cookies
Place the cookies on a baking sheet lined with parchment paper, spacing them about 2 inches apart. Bake for 10-12 minutes, or until the edges are set but the centers are still soft. Keep an eye on them; you want that perfect balance of chewy and fudgy!
Step 10: Cool and Enjoy
Once baked, let the cookies cool on the baking sheet for a few minutes before transferring them to a wire rack. This cooling time allows them to firm up a bit. Then, enjoy the fruits of your labor! Each bite will be a delightful explosion of chocolatey goodness.
Tips for Success
- Measure your ingredients accurately for the best results.
- Don’t skip the chilling step; it’s crucial for texture.
- Use a cookie scoop for uniform sizes.
- Keep an eye on the baking time; every oven is different.
- Let the cookies cool completely for the best flavor.
Equipment Needed
- Mixing bowls: Use any size you have; just ensure they’re large enough for mixing.
- Whisk: A fork works too if you don’t have one handy!
- Baking sheet: A regular sheet will do, but parchment paper is a must for easy cleanup.
- Cookie scoop: A tablespoon works just as well for portioning the dough.
- Wire rack: If you don’t have one, a plate will suffice for cooling.
Variations
- Mint Chocolate Crinkle Cookies: Add a few drops of peppermint extract to the dough for a refreshing twist.
- Nutty Delight: Fold in chopped walnuts or pecans for added crunch and flavor.
- Gluten-Free Option: Substitute all-purpose flour with a gluten-free blend for a delicious alternative.
- Vegan Version: Replace eggs with flaxseed meal mixed with water and use a plant-based oil.
- Spicy Kick: Add a pinch of cayenne pepper or cinnamon for a surprising flavor boost.
Serving Suggestions
- Pair these chocolate crinkle cookies with a glass of cold milk for a classic treat.
- Serve them warm with a scoop of vanilla ice cream on top for an indulgent dessert.
- For a festive touch, arrange them on a decorative platter with fresh berries.
- Dust with extra powdered sugar just before serving for a beautiful presentation.
FAQs about Chocolate Crinkle Cookies
Can I use cocoa powder instead of dark cocoa powder?
Absolutely! While dark cocoa powder gives a richer flavor, regular unsweetened cocoa powder works just fine. Your chocolate crinkle cookies will still be delicious!
How do I store leftover cookies?
Store your chocolate crinkle cookies in an airtight container at room temperature for up to a week. If you want to keep them longer, freeze them for up to three months!
Can I make the dough ahead of time?
Yes! You can prepare the dough and chill it in the refrigerator for up to 24 hours. Just remember to let it sit at room temperature for a few minutes before shaping and baking.
Why are my cookies flat?
Flat cookies can happen if the dough isn’t chilled long enough or if you overmixed it. Make sure to follow the chilling step and mix gently to keep that fudgy texture!
Can I add chocolate chips to the dough?
Definitely! Adding chocolate chips will enhance the chocolate flavor and add a delightful texture. Just fold them in gently before chilling the dough.
Final Thoughts
Making chocolate crinkle cookies is more than just baking; it’s about creating sweet memories in the kitchen. The joy of watching them puff up and crackle is a delight, and the aroma that fills your home is simply irresistible. Each bite offers a rich, fudgy experience that brings smiles to faces, young and old alike. Whether you’re sharing them with family or enjoying a quiet moment with a cup of coffee, these cookies are sure to brighten your day. So, roll up your sleeves and dive into this delicious adventure—you won’t regret it!
PrintChocolate crinkle cookies that will wow your taste buds!

Deliciously rich and fudgy chocolate crinkle cookies that are perfect for any occasion.
- Prep Time: 15 minutes
- Cook Time: 12 minutes
- Total Time: 57 minutes
- Yield: 24 cookies 1x
- Category: Dessert
- Method: Baking
- Cuisine: American
- Diet: Vegetarian
Ingredients
- 1 cup all-purpose flour
- 1/2 cup unsweetened cocoa powder
- 1 cup granulated sugar
- 1/2 cup brown sugar
- 1/2 cup vegetable oil
- 2 large eggs
- 1 teaspoon vanilla extract
- 1/2 teaspoon baking powder
- 1/4 teaspoon salt
- 1/2 cup powdered sugar for dusting
Instructions
- Preheat your oven to 350°F (175°C).
- In a bowl, mix together the flour, cocoa powder, baking powder, and salt.
- In another bowl, whisk together the granulated sugar, brown sugar, and vegetable oil until well combined.
- Add the eggs and vanilla extract to the sugar mixture and mix until smooth.
- Gradually add the dry ingredients to the wet ingredients and mix until just combined.
- Chill the dough in the refrigerator for about 30 minutes.
- Once chilled, scoop out tablespoon-sized portions of dough and roll them into balls.
- Roll each ball in powdered sugar until fully coated.
- Place the cookies on a baking sheet lined with parchment paper, spacing them about 2 inches apart.
- Bake for 10-12 minutes, or until the edges are set but the centers are still soft.
- Allow to cool on the baking sheet for a few minutes before transferring to a wire rack to cool completely.
Notes
- For a richer flavor, use dark cocoa powder.
- Store cookies in an airtight container for up to a week.
- These cookies can be frozen for up to 3 months.
Nutrition
- Serving Size: 1 cookie
- Calories: 120
- Sugar: 10g
- Sodium: 50mg
- Fat: 5g
- Saturated Fat: 1g
- Unsaturated Fat: 3g
- Trans Fat: 0g
- Carbohydrates: 17g
- Fiber: 1g
- Protein: 2g
- Cholesterol: 20mg