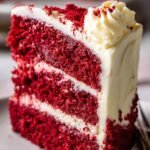
Bloody Red Velvet Cake: 2 Epic Layers of Sensational Sweet

Oh, that first slice gets me every single time. When you cut into a perfect Bloody red velvet cake and see that deep, dramatic crimson crumb against the snowy white cream cheese frosting… wow. It’s just magic. I’ve been baking this cake for what feels like forever, ever since my grandma let me stir the batter as a kid, and I’ve learned a thing or two about getting that color and flavor just right. It’s not just a dessert; it’s a showstopper that always has everyone asking for the recipe.
Why You’ll Love This Bloody Red Velvet Cake
Listen, this isn’t just any red velvet cake—it’s the kind that makes people stop mid-conversation when you bring it out. Here’s why you’re going to adore it:
- That jaw-dropping color: We’re talking deep, dramatic red—like Valentine’s Day and Christmas had a cake baby. Gel food coloring gives it that “bloody” intensity that makes everyone go “Whoa!” before they even taste it.
- Moist for days: Buttermilk and oil keep this cake unbelievably tender, even after refrigeration. No sad, dry slices here!
- Perfect balance: Just enough cocoa to whisper “chocolate” without overpowering that classic red velvet flavor you crave.
- Foolproof texture: The vinegar-baking soda reaction gives it the lightest, fluffiest crumb—no brick-like cakes on my watch.
- Showstopper status: Top it with cream cheese frosting (my personal obsession), and you’ve got a dessert that looks as incredible as it tastes.
Trust me, this is the cake that’ll have friends begging you to bring dessert to every gathering. And the secret? It’s actually easier to make than it looks.
Ingredients for Bloody Red Velvet Cake
Okay, let’s gather our weapons for this delicious battle! Here’s everything you’ll need for that perfect bloody red velvet cake – and yes, I’m picky about these ingredients because they make all the difference:
- 2 1/2 cups all-purpose flour: Spoon and level it, don’t scoop – we want perfect texture!
- 1 1/2 cups granulated sugar: Regular white sugar works best here for that clean sweetness.
- 1 tsp baking soda: Our lifting agent – make sure it’s fresh!
- 1 tsp cocoa powder: Just enough for that signature red velvet whisper of chocolate.
- 1 tsp salt: Trust me, it balances the sweetness perfectly.
- 2 large eggs: Room temperature, always – they incorporate better.
- 1 1/2 cups vegetable oil: The secret to that unbelievable moisture.
- 1 cup buttermilk: The tangy magic that makes red velvet, well, red velvet.
- 2 tbsp red food coloring: Gel recommended – it gives that dramatic color without thinning the batter.
- 1 tsp vanilla extract: Real vanilla, please – no imitations!
- 1 tsp white vinegar: This reacts with the baking soda for that perfect rise.
See? Nothing too fancy, just quality ingredients combined the right way. Now let’s make some cake magic!
Equipment Needed for Bloody Red Velvet Cake
Before we dive in, let’s grab our gear! You’ll need:
- Two 9-inch round cake pans (I like light-colored ones for even baking)
- Mixing bowls (one large, one medium)
- Electric mixer (hand or stand – both work great)
- Whisk and rubber spatula
- Wire rack for cooling
- Measuring cups and spoons
That’s it – no fancy gadgets required! Just good old-fashioned baking tools.
How to Make Bloody Red Velvet Cake
Alright, let’s do this! I’ve made this cake so many times I could probably do it in my sleep – but don’t worry, I’ll walk you through every step to ensure your bloody red velvet turns out perfect. Just follow along and resist the urge to peek in the oven too much!
Preparing the Batter
First things first – preheat that oven to 350°F (175°C) and grease those cake pans really well. I like to line the bottoms with parchment paper too – makes removing the cakes so much easier!
Now, in your large bowl, whisk together the dry ingredients: flour, sugar, baking soda, cocoa powder, and salt. Get them nice and combined – no cocoa lumps allowed! In your other bowl, whisk the eggs lightly, then add the oil, buttermilk, food coloring, vanilla, and vinegar. This is where the magic starts – that vibrant red color will have you grinning already.
Here’s the key part: pour the wet ingredients into the dry and mix just until combined. I mean it – stop when you stop seeing flour streaks! Overmixing is the enemy of tender cake. A few small lumps are totally fine – they’ll work themselves out in the oven.
Baking the Cake
Divide that gorgeous red batter evenly between your prepared pans. Pro tip: I use a kitchen scale to ensure perfect even layers – about 22 ounces per pan does the trick.
Slide them into the middle rack of your preheated oven and set your timer for 25 minutes. Don’t open the door early – we need that steady heat! At 25 minutes, do the toothpick test. If it comes out with moist crumbs (not wet batter), you’re golden. If not, give it another 3-5 minutes. These usually take 25-30 minutes total in my oven, but every oven lies a little, so trust the toothpick more than the clock.
Cooling and Frosting
When they’re done, let the cakes cool in their pans for exactly 10 minutes – this helps them set but prevents sticking. Then run a knife around the edges, flip onto a wire rack, and carefully peel off the parchment. Now comes the hard part: walk away and let them cool completely! I know it’s tempting, but frosting a warm cake is a recipe for melty disaster.
Once cooled, slather on that cream cheese frosting (you did make extra, right?) between the layers and all over. Smooth it or swirl it – your call. The contrast of bright red against white frosting is what makes this cake so stunning. And voila! You’ve just made a showstopping bloody red velvet cake that’ll have everyone begging for seconds.
Tips for Perfect Bloody Red Velvet Cake
After making this cake more times than I can count, I’ve picked up some tricks that’ll guarantee your bloody red velvet turns out perfect every single time:
- Go for gel coloring: That liquid stuff just won’t give you the same deep, dramatic red. The gel packs serious color punch without thinning your batter.
- Mix with a light hand: The moment you stop seeing flour streaks, STOP mixing! Overworked batter means a dense cake, and we want that beautiful, tender crumb.
- Room temp is key: Take those eggs and buttermilk out an hour before – they’ll incorporate so much better into your batter.
- Chill before slicing: Pop the frosted cake in the fridge for 30 minutes before serving – the frosting sets beautifully and you’ll get those clean, sharp slices.
- Leftovers? No problem: This cake actually gets more moist by day two! Just keep it refrigerated under a cake dome.
Follow these simple tricks, and you’ll be the red velvet hero at every gathering!
Storage and Reheating Instructions
This beauty keeps beautifully in the fridge! Just cover it with a cake dome or loosely with plastic wrap – it’ll stay moist and delicious for up to 5 days. If you want to revive a slice, 10 seconds in the microwave brings back that just-baked magic. Cold or warm, it’s always heavenly!
Nutritional Information for Bloody Red Velvet Cake
One decadent slice of this bloody red velvet cake (about 1/12th of the cake) packs roughly:
- 350 calories
- 25g sugar
- 18g fat (3g saturated)
- 45g carbs
- 4g protein
Now listen – these numbers can dance around depending on your exact ingredients and how generously you frost! But let’s be real… this cake is pure celebration fuel. Worth every bite!
FAQs About Bloody Red Velvet Cake
Can I use liquid food coloring instead of gel?
Technically, yes, but I don’t recommend it. Liquid food coloring waters down your batter and won’t give you that deep, dramatic red we’re going for. Gel coloring is way more concentrated, so you get that bold “bloody” look without messing with your batter’s consistency.
Can I make this cake ahead of time?
Absolutely! In fact, I think it tastes even better the next day. Bake the cake layers, let them cool completely, then wrap them tightly in plastic wrap. They’ll stay fresh at room temperature for a day or in the fridge for up to 3 days. Frost it the day you plan to serve it for the freshest taste.
What if I don’t have buttermilk?
No worries! Make your own by mixing 1 cup of milk with 1 tablespoon of lemon juice or white vinegar. Let it sit for 5 minutes until it curdles slightly. It’s not quite the same, but it’ll do in a pinch!
Can I freeze the cake?
Yes! Wrap the unfrosted cake layers tightly in plastic wrap, then foil, and freeze for up to 3 months. Thaw overnight in the fridge before frosting. Just don’t freeze the frosted cake – cream cheese frosting doesn’t take kindly to freezing.
Why is my cake not bright red?
Two likely culprits: not enough food coloring or overbaking. Gel coloring is your best bet for that vibrant hue, and be sure to check your cake at the 25-minute mark – overbaking can dull the color. When in doubt, add a little extra gel coloring to the batter!
Bloody Red Velvet Cake: 2 Epic Layers of Sensational Sweet
A rich and moist red velvet cake with a deep red color and a hint of cocoa, topped with creamy frosting.
- Prep Time: 20 minutes
- Cook Time: 30 minutes
- Total Time: 50 minutes
- Yield: 12 servings 1x
- Category: Dessert
- Method: Baking
- Cuisine: American
- Diet: Vegetarian
Ingredients
- 2 1/2 cups all-purpose flour
- 1 1/2 cups granulated sugar
- 1 tsp baking soda
- 1 tsp cocoa powder
- 1 tsp salt
- 2 large eggs
- 1 1/2 cups vegetable oil
- 1 cup buttermilk
- 2 tbsp red food coloring
- 1 tsp vanilla extract
- 1 tsp white vinegar
Instructions
- Preheat oven to 350°F. Grease and flour two 9-inch cake pans.
- In a bowl, mix flour, sugar, baking soda, cocoa powder, and salt.
- In another bowl, beat eggs, oil, buttermilk, food coloring, vanilla, and vinegar.
- Combine wet and dry ingredients. Mix until smooth.
- Divide batter evenly between pans. Bake for 25-30 minutes.
- Cool cakes in pans for 10 minutes, then transfer to a wire rack.
- Frost with cream cheese frosting once completely cooled.
Notes
- Use gel food coloring for a deeper red color.
- Do not overmix the batter to keep the cake tender.
- Store leftovers in the refrigerator.
Nutrition
- Serving Size: 1 slice
- Calories: 350
- Sugar: 25g
- Sodium: 300mg
- Fat: 18g
- Saturated Fat: 3g
- Unsaturated Fat: 12g
- Trans Fat: 0g
- Carbohydrates: 45g
- Fiber: 1g
- Protein: 4g
- Cholesterol: 35mg