Spooktacular 20-Minute Bat-Shaped Cookies Recipe Unveiled
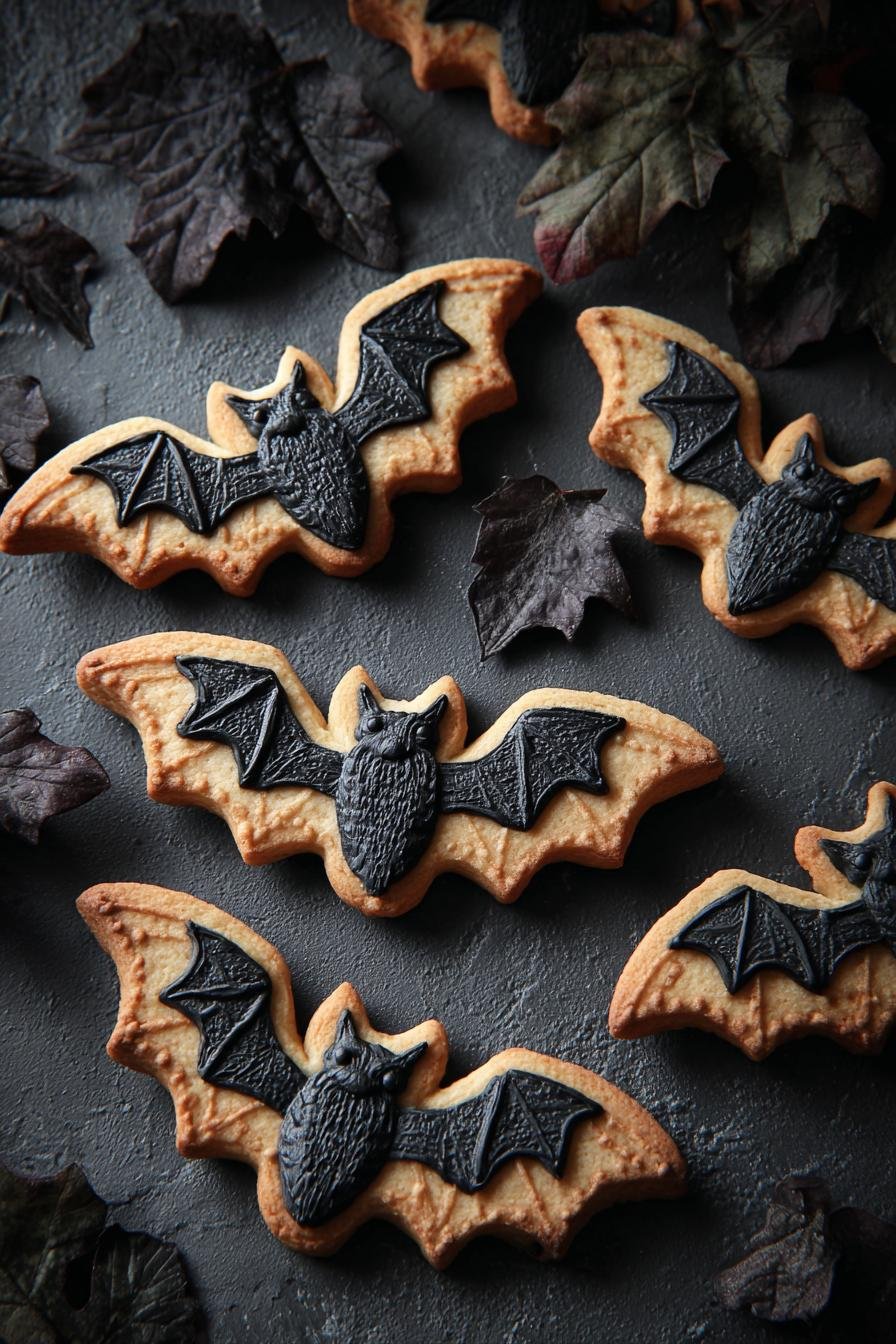
Is there anything better than biting into a homemade Halloween treat that looks as good as it tastes? Every October, my kitchen transforms into a spooky bakery, and these bat-shaped cookies always steal the show. I’ll never forget the first time I made them with my niece – her eyes lit up when she pressed the cookie cutter into the dough, and we spent the whole afternoon decorating them with googly candy eyes and edible glitter.
What I love most about this recipe is how simple it is. You don’t need fancy ingredients or pastry chef skills – just basic pantry staples and a little creativity. The dough comes together in minutes, and before you know it, you’ll have a swarm of delicious chocolate bats ready to take flight from your baking sheet. Over the years, I’ve perfected this recipe through countless Halloween parties and classroom treats (trust me, they’ve been kid-tested and approved!).
Whether you’re hosting a haunted house party or just want to surprise your family with something fun, these cookies always bring smiles. The best part? They’re sturdy enough for little hands to decorate but still melt-in-your-mouth tender. If you’re looking for a foolproof Halloween treat that’s equal parts adorable and delicious, you’ve found your recipe!
Why You’ll Love These Bat-Shaped Cookies
These bat-shaped cookies are a total crowd-pleaser, and here’s why you’ll adore them as much as I do:
- Super easy to make: Even if you’re not a baking pro, this recipe is foolproof. Just mix, roll, cut, and bake!
- Perfect for Halloween: Nothing says spooky season like a tray of adorable chocolate bats. They’re the ultimate festive treat.
- Fun for kids: Let them help with the cookie cutter and decorating – it’s a great activity for little ones (and big kids too!).
- Totally customizable: Go classic with black cookies, or get creative with icing, sprinkles, or even edible glitter.
- Great for parties: These cookies are a hit at Halloween gatherings, classroom treats, or just a fun family baking session.
Honestly, these bat-shaped cookies are more than just a recipe – they’re a memory-making machine. Trust me, once you try them, they’ll become your go-to Halloween tradition!
Ingredients for Bat-Shaped Cookies
Here’s everything you’ll need to whip up a batch of these spooky bat-shaped cookies:
- 2 1/4 cups all-purpose flour: The base of our dough – make sure to measure it correctly for the perfect texture.
- 1/2 teaspoon baking powder: Just enough to give the cookies a little lift without puffing them up too much.
- 1/2 teaspoon salt: To balance the sweetness and enhance the flavors.
- 3/4 cup unsalted butter, softened: Real butter is key here – it makes the cookies rich and tender.
- 3/4 cup granulated sugar: For that classic cookie sweetness.
- 1 large egg: Helps bind everything together.
- 1 teaspoon vanilla extract: Adds a hint of warm flavor – don’t skip it!
- Black food coloring (optional): For that extra spooky vibe.
That’s it! Simple, pantry-friendly ingredients that come together to create something truly magical.
Equipment You’ll Need
You don’t need fancy gadgets for these bat-shaped cookies, just a few basics:
- Mixing bowls: One large and one medium for combining ingredients.
- Electric mixer: Makes creaming the butter and sugar a breeze (but a sturdy whisk works too!).
- Rolling pin: For getting the dough just the right thickness – about 1/4 inch.
- Bat-shaped cookie cutter: The star of the show! Look for one with clear edges for clean cuts.
- Baking sheet: A standard one lined with parchment paper works perfectly.
That’s it – simple tools for a spooky-sweet result!
How to Make Bat-Shaped Cookies
Ready to create your own flock of delicious bat-shaped cookies? Follow these simple steps – I promise it’s easier than it looks!
- Preheat and prep: Start by heating your oven to 350°F (175°C). Line your baking sheets with parchment paper – this prevents sticking and makes cleanup a breeze.
- Mix dry ingredients: In a medium bowl, whisk together the flour, baking powder, and salt. This ensures they’re evenly distributed through your bat-shaped cookie dough.
- Cream butter and sugar: In a large bowl, beat the softened butter and sugar together until fluffy. I like to use an electric mixer, but you can use a sturdy wooden spoon if you prefer. The mixture should be light and creamy – this is the base for our perfect cookies!
- Add wet ingredients: Beat in the egg and vanilla extract until everything is well combined. The dough should look smooth and shiny at this point.
- Combine everything: Gradually mix in your dry ingredients. Go slow to avoid flour poofs! The dough will be slightly stiff but should hold together when pressed.
- Add color (optional): If you want spooky black bat-shaped cookies, now’s the time to add food coloring. Knead it in until you get an even color – wear gloves unless you want temporarily spooky hands too!
- Roll and cut: On a lightly floured surface, roll the dough to about 1/4-inch thickness. Press your bat-shaped cutter firmly into the dough. Pro tip: dip the cutter in flour between cuts to prevent sticking.
- Bake: Carefully transfer your bat shapes to the prepared baking sheets. Bake for 8-10 minutes – you’ll know they’re done when the edges look set but the centers are still soft.
- Cool: Let the cookies rest on the baking sheet for 2 minutes before moving them to a wire rack. They’ll firm up as they cool, so resist the urge to decorate immediately!
See? Making bat-shaped cookies is as easy as… well, making regular cookies with a fun twist! The hardest part is waiting for them to cool before decorating.
Tips for Perfect Bat-Shaped Cookies
After making countless batches of these bat-shaped cookies (some more successful than others – oops!), I’ve picked up some foolproof tricks to guarantee perfect results every time:
- Chill the dough if it’s sticky: Just 20-30 minutes in the fridge makes the dough much easier to handle when rolling and cutting those bat shapes.
- Black food coloring works best added to the dough: For truly spooky bats, knead in the coloring before rolling. Liquid gives deeper color than gel, but both work!
- Flour is your friend: Lightly dust your rolling pin, surface, and cookie cutter to prevent sticking without drying out the dough.
- Decorate after cooling: Wait until your bat-shaped cookies are completely cool before adding icing or sprinkles – otherwise, they’ll just melt right off.
- Store them right: Keep your spooky creations fresh in an airtight container at room temperature for up to 5 days (if they last that long!).
The best part about these bat-shaped cookies? Even the “mistakes” still taste amazing – so don’t stress and have fun with it!
Variations for Bat-Shaped Cookies
Once you’ve mastered the basic bat-shaped cookies, it’s time to get creative! Here are some of my favorite ways to mix things up:
- Chocolate bat attack: Replace 1/4 cup of flour with unsweetened cocoa powder for delicious chocolate bats – spooky and decadent!
- Glitter bats: Brush cooled cookies with a little corn syrup and sprinkle with edible glitter for magical, sparkly wings.
- Shape-shifting dough: No bat cutter? Use the same dough with ghost, pumpkin, or witch hat cutters for a Halloween assortment.
- Candy eyes: Press mini chocolate chips or candy eyes into the dough before baking for instant personality.
- Cinnamon bats: Add 1 teaspoon of cinnamon to the dry ingredients for a warm, spiced twist.
The possibilities are endless – let your Halloween spirit guide you!
Serving and Storing Bat-Shaped Cookies
These bat-shaped cookies are best served fresh when they’re still slightly crisp on the edges but soft in the center – perfect with a cold glass of milk! If you’re planning ahead (or somehow have leftovers), they keep beautifully in an airtight container at room temperature for up to 5 days. I like to layer them with parchment paper to prevent sticking. For that just-baked taste, pop them in a 300°F oven for 2-3 minutes to refresh. Pro tip: Undecorated bat-shaped cookies freeze great too – just thaw and decorate when ready to serve!
Nutritional Information for Bat-Shaped Cookies
Each delicious bat-shaped cookie (if you can stop at just one!) contains approximately:
- 120 calories
- 7g sugar
- 5g fat (3g saturated)
- 17g carbs
- 2g protein
Now, before you start counting every crumb – remember these are just estimates! Actual nutrition can vary based on your specific ingredients, how big you make your bats, and what decorations you add. The values are for the basic cookie without icing or extra toppings. But let’s be honest… when it comes to Halloween treats, sometimes the spooky fun matters more than the numbers, right?
FAQs About Bat-Shaped Cookies
Can I use a different cookie cutter? Absolutely! While bat-shaped cookies are perfect for Halloween, this dough works beautifully with any shape. I’ve used pumpkin, ghost, and even coffin cutters – just adjust baking times slightly if your shapes are much larger or smaller than bats.
How do I make the cookies really black? For the spookiest bats, knead black food coloring into the dough before rolling. Liquid coloring gives deeper color than gel, but either works. Start with a few drops and add more until you get that midnight-black shade. Warning: Your hands might look like you’ve been digging graves!
Can I freeze the dough? Yes! Wrap it tightly in plastic wrap and freeze for up to 3 months. Thaw overnight in the fridge before rolling. You can also freeze baked bat-shaped cookies – just hold off on decorating until after thawing.
How long do they stay fresh? Stored properly in an airtight container, these bat-shaped cookies stay delicious for about 5 days. If they last that long! The sugar content helps preserve them, but they’re usually gone well before freshness becomes an issue.
Can kids help decorate? Of course! That’s half the fun. Set up a decorating station with icing, sprinkles, and candy eyes. Just make sure the cookies are completely cooled first – melted icing is spooky in the wrong way!
Share Your Bat-Shaped Cookies
I’d love to see your spooky creations! Snap a photo of your bat-shaped cookies and tag me on social media – it’s so fun to see how everyone decorates them. If you tried this recipe, leave a comment below and let me know how it turned out. Did the kids love them? Did you add your own twist? Your feedback helps make this recipe even better for the next batch of bakers. Happy baking!
PrintSpooktacular 20-Minute Bat-Shaped Cookies Recipe Unveiled

Simple and fun bat-shaped cookies perfect for Halloween or any spooky occasion.
- Prep Time: 20 minutes
- Cook Time: 10 minutes
- Total Time: 30 minutes
- Yield: 24 cookies 1x
- Category: Dessert
- Method: Baking
- Cuisine: American
- Diet: Vegetarian
Ingredients
- 2 1/4 cups all-purpose flour
- 1/2 teaspoon baking powder
- 1/2 teaspoon salt
- 3/4 cup unsalted butter, softened
- 3/4 cup granulated sugar
- 1 large egg
- 1 teaspoon vanilla extract
- Black food coloring (optional)
Instructions
- Preheat the oven to 350°F (175°C).
- Whisk flour, baking powder, and salt in a bowl.
- Cream butter and sugar until fluffy.
- Beat in egg and vanilla.
- Mix in dry ingredients until combined.
- Divide dough, add black food coloring if desired.
- Roll dough to 1/4-inch thickness and cut into bat shapes.
- Bake for 8-10 minutes until edges are firm.
- Cool completely before serving.
Notes
- Chill dough for 30 minutes if too soft.
- Decorate with icing or sprinkles after baking.
- Store in an airtight container for up to 5 days.
Nutrition
- Serving Size: 1 cookie
- Calories: 120
- Sugar: 7g
- Sodium: 50mg
- Fat: 5g
- Saturated Fat: 3g
- Unsaturated Fat: 2g
- Trans Fat: 0g
- Carbohydrates: 17g
- Fiber: 0.5g
- Protein: 2g
- Cholesterol: 20mg