Coffee Mocha Bûche de Noël: Indulge in Holiday Delight!
Introduction to Coffee Mocha Bûche de Noël
As the holiday season approaches, I find myself dreaming of cozy gatherings and sweet treats. One dessert that never fails to impress is the Coffee Mocha Bûche de Noël. This delightful Yule log combines the rich flavors of coffee and chocolate, making it a perfect centerpiece for your festive table. Whether you’re a busy mom juggling holiday plans or a professional looking to impress guests, this recipe is a quick solution that brings joy and warmth to any occasion. Trust me, your loved ones will be asking for seconds!
Why You’ll Love This Coffee Mocha Bûche de Noël
This Coffee Mocha Bûche de Noël is not just a dessert; it’s a celebration of flavors that come together effortlessly. With its simple steps, you can whip up this showstopper in no time, even on the busiest days. The combination of coffee and chocolate creates a taste that feels indulgent yet comforting. Plus, it’s a delightful way to impress your family and friends without spending hours in the kitchen!
Ingredients for Coffee Mocha Bûche de Noël
Gathering the right ingredients is the first step to creating your Coffee Mocha Bûche de Noël. Here’s what you’ll need:
- Brewed Coffee: Freshly brewed coffee adds a rich depth of flavor. Use your favorite blend for the best results.
- Cocoa Powder: Unsweetened cocoa powder gives the cake its chocolatey essence. Opt for high-quality brands for a more intense flavor.
- All-Purpose Flour: This is the backbone of your cake, providing structure. You can substitute with gluten-free flour if needed.
- Sugar: Granulated sugar sweetens the cake and helps create that fluffy texture. Brown sugar can be used for a deeper flavor.
- Large Eggs: Eggs are essential for binding and moisture. They also help the cake rise beautifully.
- Unsalted Butter: Melted butter adds richness. If you prefer, you can use coconut oil for a dairy-free option.
- Vanilla Extract: A splash of vanilla enhances the overall flavor. Pure vanilla extract is always best.
- Baking Powder: This leavening agent helps the cake rise. Make sure it’s fresh for optimal results.
- Salt: Just a pinch of salt balances the sweetness and enhances the flavors.
- Heavy Cream: Whipped cream is the perfect filling and frosting for your bûche. You can substitute with whipped coconut cream for a lighter option.
- Powdered Sugar: This sweetens the whipped cream and helps it hold its shape. You can adjust the amount to your taste.
- Chocolate Shavings: These are for decoration, adding a touch of elegance. You can use store-bought or make your own from a chocolate bar.
For exact measurements, check the bottom of the article where you can find everything listed for easy printing. Happy baking!
How to Make Coffee Mocha Bûche de Noël
Step 1: Preheat and Prepare
First things first, preheat your oven to 350°F (175°C). While it warms up, grab a jelly roll pan and grease it well. This step is crucial to ensure your cake doesn’t stick. I like to line the bottom with parchment paper for extra insurance. It makes the whole process smoother, and trust me, you’ll thank yourself later when it’s time to roll!
Step 2: Mix Dry Ingredients
In a medium bowl, combine the all-purpose flour, cocoa powder, baking powder, and salt. Whisk them together until they’re well blended. This step is important because it ensures that the leavening agent is evenly distributed. A good mix will help your Coffee Mocha Bûche de Noël rise beautifully, giving it that light and airy texture we all love.
Step 3: Beat Eggs and Sugar
In a separate large bowl, beat the eggs and sugar together until the mixture is light and fluffy. This usually takes about 3-5 minutes with an electric mixer. The goal here is to incorporate air, which will help your cake rise. You’ll know it’s ready when it looks pale and has doubled in volume. It’s like magic watching it transform!
Step 4: Combine Wet Ingredients
Now, it’s time to add the melted butter and vanilla extract to your egg mixture. Gently fold these in until just combined. Be careful not to overmix; we want to keep that lovely airiness from the eggs. The aroma of vanilla will fill your kitchen, making it feel like a warm hug on a chilly day!
Step 5: Fold in Dry Ingredients and Coffee
Next, it’s time to bring everything together. Gradually fold in the dry ingredients along with the brewed coffee. Use a spatula to gently combine everything until no dry streaks remain. This is where the magic happens! The rich coffee flavor will blend beautifully with the chocolate, creating a batter that’s simply irresistible. Just be gentle; we don’t want to deflate all that air we’ve worked so hard to create!
Step 6: Bake the Cake
Pour the batter into your prepared jelly roll pan, spreading it evenly. Pop it into the preheated oven and bake for 15-20 minutes. Keep an eye on it! You’ll know it’s done when a toothpick inserted in the center comes out clean. The smell of coffee and chocolate wafting through your home will be heavenly!
Step 7: Cool and Roll
Once baked, let the cake cool for a few minutes in the pan. Then, carefully invert it onto a clean kitchen towel dusted with powdered sugar. This is where the rolling magic begins! Roll the cake up with the towel, starting from one short end. This helps shape it while it cools completely. It’s a bit like wrapping a present, and who doesn’t love a good surprise?
Step 8: Prepare Whipped Cream
While your cake cools, it’s time to whip the heavy cream with powdered sugar. Use an electric mixer to beat it until soft peaks form. This will take just a few minutes. The whipped cream should be fluffy and hold its shape well. It’s the perfect filling for your bûche, adding a light and creamy contrast to the rich chocolate.
Step 9: Assemble the Bûche
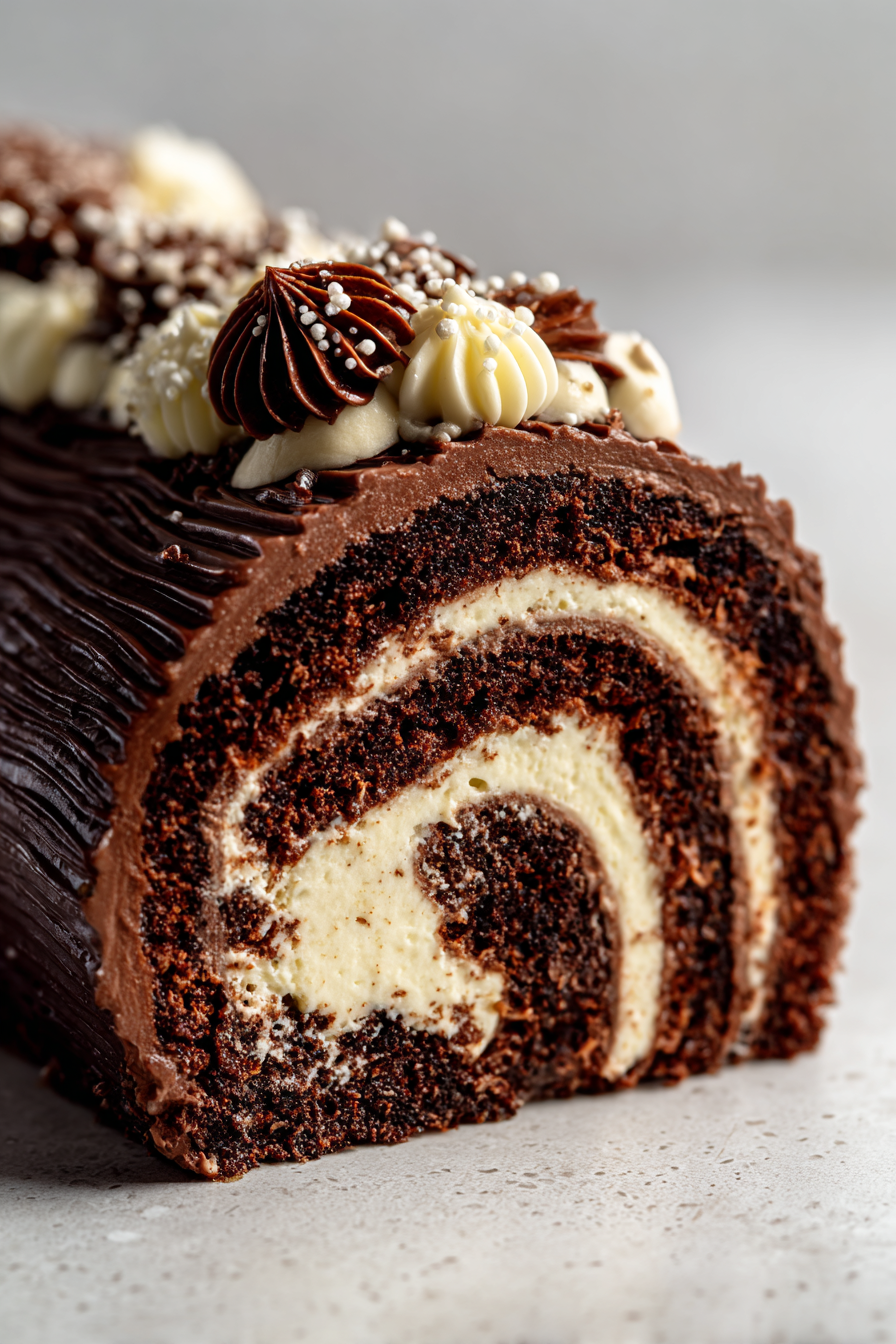
Unroll the cooled cake gently and spread the whipped cream evenly over the surface. Then, roll it back up without the towel this time. It’s like a delicious chocolatey burrito! Make sure to keep it tight but not too tight, as you want to maintain that lovely spiral. This is where the magic of the Coffee Mocha Bûche de Noël truly comes to life!
Step 10: Frost and Decorate
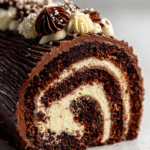
Finally, frost the outside of your rolled cake with any remaining whipped cream. Don’t be shy; make it look as pretty as you can! Finish it off with chocolate shavings for that elegant touch. It’s like putting the cherry on top, but in this case, it’s all about the chocolate. Your Coffee Mocha Bûche de Noël is now ready to shine at your holiday gathering!
Tips for Success
- Always use fresh brewed coffee for the best flavor in your Coffee Mocha Bûche de Noël.
- Make sure your eggs are at room temperature for better mixing and fluffiness.
- Don’t skip the powdered sugar on the towel; it prevents sticking when rolling the cake.
- Feel free to experiment with flavored coffee for a unique twist!
- Chill your whipped cream before whipping for a quicker, fluffier result.
Equipment Needed
- Jelly Roll Pan: A standard size works best, but a baking sheet with edges can be a good alternative.
- Electric Mixer: This makes beating eggs and whipping cream easier. A whisk can work in a pinch!
- Parchment Paper: Use it to line the pan for easy removal. Wax paper is not recommended.
- Spatula: A rubber spatula is perfect for folding ingredients and spreading whipped cream.
Variations
- Nutty Delight: Add chopped nuts like walnuts or hazelnuts to the batter for a crunchy texture.
- Minty Fresh: Incorporate a few drops of peppermint extract into the whipped cream for a festive twist.
- Gluten-Free Option: Substitute all-purpose flour with a gluten-free blend to accommodate dietary needs.
- Vegan Version: Use aquafaba (chickpea water) instead of eggs and coconut cream for the whipped topping.
- Spiced Up: Add a pinch of cinnamon or nutmeg to the batter for a warm, holiday flavor.
Serving Suggestions
- Pair your Coffee Mocha Bûche de Noël with a dollop of extra whipped cream for added indulgence.
- Serve alongside a warm cup of coffee or hot chocolate to enhance the flavors.
- Garnish with fresh berries for a pop of color and a refreshing contrast.
- Present on a festive platter, dusted with powdered sugar for a snowy effect.
FAQs about Coffee Mocha Bûche de Noël
Can I make the Coffee Mocha Bûche de Noël ahead of time?
Absolutely! This dessert can be made a day in advance. Just store it in the refrigerator after decorating. It allows the flavors to meld beautifully, making it even more delicious!
What can I substitute for brewed coffee?
If you’re not a coffee fan, you can use brewed tea or even hot chocolate for a different flavor profile. Just keep in mind that it will change the overall taste of your Coffee Mocha Bûche de Noël.
How do I store leftovers?
Leftovers can be stored in the refrigerator for up to three days. Just make sure to cover it well to keep it fresh. You might want to enjoy it with a cup of coffee!
Can I freeze the Coffee Mocha Bûche de Noël?
Yes, you can freeze it! Wrap it tightly in plastic wrap and then in aluminum foil. It can be frozen for up to a month. Just thaw it in the fridge before serving.
What’s the best way to serve this dessert?
Slice it into generous pieces and serve with a dollop of whipped cream on top. A sprinkle of chocolate shavings or fresh berries adds a lovely touch, making your Coffee Mocha Bûche de Noël even more inviting!
Final Thoughts
Creating a Coffee Mocha Bûche de Noël is more than just baking; it’s about sharing joy and warmth with those you love. The rich flavors of coffee and chocolate come together in a delightful way, making every bite a celebration of the season. Whether it’s for a holiday gathering or a cozy family dinner, this dessert is sure to impress. Plus, the smiles on your loved ones’ faces as they savor each slice will be the sweetest reward. So, roll up your sleeves and let the magic of this festive treat fill your home with happiness!
PrintCoffee Mocha Bûche de Noël: Indulge in Holiday Delight!
A delightful holiday dessert that combines the rich flavors of coffee and chocolate in a traditional Yule log shape.
- Prep Time: 30 minutes
- Cook Time: 20 minutes
- Total Time: 50 minutes
- Yield: 8 servings 1x
- Category: Dessert
- Method: Baking
- Cuisine: French
- Diet: Vegetarian
Ingredients
- 1 cup brewed coffee
- 1/2 cup cocoa powder
- 1 cup all-purpose flour
- 1 cup sugar
- 4 large eggs
- 1/2 cup unsalted butter, melted
- 1 teaspoon vanilla extract
- 1 teaspoon baking powder
- 1/2 teaspoon salt
- 1 cup heavy cream
- 2 tablespoons powdered sugar
- Chocolate shavings for decoration
Instructions
- Preheat the oven to 350°F (175°C) and grease a jelly roll pan.
- In a bowl, mix together the flour, cocoa powder, baking powder, and salt.
- In another bowl, beat the eggs and sugar until light and fluffy.
- Gradually add the melted butter and vanilla extract to the egg mixture.
- Fold in the dry ingredients and brewed coffee until well combined.
- Pour the batter into the prepared pan and spread evenly.
- Bake for 15-20 minutes or until a toothpick comes out clean.
- Let it cool for a few minutes, then invert onto a clean kitchen towel dusted with powdered sugar.
- Roll the cake with the towel and let it cool completely.
- Whip the heavy cream with powdered sugar until soft peaks form.
- Unroll the cake, spread the whipped cream over it, and roll it back up.
- Frost the outside with remaining whipped cream and decorate with chocolate shavings.
Notes
- Make sure to use fresh brewed coffee for the best flavor.
- Store leftovers in the refrigerator for up to 3 days.
- This dessert can be made a day in advance for easier preparation.
Nutrition
- Serving Size: 1 slice
- Calories: 350
- Sugar: 25g
- Sodium: 150mg
- Fat: 20g
- Saturated Fat: 10g
- Unsaturated Fat: 8g
- Trans Fat: 0g
- Carbohydrates: 40g
- Fiber: 2g
- Protein: 5g
- Cholesterol: 80mg