Spooky 10-Minute Ghoulish Marshmallow Cookies
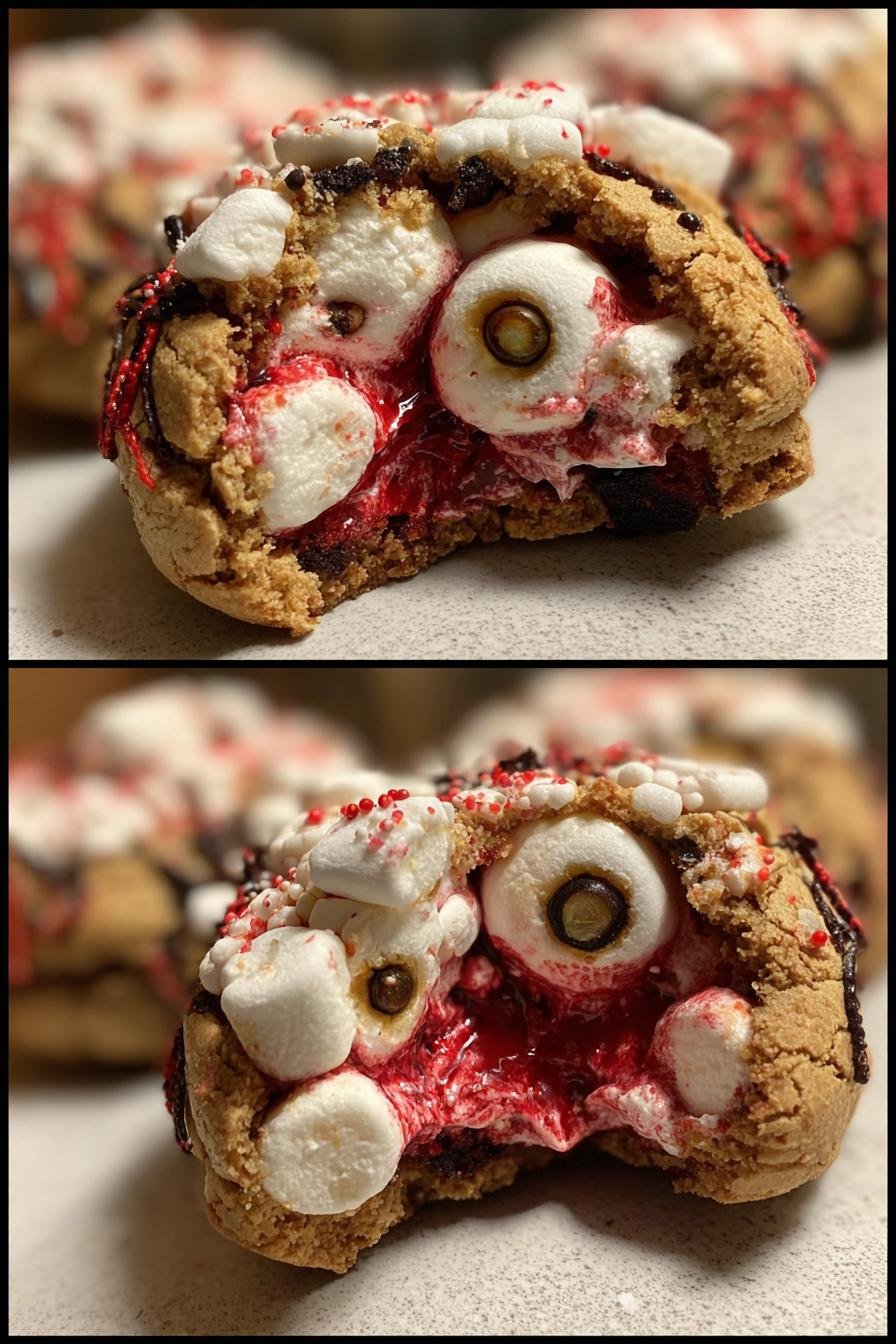
Halloween baking is my absolute favorite time of year—there’s something so magical about turning simple ingredients into spooky, festive treats. And let me tell you, these ghoulish marshmallow cookies are the stars of my Halloween dessert table every single year. I’ve been making them for over a decade, tweaking the recipe until it’s just right. The soft, chocolatey cookie base paired with gooey marshmallows and creepy black icing is a combo that’s impossible to resist. Trust me, your little monsters (and the big ones too) will be begging for more. Let’s get baking and make this Halloween the sweetest one yet!
Why You’ll Love These Ghoulish Marshmallow Cookies
Oh my gosh, where do I even start? These cookies are seriously everything you want for Halloween baking – fun, easy, and downright delicious. Here’s why they’re my go-to spooky treat every October:
- Super Simple: You probably have most ingredients in your pantry already! Just basic baking staples plus marshmallows and some black icing.
- Kid-Friendly Magic: Little helpers can get hands-on with decorating (though be warned – marshmallow fingers might disappear!).
- Festive Crowd-Pleaser: Those creepy faces peeking out from cookies bowls? Instant party hit!
- Texture Heaven: Crispy-chewy cookie with melty marshmallow surprises – it’s like a haunted house party in your mouth!
The best part? Even if your decorating skills are “abstract” like mine were at first, they still taste amazing!
Ingredients for Ghoulish Marshmallow Cookies
Okay, let’s raid our pantries for these spooky little guys! Here’s everything you’ll need to make cookies that’ll have your Halloween guests screaming (with delight, of course):
- 1 cup all-purpose flour – Or swap in gluten-free 1-to-1 baking flour if needed!
- 1/2 cup sugar – Regular granulated works perfectly here.
- 1/4 cup cocoa powder – The darker the better for our “haunted” cookie base!
- 1/2 tsp baking powder – Our little rising helper.
- 1/4 tsp salt – Just enough to balance all that sweetness.
- 1/2 cup butter, softened – And when I say softened, I mean leave it out for 30 minutes – not melted! This makes ALL the difference.
- 1 egg – Room temp is ideal for happy mixing.
- 1 tsp vanilla extract – The good stuff, not imitation!
- 1 cup mini marshmallows – Trust me, mini are better than big ones here – they distribute the gooeyness perfectly!
- Black icing gel – For those creepy crawly decorations!
See? Nothing too crazy – just good ingredients coming together to make something magically spooky. Now let’s get mixing!
Equipment Needed for Ghoulish Marshmallow Cookies
Now let’s talk tools! Don’t worry – you don’t need anything fancy to make these spooky treats. Just grab:
- Mixing bowls – One for dry, one for wet ingredients (I’m partial to my grandma’s old yellow bowl)
- Baking sheet – Line it with parchment paper for easy cleanup (and to prevent marshmallow stickage!)
- Hand mixer or wooden spoon – I literally use whatever’s clean!
- Cookie scoop or tablespoon – For perfectly portioned ghosties
- Piping bag or ziplock – With a tiny tip cut off for decorating those creepy faces
That’s it! See? Told you this was easy. Now let’s get our hands dirty!
How to Make Ghoulish Marshmallow Cookies
Alright, let’s dive into the fun part – making these spooky little treats! Don’t worry, it’s easier than escaping a haunted house. Just follow these steps and you’ll have ghoulish cookies ready to terrify (your tastebuds) in no time!
Step 1: Mix Dry Ingredients
First things first – preheat that oven to 350°F (175°C). While it’s heating up, grab your flour, sugar, cocoa powder, baking powder, and salt. Here’s my secret: always sift the cocoa powder! Those sneaky little lumps love to hide in there. I learned this the hard way after biting into a “chocolate surprise” lump cookie (not cute). Just whisk everything together in a bowl until it’s one happy, dark powder mixture.
Step 2: Cream Butter and Sugar
Now for my favorite part – creaming the butter and sugar! Remember how I said “softened” butter? I mean room temperature soft – you should be able to press your finger in easily without it melting into a puddle. Beat it with the sugar until it’s light and fluffy, about 2-3 minutes. Then crack in that egg and vanilla, mixing just until combined. Oh! And scrape down the sides of the bowl – those butter pockets love to hide!
Step 3: Combine and Bake
Time to bring it all together! Add your dry ingredients to the butter mixture in two batches, mixing gently after each addition. Here’s the trick – don’t overmix! We’re making cookies, not hockey pucks. Now carefully fold in those mini marshmallows – think gentle hugs, not wrestling moves. Scoop tablespoon-sized balls onto your lined baking sheet (they’ll spread a little, so give them space). Bake for 10-12 minutes until the edges are set but centers are still soft. Let them cool for 5 minutes before attempting to decorate – hot marshmallows are sneaky little burners!
There you have it! Now comes the really fun part – turning these chocolatey delights into proper Halloween monsters!
Tips for Perfect Ghoulish Marshmallow Cookies
After making these cookies every Halloween for years (and eating my fair share of “oops” batches), I’ve learned all the tricks to cookie perfection. Here are my must-know tips:
- Chill the dough for 30 minutes if you have time – it prevents spreading and gives you those crisp edges that make your ghosts look extra spooky.
- Cool completely before decorating unless you want your ghost faces to look like they’re melting (unless that’s your aesthetic – no judgment!).
- Use kitchen scissors to cut stubborn marshmallows that clump together – much easier than fighting with a spoon!
- Store icing gel upside down for 10 minutes before piping – it helps prevent those annoying air bubbles in your decorations.
And remember – even the “ugly” ones still taste amazing! That’s my kind of Halloween magic.
Decorating Your Ghoulish Marshmallow Cookies
Now for the best part – bringing these cookies to life (or should I say… afterlife?). Once completely cooled, grab your black icing gel and let your creativity run wild! I like to pipe simple ghost faces – little “O” mouths and dot eyes for classic spooks. Feeling fancy? Try spiderwebs dripping off edges or zigzag Franken-monster scars. Pro tip: Practice your designs on parchment first! And don’t stress – even lopsided ghosts are terrifyingly tasty.
Storing and Freezing Ghoulish Marshmallow Cookies
Here’s the spooky truth – these cookies disappear fast at my house! But if you somehow have leftovers (impressive!), store them in an airtight container at room temp for up to 3 days. The marshmallows might get a bit less gooey, but they’ll still taste fantastic. Want to make them ahead? Freeze undecorated cookies for up to a month – just thaw and add your creepy icing when ready to serve. Perfect for last-minute Halloween scares!
Ghoulish Marshmallow Cookies FAQs
Over the years, I’ve gotten SO many questions about these spooky Halloween cookies – so let me share the answers to the ones that pop up most often!
Can I use large marshmallows instead of mini?
Technically yes, but I don’t recommend it! Big marshmallows tend to melt into one giant blob instead of giving you those perfect little pockets of gooeyness. If you must use them, chop them into quarters first.
Help! My cookies stuck to the pan!
Oh no – been there! Next time, don’t skip the parchment paper (it’s magic). If they’re already stuck, try sliding a thin spatula underneath while they’re still slightly warm. Pro tip: Let them cool fully before decorating!
Can I make these gluten-free?
Absolutely! Just swap the all-purpose flour for your favorite 1-to-1 gluten-free baking blend. The texture comes out nearly identical – I’ve fooled many gluten-loving ghosts this way!
Why do my marshmallows disappear?
Ahhh the great marshmallow mystery! They’re probably baking too long – try reducing oven time by 1-2 minutes. Also, make sure you’re folding them in gently at the very end. They’re shy little things!
Can I use regular frosting instead of gel?
You can, but gel icing gives much cleaner lines for those creepy details. If using regular frosting, thin it with a tiny bit of milk first so it pipes easily. Happy haunting!
Nutrition Information for Ghoulish Marshmallow Cookies
Okay, let’s keep it real – we’re not eating these cookies for their health benefits! But since I know some folks like to track these things (or need to for allergies), here’s the general nutrition scoop for one cookie. Remember – these are estimates since ingredients and brands can vary:
- Calories: Around 120 per cookie (but who stops at one?)
- Sugar: About 8g (mostly from our marshmallow friends)
- Fat: Roughly 5g (thank you, delicious butter)
- Carbs: Approximately 17g (worth every bite!)
My professional baker’s opinion? These are Halloween treats meant to be enjoyed in their full sugary glory! But if you’re watching portions, maybe share with a little ghost buddy.
Share Your Spooky Creations
I can’t wait to see your ghoulish marshmallow cookies! Snap a pic and tag me on social media – I’d love to see your spooky (and delicious) creations. Let’s haunt the internet together!
PrintSpooky 10-Minute Ghoulish Marshmallow Cookies

Spooky marshmallow cookies perfect for Halloween.
- Prep Time: 15 minutes
- Cook Time: 12 minutes
- Total Time: 27 minutes
- Yield: 24 cookies 1x
- Category: Dessert
- Method: Baking
- Cuisine: American
- Diet: Vegetarian
Ingredients
- 1 cup all-purpose flour
- 1/2 cup sugar
- 1/4 cup cocoa powder
- 1/2 tsp baking powder
- 1/4 tsp salt
- 1/2 cup butter, softened
- 1 egg
- 1 tsp vanilla extract
- 1 cup marshmallows
- Black icing gel (for decoration)
Instructions
- Preheat oven to 350°F (175°C).
- Mix flour, sugar, cocoa powder, baking powder, and salt.
- Cream butter, then add egg and vanilla.
- Combine wet and dry ingredients.
- Fold in marshmallows.
- Scoop dough onto baking sheet.
- Bake for 10-12 minutes.
- Cool and decorate with black icing.
Notes
- Store in an airtight container.
- Use mini marshmallows for better texture.
- Adjust baking time based on cookie size.
Nutrition
- Serving Size: 1 cookie
- Calories: 120
- Sugar: 8g
- Sodium: 60mg
- Fat: 5g
- Saturated Fat: 3g
- Unsaturated Fat: 2g
- Trans Fat: 0g
- Carbohydrates: 17g
- Fiber: 1g
- Protein: 2g
- Cholesterol: 20mg