Creepy 24 Eyeball Cake Pops That’ll Haunt Your Halloween
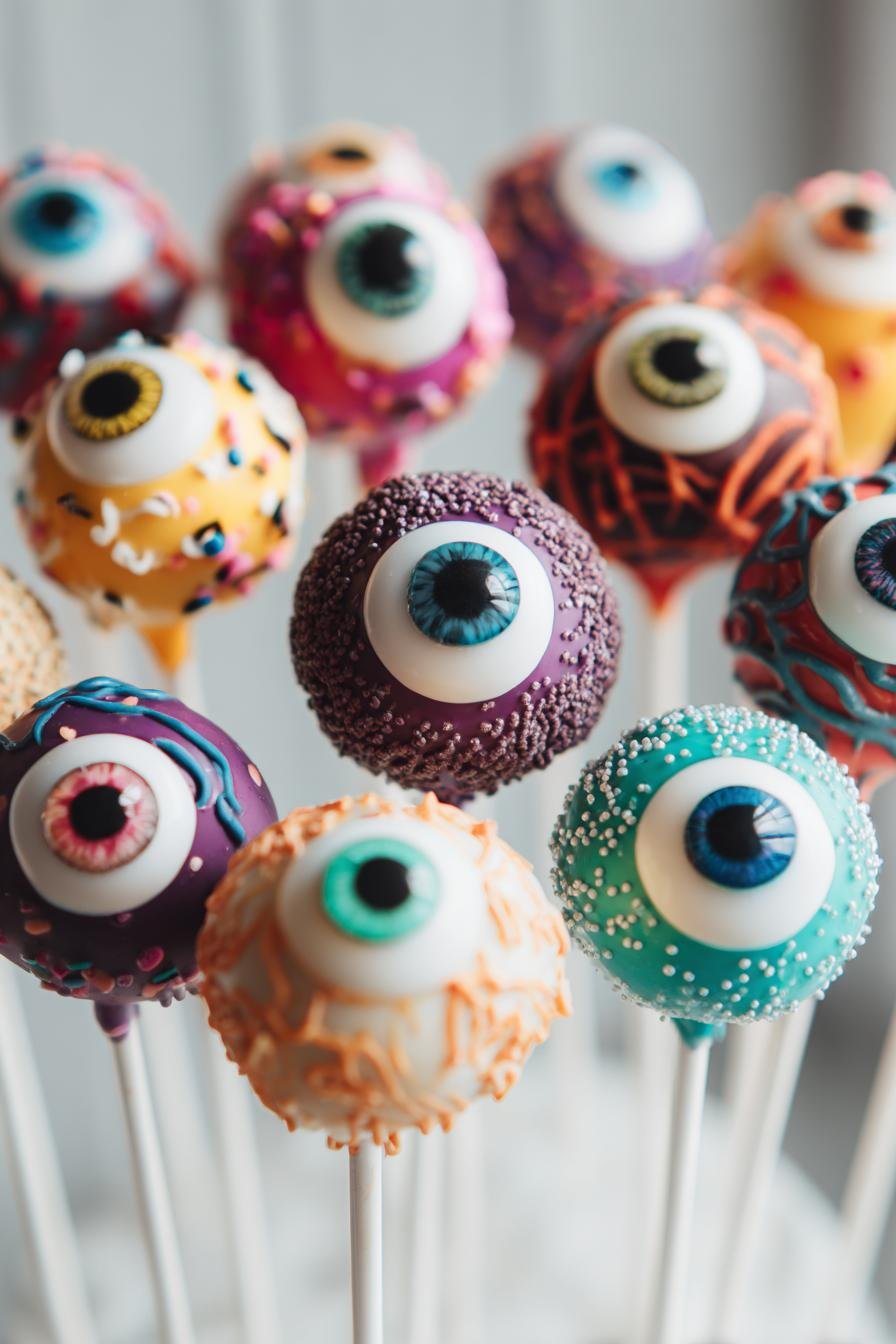
Halloween just isn’t Halloween in my house without a batch of these delightfully creepy eyeball cake pops staring up at you from the dessert table! I still remember the first time I made them for my niece’s costume party – the kids went absolutely wild, squealing with equal parts horror and delight as they bit into those bloodshot edible eyes. There’s something so fun about taking ordinary cake pops and turning them into little works of spooky art. The best part? They’re actually super simple to make, even if you’re not usually a baker. Just wait until you see how these eyeball cake pops become the talk of any Halloween gathering!
Why You’ll Love These Eyeball Cake Pops
Trust me, once you make these eyeball cake pops, they’ll become your go-to Halloween treat every year. Here’s why:
- So easy even zombies could do it: Seriously, if I can make these (and I’m the queen of kitchen disasters), you absolutely can too!
- Customizable creepy-factor: Want bloodshot zombie eyes or elegant vampire eyes? Change up the colors and decorations to match your spooky vibe.
- Party showstoppers: These little guys disappear faster than ghosts at sunrise at any Halloween gathering.
- Kid-approved fun: My nieces and nephews actually fight over who gets the “grossest” looking eyeball.
- Sneakily delicious: Underneath all that creepy decor? Just pure, moist cake pop goodness.
The best part? Watching people’s hilarious reactions when they take their first bite!
Eyeball Cake Pops Ingredients
Here’s everything you’ll need to bring these creepy little eyeballs to life (along with my favorite brands and prep notes):
- 1 box cake mix (any flavor you love – I’m partial to devil’s food for extra dark “eyeballs,” but vanilla works great too. Bake and cool completely before using)
- 1 cup prepared frosting (again, any flavor – cream cheese frosting makes amazing cake pops!)
- 2 cups candy melts (white gives classic eyeball vibes, but go wild with red, green, or purple for monster eyes)
- 24 lollipop sticks (the 4-inch ones work perfectly)
- Red gel icing (for those deliciously gross bloodshot veins)
- Black decorating gel (pupils that’ll stare right into your soul)
- Sprinkles or small round candies (for funky pupil textures – I raid my kids’ Nerds stash every year!)
Ingredient Substitutions
No worries if you need to swap things out! Gluten-free cake mix works just fine. For vegan versions, use plant-based frosting and candy melts. Out of candy melts? White chocolate chips with a teaspoon of coconut oil melted together make a great substitute. Food coloring mixed into white frosting can stand in for gels in a pinch.
How to Make Eyeball Cake Pops
Alright, let’s get to the fun part – transforming ordinary cake into these delightfully creepy eyeball cake pops! I promise it’s easier than it looks, and I’ll walk you through each step like I’m right there in the kitchen with you.
Bake and Crumble the Cake
First things first – bake your cake according to the package directions. Here’s my secret: slightly underbake it by a minute or two for extra moist eyeballs! Let it cool completely – I mean completely – because warm cake turns into mushy cake pop dough (trust me, I learned this the hard way). Once cooled, crumble it into fine crumbs in a large bowl. You want it to look like damp sand, with no big chunks left.
Mix Frosting and Form Balls
Now, add your frosting gradually – start with 3/4 cup and mix until it holds together when you squeeze a handful. The texture should be like cookie dough – not too sticky, not too dry. Roll tablespoon-sized portions between your palms into smooth balls. Pro tip: wear disposable gloves to prevent sticky fingers! Place them on a parchment-lined baking sheet.
Chill and Assemble Eyeball Cake Pops
This next step is crucial – chill those babies for at least 30 minutes! While they’re firming up, melt your candy melts carefully (I microwave mine in 30-second bursts, stirring between each). Dip the tip of each lollipop stick in melted candy before inserting it halfway into a cake ball – this acts like edible glue. Now the magic happens! Dip each eyeball cake pop straight down into the melted candy, swirl gently, and let excess drip off before standing them upright in a foam block.
Decorate Like Creepy Eyeballs
The moment we’ve been waiting for – bringing these eyeball cake pops to life! While the coating is still wet, add small candies or sprinkles for pupils. Once set, get creative with your decorating gels. Use black gel to outline pupils for that eerie stare. Then take red gel and make squiggly veins radiating outward – the messier, the better! Want extra drama? Add edible glitter while the gel is still wet for sparkling vampire eyes.
Tips for Perfect Eyeball Cake Pops
Let me share some of my hard-earned tricks to make your eyeball cake pops absolutely flawless:
- Foam block is your best friend: I use a cheap foam block from the craft store to stand my pops upright while they dry. No leaning eyeballs here!
- Keep that candy smooth: If your melts start to thicken, just pop them back in the microwave for 10-15 seconds. Thick coating = lumpy eyeballs.
- Work in small batches: Only take a few cake balls out of the fridge at a time. Cold balls = better coating.
- Tap, don’t shake: After dipping, gently tap your wrist to remove excess coating. Shaking can make your pops fall off the stick!
- Have fun with the creepy factor: The messier the veins, the better – these are supposed to look gross, after all!
Eyeball Cake Pops Variations
Once you’ve mastered the basic eyeball cake pops, the real fun begins! Here are some of my favorite ways to mix things up:
- Zombie attack: Use green candy melts with black and red veins for proper undead eyeballs. Extra points for adding edible “dirt” sprinkles!
- Vampire glam: Mix red edible glitter into white candy coating for bloodshot eyes that sparkle in the moonlight.
- Alien invasion: Go wild with neon colors and weird pupil shapes – try star sprinkles for truly extraterrestrial eyes.
- Werewolf eyes: Add gold luster dust to yellow candy melts for glowing night-vision effects.
The only limit is your imagination – and how creepy you’re willing to get!
Serving and Storing Eyeball Cake Pops
These eyeball cake pops are best served at room temperature – the flavors really pop when they’re not too cold! For parties, I arrange them in a foam block covered with black tissue paper to look like they’re floating in a spooky void. Leftovers (if you have any!) keep beautifully in an airtight container at room temperature for up to 3 days. Just be careful – the candy coating can get sticky if it’s humid. Pro tip: Layer them between parchment paper so your creepy creations don’t stick together in their container!
Eyeball Cake Pops Nutritional Information
Now, I’m not going to pretend these eyeball cake pops are health food – they’re Halloween treats, after all! But if you’re curious about the nutritional breakdown (or just want to know how many you can sneak before the party), here’s the scoop. These values are estimates per cake pop and will vary based on your specific ingredients:
- Calories: About 120 per pop
- Fat: 5g (2g saturated)
- Carbohydrates: 18g
- Sugar: 10g
- Protein: 1g
Remember, these numbers can change if you use different cake mixes, frostings, or decorations. Gluten-free or sugar-free versions will have different values. But hey – it’s Halloween! These are meant to be enjoyed in all their spooky, sugary glory. I always say one eyeball cake pop is just right, two is a treat, and three means you’re officially part of the monster squad!
Eyeball Cake Pops FAQs
I get so many questions about these eyeball cake pops – here are the ones that pop up most often (see what I did there?):
Can I freeze eyeball cake pops?
Absolutely! These little creepers freeze beautifully for up to a month. Just wrap them individually in plastic wrap after the candy coating has fully set, then pop them in a freezer bag. Thaw overnight in the fridge when you’re ready to serve – the texture stays perfect!
How far in advance can I make these for a party?
The sweet spot is 1-2 days ahead. The cake pops stay fresh, and the decorations hold up great. I usually make the cake balls one day, then dip and decorate the next. Any longer than 3 days and the red veins might start to bleed a little (which, okay, actually looks kinda cool for zombie eyes!).
Help! My candy coating is cracking. What did I do wrong?
Oh honey, I’ve been there! Usually it means your cake balls were too cold when you dipped them. Next time, let them sit out for about 5 minutes after taking them out of the fridge. If cracks happen, just drizzle a little extra melted candy over them – call them “cracked zombie eyes” and pretend you meant to do it!
Can I use real chocolate instead of candy melts?
You can, but be warned – real chocolate doesn’t set as firm. If you go this route, temper it properly and add a teaspoon of coconut oil to help it flow better. And maybe keep them chilled until serving time so your eyeballs don’t melt into puddles of… well, you get the idea.
My cake pops keep falling off the sticks! Any tricks?
The number one culprit is not dipping the stick in candy first – that edible glue step is crucial! Also make sure your cake balls are cold (but not frozen) when you insert the sticks. If all else fails, you can always skip the sticks and serve them as creepy eyeball truffles instead – problem solved!
Creepy 24 Eyeball Cake Pops That’ll Haunt Your Halloween

Eyeball cake pops are fun and spooky treats perfect for Halloween. These bite-sized desserts look like creepy eyeballs but taste delicious.
- Prep Time: 30 minutes
- Cook Time: 25 minutes
- Total Time: 1 hour 25 minutes (includes chilling time)
- Yield: 24 cake pops 1x
- Category: Dessert
- Method: Baking
- Cuisine: American
- Diet: Vegetarian
Ingredients
- 1 box cake mix (any flavor)
- 1 cup frosting (any flavor)
- 2 cups candy melts (white or colored)
- 24 lollipop sticks
- Red gel icing
- Black decorating gel
- Sprinkles or small candies for pupils
Instructions
- Bake the cake according to the package instructions. Let it cool completely.
- Crumble the cake into fine crumbs in a large bowl.
- Mix in the frosting until the mixture holds together like dough.
- Roll the mixture into small balls and place them on a baking sheet.
- Chill the cake balls in the fridge for 30 minutes.
- Melt the candy melts according to the package instructions.
- Dip the tip of each lollipop stick into the candy melt and insert it into a cake ball.
- Dip each cake pop into the melted candy and let the excess drip off.
- Place the cake pops upright in a stand or foam block to set.
- Use black gel to draw a pupil and red gel to create bloodshot veins.
- Let the cake pops dry completely before serving.
Notes
- Use different colored candy melts for a variety of eyeball effects.
- Add edible glitter for a spooky shimmer.
- Store cake pops in an airtight container for up to 3 days.
Nutrition
- Serving Size: 1 cake pop
- Calories: 120
- Sugar: 10g
- Sodium: 80mg
- Fat: 5g
- Saturated Fat: 2g
- Unsaturated Fat: 2g
- Trans Fat: 0g
- Carbohydrates: 18g
- Fiber: 0g
- Protein: 1g
- Cholesterol: 5mg