17 Spooky Mummy Wrapped Biscuits Kids Adore
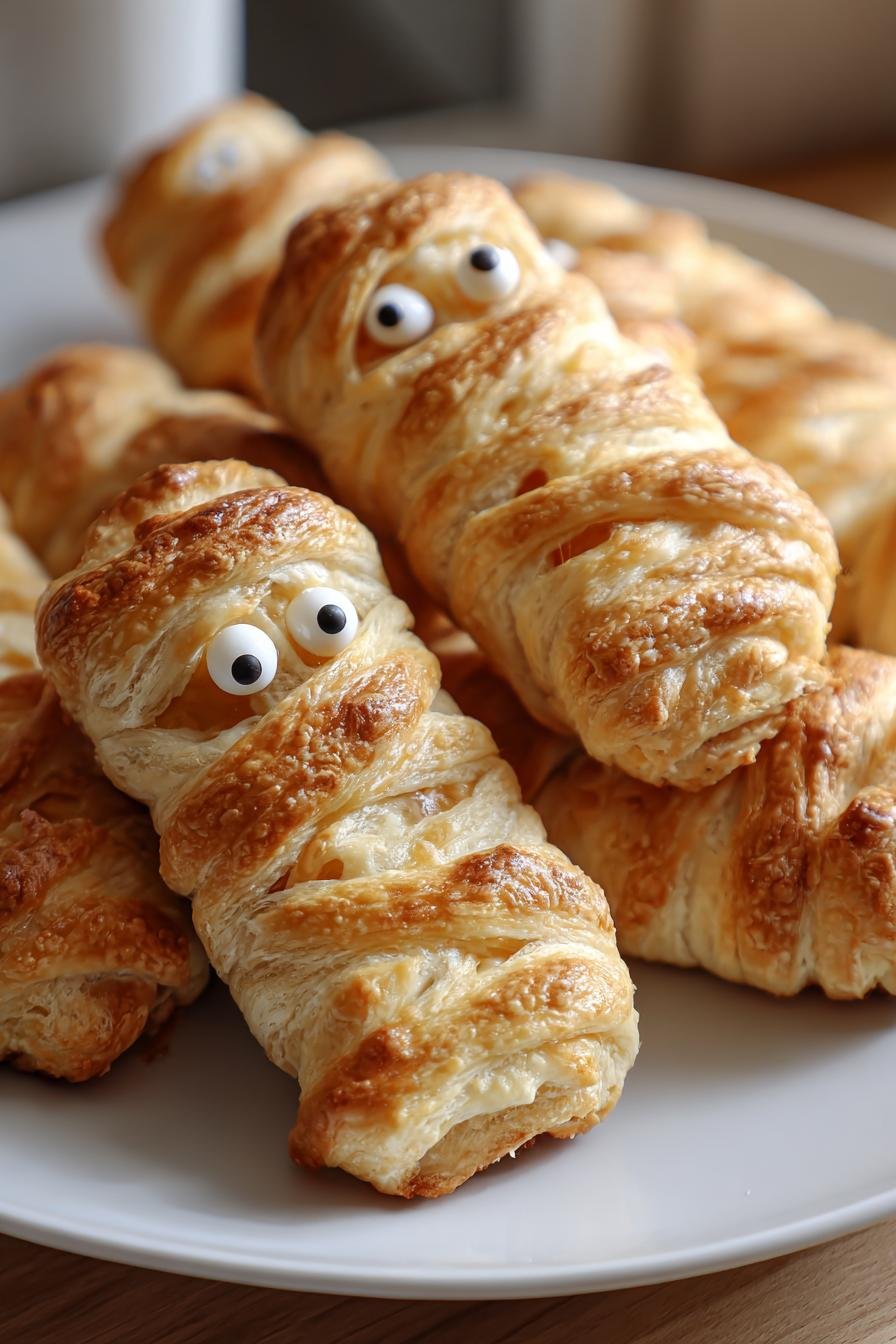
Halloween is my absolute favorite time to get creative in the kitchen, and these mummy wrapped biscuits are my go-to spooky treat every year! They’re so easy to make—seriously, even if you’re usually all thumbs in the kitchen, you can pull these off. I remember the first time I made them for my niece’s Halloween party; the kids went wild for them, and the parents kept asking for the recipe. The best part? You only need a few simple ingredients to turn ordinary biscuits into adorable edible mummies. Trust me, once you try these, they’ll become your Halloween tradition too!
Why You’ll Love These Mummy Wrapped Biscuits
These mummy wrapped biscuits are a total crowd-pleaser, and here’s why:
- Quick and Easy: Seriously, they come together in under 30 minutes—perfect for last-minute Halloween prep.
- Kid-Friendly Fun: Let the little ones help with the decorating. It’s a messy, giggly good time!
- Party Perfect: They’re spooky, adorable, and guaranteed to be the star of your Halloween spread.
- Totally Customizable: Use dark chocolate, swap candy eyes for sprinkles, or add food coloring for extra flair.
Trust me, these biscuits are as fun to make as they are to eat!
Ingredients for Mummy Wrapped Biscuits
Grab these simple ingredients—that’s all you’ll need to bring these adorable mummies to life!
- 1 package refrigerated biscuit dough: The shortcut hero! Use your favorite brand—they all work great.
- 1 cup melted white chocolate: Go for good-quality chips; they melt smoother and taste better.
- 2 tablespoons cocoa powder: This gives the “bandages” that creepy, dusty look.
- Candy eyes: The bigger, the better for that perfectly spooky stare!
See? Told you it was easy. Now let’s get baking!
Equipment You’ll Need
No fancy gadgets needed—just these basics:
- Baking sheet: For perfectly golden biscuits.
- Toothpicks: Your secret weapon for those mummy-wrap details.
- Piping bag (or zip-top bag): Makes drizzling chocolate a breeze—just snip the corner!
That’s it! Now you’re ready to mummify some biscuits.
How to Make Mummy Wrapped Biscuits
Don’t worry—these adorable mummies come together faster than you can say “Boo!” Just follow these simple steps, and you’ll have a tray of spooky treats in no time.
Step 1: Preheat and Prepare
First things first—preheat your oven to whatever temperature your biscuit dough package says (usually around 375°F). While that’s heating up, pop open that tube of biscuits—yes, that satisfying *pop* is half the fun! Separate them gently and space them out on your baking sheet. No need to grease it—these little guys won’t stick.
Step 2: Bake the Biscuits
Slide that baking sheet into the oven and bake until they’re puffed up and golden brown—about 10-12 minutes should do it. Keep an eye on them though; nobody likes a burnt mummy! Once they’re done, let them cool completely on a rack. I know it’s tempting to rush, but trust me, warm biscuits plus melted chocolate equals a gooey mess. Patience pays off here!
Step 3: Decorate Like a Mummy
Time for the fun part! Melt your white chocolate (short bursts in the microwave, stirring in between, works like a charm). Dip each cooled biscuit about halfway, leaving a gap at the top for the eyes—this is where your mummy’s “face” will peek through. Press on two candy eyes while the chocolate’s still tacky. Then, grab a toothpick or that piping bag and drizzle lines across the chocolate to look like wrappings. For extra creep factor, dust lightly with cocoa powder—just a sprinkle makes them look ancient and tomb-worthy!
Pro tip: If your chocolate sets too fast, just zap it for 5 more seconds. And if the drizzle goes rogue? More “bandages” mean more character—embrace the chaos!
Tips for Perfect Mummy Wrapped Biscuits
Want your mummy biscuits to look straight out of a bakery? Here are my tried-and-true secrets:
- Cool completely: I’ve learned the hard way—warm biscuits make melty chocolate puddles. Let them sit until no warmth lingers.
- Piping bag hack: No fancy bag? Snip the tiniest corner off a zip-top bag. You’ll get those crisp “bandage” lines every time.
- Eyes on first: Press candy eyes into soft chocolate so they stick. Waiting means glue or lopsided stares!
- Store smart: Layer them in an airtight container with parchment between layers. They’ll stay fresh (and un-squished) for 3 days.
Bonus: If your chocolate seizes, add a drizzle of coconut oil while reheating—saves the day!
Variations and Substitutions
Oh, the possibilities! These mummy biscuits are like a blank (slightly spooky) canvas:
- Dark chocolate lovers: Swap white for dark chocolate—it gives an extra eerie, ancient look!
- Candy swap: No eyes? Red icing “bloodshot” lines or mini marshmallows work too.
- Gluten-free? Use your favorite GF biscuit dough—they’ll mummify just as well.
- Add spice: Mix cinnamon into cocoa powder for “sandy” mummies with a flavor kick.
See? Even mummies can’t resist a little makeover!
Serving and Storage
These mummy wrapped biscuits shine brightest on a spooky platter at your Halloween party—just watch them disappear! Leftovers? (As if!) Store any survivors in an airtight container at room temperature for up to 3 days. Layer them with parchment paper to keep those precious chocolate bandages intact. No refrigeration needed—unless you like your mummies extra chilly!
Nutritional Information
Each mummy wrapped biscuit comes in at around 150 calories, with 8g of sugar and 7g of fat. But hey, it’s Halloween—indulge a little! Keep in mind, these numbers can vary based on the biscuit dough and chocolate you use. Treats like these are all about the fun, not the math!
Frequently Asked Questions
Got questions? I’ve got answers! Here are the most common things people ask about these adorable mummy wrapped biscuits.
Can I use homemade biscuit dough instead of store-bought?
Absolutely! If you’ve got a favorite biscuit recipe, go for it. Just roll the dough into small rounds before baking. The key is making sure they’re fully cooled before the chocolate dip—homemade biscuits can be a bit more delicate when warm.
How long do these Halloween treats last?
They’re best eaten within 3 days (if they last that long!). Store them in an airtight container at room temperature. The chocolate might lose its shine after a day, but they’ll still taste delicious.
My chocolate keeps hardening too fast—help!
Been there! If your melted chocolate starts thickening, just pop it back in the microwave for 5-second bursts, stirring between each. Adding a tiny bit of coconut oil (1/4 teaspoon at a time) can help keep it workable longer.
Can I make these ahead for a party?
You bet! Bake the biscuits a day early, then decorate them the morning of your event. The chocolate coating needs about an hour to set completely, so plan accordingly.
No candy eyes—what else can I use?
Get creative! Mini chocolate chips (pointy side out), white chocolate dots with a food coloring pupil, or even small dollops of icing work great. The spookier, the better!
Share Your Creations
I’d love to see your spooky masterpieces! Snap a pic of your mummy wrapped biscuits and tag me—I might just feature your creation! And if you put your own frightful twist on them, leave a comment below. Nothing makes me happier than seeing all your creepy-cute kitchen magic!
Print17 Spooky Mummy Wrapped Biscuits Kids Adore

Create fun and spooky mummy wrapped biscuits that are perfect for Halloween. These treats are easy to make and will impress your guests.
- Prep Time: 10 minutes
- Cook Time: 15 minutes
- Total Time: 25 minutes
- Yield: 8 biscuits 1x
- Category: Dessert
- Method: Baking
- Cuisine: American
- Diet: Vegetarian
Ingredients
- 1 package of refrigerated biscuit dough
- 1 cup of melted white chocolate
- 2 tablespoons of cocoa powder
- Candy eyes for decoration
Instructions
- Preheat your oven to the temperature specified on the biscuit dough package.
- Separate the biscuit dough into individual pieces and place them on a baking sheet.
- Bake the biscuits according to the package instructions until golden brown.
- Let the biscuits cool completely.
- Dip each biscuit into the melted white chocolate, leaving a small gap uncovered to resemble a mummy’s bandages.
- Place two candy eyes on the uncovered part of the biscuit.
- Use a toothpick to drizzle cocoa powder over the white chocolate to create a mummy wrap effect.
- Allow the chocolate to set before serving.
Notes
- Ensure the biscuits are completely cool before dipping them in chocolate.
- Use a piping bag for more precise chocolate drizzling.
- Store the biscuits in an airtight container to keep them fresh.
Nutrition
- Serving Size: 1 biscuit
- Calories: 150
- Sugar: 8g
- Sodium: 200mg
- Fat: 7g
- Saturated Fat: 3g
- Unsaturated Fat: 3g
- Trans Fat: 0g
- Carbohydrates: 20g
- Fiber: 1g
- Protein: 2g
- Cholesterol: 5mg