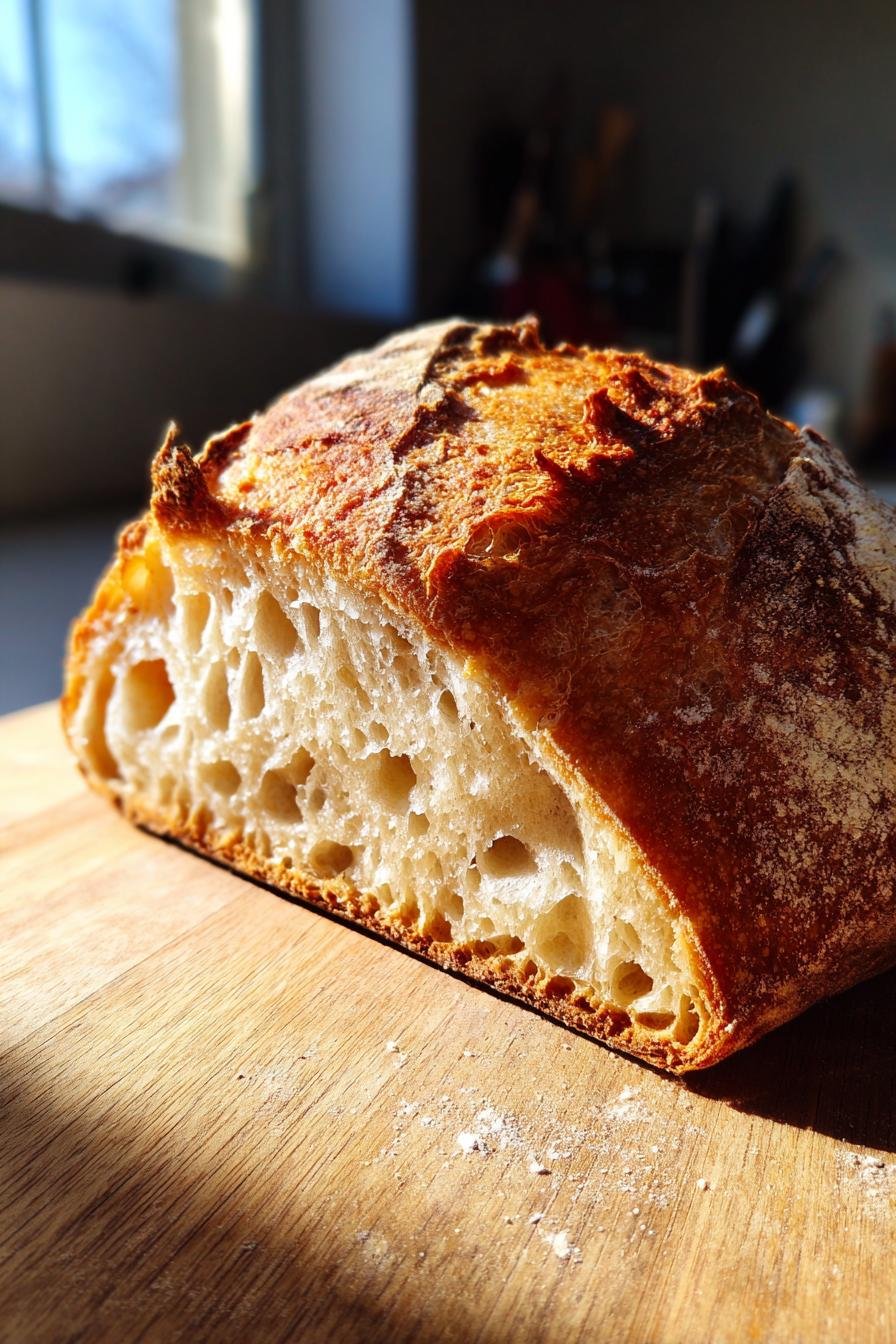
Simple crusty bread: Master the art of baking!
Introduction to Simple Crusty Bread
There’s something magical about the aroma of freshly baked bread wafting through your home. With this simple crusty bread recipe, you can create that magic without spending hours in the kitchen. As a busy mom, I know how precious time is, and this recipe is a quick solution for those hectic days. It’s perfect for impressing your loved ones or simply enjoying a slice with your morning coffee. Trust me, once you master this simple crusty bread, you’ll find yourself baking it on repeat, filling your home with warmth and comfort.
Why You’ll Love This Simple Crusty Bread
This simple crusty bread is a game-changer for busy lives. It requires minimal effort, allowing you to focus on other tasks while it rises. The taste? Oh, it’s heavenly! With a crunchy crust and a soft, airy interior, each bite is pure bliss. Plus, the satisfaction of baking your own bread is unmatched. You’ll feel like a culinary rockstar, and your family will love you for it!
Ingredients for Simple Crusty Bread
Gathering the right ingredients is the first step to baking your simple crusty bread. Here’s what you’ll need:
- All-purpose flour: This is the backbone of your bread. It provides structure and a lovely texture. You can also experiment with whole wheat or bread flour for a different flavor.
- Salt: A crucial ingredient that enhances the flavor of the bread. It also helps control yeast activity, ensuring a perfect rise.
- Instant yeast: This little powerhouse helps your dough rise quickly. It’s convenient and doesn’t require proofing, making it perfect for busy bakers.
- Water: The magic ingredient that brings everything together. Use warm water to activate the yeast, but make sure it’s not too hot, or you’ll risk killing it.
Feel free to get creative! You can add herbs like rosemary or spices such as garlic powder for an extra flavor boost. If you’re looking for a gluten-free option, consider using a gluten-free flour blend. Just remember, the exact measurements for these ingredients are at the bottom of the article, ready for you to print and keep handy!
How to Make Simple Crusty Bread
Now that you have your ingredients ready, let’s dive into the fun part: making your simple crusty bread! Follow these steps, and you’ll be on your way to baking a loaf that will impress everyone.
Step 1: Mix the Dry Ingredients
Start by grabbing a large bowl. In it, combine the all-purpose flour, salt, and instant yeast. Use a whisk or a fork to mix them together well. This step is crucial because it ensures that the yeast and salt are evenly distributed throughout the flour. Trust me, this little detail makes a big difference in the final loaf!
Step 2: Add Water and Form Dough
Next, it’s time to add the water. Pour in the warm water and stir with a wooden spoon or spatula until a shaggy dough forms. Don’t worry if it looks a bit messy; that’s perfectly normal! The dough should be sticky and rough, which is exactly what you want. This texture will help create that beautiful crusty exterior.
Step 3: Let the Dough Rest
Now comes the magic part: letting the dough rest. Cover the bowl with plastic wrap and let it sit at room temperature for 12 to 18 hours. This long resting period allows the flavors to develop and the dough to rise. It’s like giving your bread a cozy nap, and trust me, it’s worth the wait!
Step 4: Shape the Dough
After the dough has rested, it’s time to shape it. Lightly flour your work surface and turn the dough out onto it. With floured hands, gently shape the dough into a ball. Don’t overwork it; you want to keep that airy texture. Once shaped, place it on a floured surface and cover it with a towel. Let it rise for about 1-2 hours. This second rise is essential for achieving that perfect fluffiness!
Step 5: Second Rise
During this time, the dough will puff up beautifully. Keep an eye on it; it should roughly double in size. This is the moment when your kitchen starts to smell like a bakery, and you can almost taste the crusty bread already! Patience is key here, so resist the urge to rush.
Step 6: Preheat the Oven
About 30 minutes before you’re ready to bake, preheat your oven to 450°F (230°C). Place your Dutch oven inside to heat up as well. This step is crucial because a hot Dutch oven creates steam, which helps form that gorgeous crust. It’s like giving your bread a warm hug as it bakes!
Step 7: Bake the Bread
Once the oven is hot, carefully remove the Dutch oven. Gently transfer your dough into it. Cover it with the lid and bake for 30 minutes. After that, remove the lid and bake for an additional 15-20 minutes until the bread is golden brown. The sound of that crust crackling as it bakes is music to my ears!
Step 8: Cool and Slice
After baking, let the bread cool on a wire rack for at least 30 minutes. I know it’s tempting to slice right away, but this cooling time is essential. It allows the bread to finish cooking inside and helps set the crust. Once cooled, slice it up and enjoy the fruits of your labor!
Tips for Success
- Use a kitchen scale for precise measurements, especially for flour.
- Don’t skip the resting time; it’s key for flavor and texture.
- Experiment with different flours for unique tastes and textures.
- Keep your workspace floured to prevent sticking.
- For a crustier loaf, place a pan of water in the oven while baking.
- Store leftover bread in a paper bag to maintain its crust.
Equipment Needed
- Large mixing bowl: Any bowl will do, but a glass or stainless steel one is ideal.
- Wooden spoon or spatula: Use whatever you have on hand for mixing.
- Floured surface: A clean countertop works great; a cutting board is a good alternative.
- Dutch oven: If you don’t have one, a heavy pot with a lid will work.
- Wire rack: A cooling rack is best, but a plate can suffice.
Variations of Simple Crusty Bread
- Herb-Infused: Add dried herbs like rosemary, thyme, or oregano to the dry ingredients for a fragrant twist.
- Garlic Bread: Mix in minced garlic or garlic powder for a savory flavor that pairs perfectly with pasta dishes.
- Cheesy Delight: Fold in shredded cheese, such as cheddar or parmesan, into the dough for a cheesy crust.
- Whole Wheat Option: Substitute half of the all-purpose flour with whole wheat flour for a nuttier flavor and added fiber.
- Olive Oil Bread: Drizzle a tablespoon of olive oil into the dough for a richer taste and softer texture.
- Sweet Variation: Add a tablespoon of honey or sugar and some cinnamon for a subtly sweet bread that’s perfect for breakfast.
- Gluten-Free: Use a gluten-free flour blend to make this recipe suitable for those with gluten sensitivities.
Serving Suggestions for Simple Crusty Bread
- With Soup: Serve warm slices alongside a hearty vegetable or tomato soup for a comforting meal.
- Cheese Platter: Pair with a selection of cheeses, olives, and cured meats for an elegant appetizer.
- Bruschetta: Top with fresh tomatoes, basil, and a drizzle of balsamic for a delightful snack.
- Breakfast Toast: Enjoy with butter, jam, or avocado for a delicious breakfast option.
- Presentation: Serve on a wooden board with a bread knife for a rustic touch.
FAQs about Simple Crusty Bread
Can I use bread flour instead of all-purpose flour?
Absolutely! Using bread flour will give your simple crusty bread a chewier texture and a slightly higher rise. It’s a great option if you want to experiment with different flours.
What if I don’t have a Dutch oven?
No worries! You can use any heavy pot with a lid. Just make sure it can withstand high temperatures. Alternatively, you can bake the bread on a baking sheet, but the crust may not be as crispy.
How do I store leftover bread?
To keep your simple crusty bread fresh, store it in a paper bag at room temperature. Avoid plastic bags, as they can make the crust soggy. If you want to keep it longer, slice it and freeze it!
Can I add other ingredients to the dough?
Definitely! Feel free to mix in herbs, cheese, or even nuts for added flavor. Just remember to adjust the moisture slightly if you add dry ingredients.
Why is my bread not rising?
If your simple crusty bread isn’t rising, it could be due to old yeast or water that’s too hot. Always check the expiration date on your yeast and use warm water, not hot, to activate it properly.
Final Thoughts
Baking this simple crusty bread is more than just a recipe; it’s an experience that fills your home with warmth and love. The joy of pulling a golden loaf from the oven, with its crackling crust and soft interior, is simply unmatched. Each slice tells a story of patience and care, making it perfect for family gatherings or quiet mornings. Plus, the satisfaction of creating something so delicious from just a few ingredients is a reminder that even in our busy lives, we can find moments of joy in the kitchen. So, roll up your sleeves and enjoy the journey!
PrintSimple crusty bread: Master the art of baking!

A straightforward recipe for baking deliciously crusty bread at home.
- Prep Time: 15 minutes
- Cook Time: 45 minutes
- Total Time: 12-18 hours (including resting time)
- Yield: 1 loaf 1x
- Category: Baking
- Method: Baking
- Cuisine: General
- Diet: Vegetarian
Ingredients
- 3 cups all-purpose flour
- 1 1/4 teaspoons salt
- 1/4 teaspoon instant yeast
- 1 1/2 cups water
Instructions
- In a large bowl, mix the flour, salt, and yeast together.
- Add the water and stir until a shaggy dough forms.
- Cover the bowl with plastic wrap and let it rest for 12 to 18 hours at room temperature.
- After resting, turn the dough out onto a floured surface and shape it into a ball.
- Let the dough rise for about 1-2 hours, covered with a towel.
- Preheat the oven to 450°F (230°C) and place a Dutch oven inside to heat up.
- Carefully transfer the dough into the hot Dutch oven, cover it, and bake for 30 minutes.
- Remove the lid and bake for an additional 15-20 minutes until golden brown.
- Let the bread cool on a wire rack before slicing.
Notes
- For a more flavorful bread, consider adding herbs or spices to the dough.
- Ensure the water is warm but not hot to activate the yeast properly.
- Experiment with different types of flour for varied textures.
Nutrition
- Serving Size: 1 slice
- Calories: 120
- Sugar: 0g
- Sodium: 200mg
- Fat: 0.5g
- Saturated Fat: 0g
- Unsaturated Fat: 0g
- Trans Fat: 0g
- Carbohydrates: 24g
- Fiber: 1g
- Protein: 4g
- Cholesterol: 0mg